Tuesday 28 January 2014

selection sorting

 SELECTION SORT IN C++


Searching and sorting are popular in elementry data structures. Although now a days many advanced sorting techniques are used to sort a set of data, the basic sorting methods are still popular and are the used frequently.

The algorithm works is selection sort works by finding the smallest element in the list and by assuming that we are doing sorting in ascending order we replace that smallest found element with first element of list in this way we put the smallest element of list at first  position . Then we go on repeating this task for rest of elements. We then find the second smallest element in the list and then replace it with second element of list and thus we have our first two elements of list in sorted order of ascending order .


 I have given  C++ code for selection sort . The algorithm for selection sort is quite simple. In the first iteration, 1st element is compared against all the other elements (from array index 1 to array index n). In the second iteration 2nd element is compared with the elements from array index 2 to n. This process is repeated n-1 times.

 Disadvantages of Selection Sort
  • It is slow as the sorting process is too long and time consuming so it is mainly used for sorting when N (number of elements is less)


 Advantages of Selection Sort


  • Selection sort is easy to implement and does not require additional storage
  • It implements better on small lists


Code For Selection Sort
//It is for 10 elements and to change number of elements change 10 arguement in smallest function call


#include<iostream.h>
#include<conio.h>

int small , a1=0 , loc;
int a[ 10 ];
int main( )
{
int n, temp, temp1, count, compare;
int smallest( int , int ) ;
clrscr( );
cout<<"enter number of elements you want to sort";
cin>>n;
count=n-1;
for(int i=0; i<=n-1; i++)
{
cout<<"ARRAY ["<<i<<"] :- ";
cin>>a[ i ];
}
for(int j1=0;j1<=n-1;j1++)
{
compare = smallest(10,a1);            // call smallest() function to calculate smallest element
temp1 = a[ j1 ];
a[ j1 ] = a[ loc ];
a[ loc ] = temp1;
a1 = a1 + 1;
}
cout<<endl;
cout<<" sorted array is ";cout<<endl;

for(i=0;i<=n-1;i++)                                      // Print sorted Array 
{
cout<<"ARRAY ["<<i<<"] :- ";
cout<<a[i];cout<<endl;
}
 getch();
}
int smallest(int n,int a1)      // function to calculate smaller number
{
for(int k=a1;k<=a1;k++)
{
small=a[k];                       // smaller is assigned first element
for(int j=k+1;j<=n-1;j++)
{
if(small>a[j])                       // if value smaller than small variable found
                                             then small = a[j] 

{                                                      
small = a[j];
loc = j;                                 // and location of smallest loc = j
}
}
}
return(loc);                              //return location of smallest element
     }


Sunday 26 January 2014

Error dnndev/desktopmodules/ could not be found

http://geeksprogrammings.blogspot.com/2014/01/donetnuke.html
geeksprogrammings.blogspot.in

 DotNetNuke is one of best Web Content Management System Based on Microsoft .Net. The main ease is it's community Edition is OpenSource. After successfull installation of DotnetNuke if you want to develop your own modules for Dotnetnuke .you require following things

1. Microsoft Visual Studio
Download Visual Studio 2010

2. Microsoft Sql Server
Download SqlServer 2008 32/64 Bit

3 DotNetNuke C# Compiled Module  OR DotNetNuke Vb# Compiled Module
DotNetNuke C# / Vb Compiled Module For vs 2010

First I will recommend if you are using only one website of dotnetnuke at one time one one Host or computer . Put all your website files in C:\inetpub\wwwroot that will be ease not put it in folder in wwwroot as it also works in folder but there could be easy url if you keep them in wwwroot


Configure Host File

1. Press windowskey +r from keyboard
2. In Run dialog Box typein "c:\WINDOWS\system32\drivers\etc" and Hit Enter
3. Now in New window opened right click on hosts file and open it in your favourite notepad editor
4. Now put the following line in it and it looks something like in image below
Put this line :-
127.0.0.1       dnndev
5. Save this file and close it
http://geeksprogrammings.blogspot.com/2014/01/donetnuke.html
geeksprogrammings.blogspot.in

                      e.g. Hosts file

6. Now check it its done properly
7. To check it open any browser Typein- "dnndev/" and Hit enter
8. if your dotnetnuke site opens then host file configuration done.


Installation of C# Compiled Module Development 

1. Download DotNetNuke C# Compiled Module  OR DotNetNuke Vb# Compiled Module
DotNetNuke C# / Vb Compiled Module For vs 2010

2. Installing the Visual Studio Template is very straight forward.
3. First close all instances of VS2008  
4. Now copy the ZIP file that you downloaded from Codeplex in previous step
5. Now  paste this ZIP file into a very specific folder.
6. Open the following folder "My Documents\Visual Studio 2008\Templates folder". 
7. Within that folder go into ProjectTemplates\Visual C#\
8. within the Visual C# folder  simply create a new folder Web folder
9. Place zip file in web folder
10.  Now open  visual studio 2010 and click on file -> New Project 
11. christoc.com C# compiled module template give filename and click ok

ERROR

The Web Application Project hello is configured to use IIS. The Web server "http://dnndev/desktopmodules/hello/' could not be found."


Solution

Now we will do configuration for module development. check Which Version of IIS you are using .Follow the steps below to know which version of IIs you are using

Steps To Know IIS Version

1. Press windowskey +r from keyboard
2. In Run dialog Box typein "inetmgr" and Hit Enter
3. Now click on Help menu item in Menu Bar
4. click on About Internet Information Services
5. This gives version of IIs you are using like in image below
http://geeksprogrammings.blogspot.com/2014/01/donetnuke.html
geeksprogrammings.blogspot.in


6. Now depending on version using steps below


Configure Bindings In IIS 5

1. Press windowskey +r from keyboard
2. In Run dialog Box typein "inetmgr" and Hit Enter
3. This opens Internet Information Services
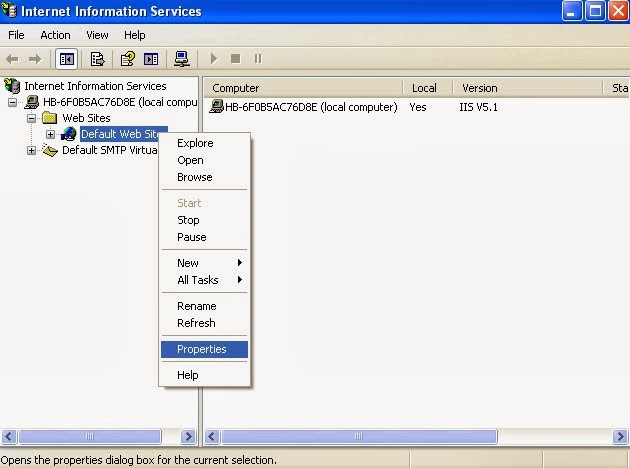
4. Right click on Default WebS ite
5. click on Properties. This opens Default Website Properties

http://geeksprogrammings.blogspot.com/2014/01/donetnuke.html

6. Focus on Web Site Tab under Web Site Identification Section
7. In this section you see Advance Button after Ip Address Label
8. click on Advanced Button
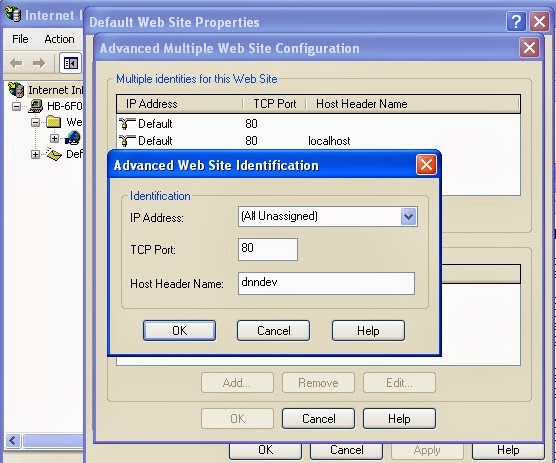
9. It opens Advanced Multiple Web Site configuration window
11. 10. Now click on Add button under Multiple identities for this Web site
http://geeksprogrammings.blogspot.com/2014/01/donetnuke.html
geeksprogrammings.blogspot.in


12. Put Ip Address field equals to All Unassigned
13. Put TCP Port equals to 80
14. Put Host Header Name equals to dnndev
15. click ok ....again click ok on other window
16. At last click apply and ok to close properties window


Configure Bindings In IIS 7

1. Press windowskey +r from keyboard
2. In Run dialog Box typein "inetmgr" and Hit Enter
3. This opens Internet Information Services
4. In the Connections pane, expand the server name, expand Sites, and then click the Web site on which you want to configure the bindings.
5. In the Actions pane, click Bindings
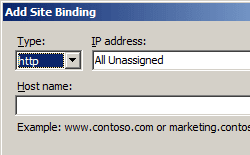
6. In the Site Bindings dialog box, click Add.
7. In the Add Site Binding dialog box, add the binding information
to solve dotnetnuke error add binding to iis
geeksprogrammings.blogspot.in


8.Put Ip Address field equals to All Unassigned
9. Put Host Header Name equals to dnndev
10 click ok

For any more problem or for Configure Bindings In IIS 7 or other problem you can comment here i am here to help you anytime

Tuesday 22 October 2013

Datagridview Cellvaluechanged Event VB.net


DatagridView is a windows forms grid Control . It was first introduced in 
.Net framework 1.0 and It comes with advanced and improved features in .Net Framework 2.0  It allows you to show the data in the tabular form. It contains data organized in rows and columns. It can be used to retrieve data in Tabular from from Database . It can be bound to Sql Database or Microsoft-Access Database.


Datagridview Cellvaluechanged Event in VB.net is used to make the change to occur or to call an event when value within particular cell is changed. In this app I have put event on each . when value of cell is changed its corresponding value in Maskedtextbox will change


Download Datagridview cellvaluechanged App


Design For Datagridview Cellvaluechanged Event VB.net


-- Add DatagridView To Form


1. Click on Tools


2. Then Scroll down and Find Datagridview .


3. Now Double click on it to put it on windows form.


-- Add Columns To Datagridview

1. Single Click on Datagridview


2. Click on small arrow on Top-right of Datagridview


3. A pop-up Menu appears. Click on "Add Column"


4. Now in Add Column Dialog Box Change HeaderText to "Name" and Click on Add . This Adds column Name to Datagridview


5. Now in second column give HeaderText to "Salary"


6. Now in Third column give HeaderText to "Bonus"


7. Now in Fourth column give HeaderText to "Total Salary"


8. Now Add Four Labels to Form and change its text property to :-


( I ) Name

( II ) Salary
( III )Bonus
( IV )Total Salary

9. Take four Masked Textbox from Toolbox and drag them to Windows form


10. Take a Button and Change its Text Property to "Get Data".


How To Operate


1 click on Get Data Button


2. It will load Default data in datagridview


3. If you change data in any Datagridview column Then the corresponding value in MaskedTextbox also change


Code For Datagridview 


Cellvaluechanged Event vb.net App


Public Class Form5 Public isdirty As Boolean Private Sub Button1_Click(ByVal sender As System.Object, ByVal e As System.EventArgs) Handles Button1.Click DataGridView1.Rows(0).Cells(0).Value = "Jorge" DataGridView1.Rows(0).Cells(1).Value = 12000 DataGridView1.Rows(0).Cells(2).Value = 2900 DataGridView1.Rows(0).Cells(3).Value = DataGridView1.Rows(0).Cells(1).Value + DataGridView1.Rows(0).Cells(2).Value End Sub Private Sub MaskedTextBox1_TextChanged(ByVal sender As Object, ByVal e As System.EventArgs) Handles MaskedTextBox1.TextChanged DataGridView1.Rows(0).Cells(0).Value = MaskedTextBox1.Text End Sub Private Sub MaskedTextBox2_TextChanged(ByVal sender As Object, ByVal e As System.EventArgs) Handles MaskedTextBox2.TextChanged DataGridView1.Rows(0).Cells(1).Value = MaskedTextBox2.Text DataGridView1.Rows(0).Cells(3).Value = Val(DataGridView1.Rows(0).Cells(1).Value) + Val(DataGridView1.Rows(0).Cells(2).Value) End Sub Private Sub MaskedTextBox3_TextChanged(ByVal sender As System.Object, ByVal e As System.EventArgs) Handles MaskedTextBox3.TextChanged DataGridView1.Rows(0).Cells(2).Value = MaskedTextBox3.Text DataGridView1.Rows(0).Cells(3).Value = Val(DataGridView1.Rows(0).Cells(1).Value) + Val(DataGridView1.Rows(0).Cells(2).Value) End Sub Private Sub MaskedTextBox4_TextChanged(ByVal sender As System.Object, ByVal e As System.EventArgs) Handles MaskedTextBox4.TextChanged DataGridView1.Rows(0).Cells(3).Value = MaskedTextBox4.Text DataGridView1.Rows(0).Cells(3).Value = Val(DataGridView1.Rows(0).Cells(1).Value) + Val(DataGridView1.Rows(0).Cells(2).Value) End Sub Private Sub EndEdit(ByVal sender As System.Object, ByVal e As EventArgs) Handles DataGridView1.CurrentCellDirtyStateChanged If DataGridView1.IsCurrentCellDirty Then DataGridView1.CommitEdit(DataGridViewDataErrorContexts.Commit) End If End Sub Private Sub DataGridView1_TextChanged(ByVal sender As System.Object, ByVal e As System.Windows.Forms.DataGridViewCellEventArgs) Handles DataGridView1.CellValueChanged If e.RowIndex = -1 Then isdirty = True End If If e.ColumnIndex = 0 Then MaskedTextBox1.Text = DataGridView1.Rows(0).Cells(0).Value End If If e.ColumnIndex = 1 Then MaskedTextBox2.Text = DataGridView1.Rows(0).Cells(1).Value DataGridView1.Rows(0).Cells(3).Value = Val(DataGridView1.Rows(0).Cells(1).Value) + Val(DataGridView1.Rows(0).Cells(2).Value) End If If e.ColumnIndex = 2 Then MaskedTextBox3.Text = DataGridView1.Rows(0).Cells(2).Value DataGridView1.Rows(0).Cells(3).Value = Val(DataGridView1.Rows(0).Cells(1).Value) + Val(DataGridView1.Rows(0).Cells(2).Value) End If If e.ColumnIndex = 3 Then MaskedTextBox4.Text = DataGridView1.Rows(0).Cells(3).Value Dim c As Integer = DataGridView1.Rows(0).Cells(3).Value Dim str As String = CInt(c) If Len(str) = 1 Then MaskedTextBox4.Mask = "0" ElseIf Len(str) = 2 Then MaskedTextBox4.Mask = "00" ElseIf Len(str) = 3 Then MaskedTextBox4.Mask = "0,00" ElseIf Len(str) = 4 Then MaskedTextBox4.Mask = "0,000" ElseIf Len(str) = 5 Then MaskedTextBox4.Mask = "00,000" ElseIf Len(str) = 6 Then MaskedTextBox4.Mask = "0,00,000" ElseIf Len(str) = 7 Then MaskedTextBox4.Mask = "00,00,000" End If End If End Sub Private Sub Form5_Load(ByVal sender As System.Object, ByVal e As System.EventArgs) Handles MyBase.Load MaskedTextBox4.Mask = "0000000" '' End Sub End Class


OUTPUT :-


After Changing value of Cell of Datagridview :- 


Friday 11 October 2013

Masked TextBox in .NET

Masked TextBox Control in .NET are used to Restrict the input from user . Masked Edit controls are also used to change the format of output that is to be delivered . In vb 6 we have Mask Edit control But in VB.NET we can get Maskedtextbox 
from Toolbox. 

Saturday 5 October 2013

Connect Access Database with C#


Connect Access Database with C#

To connect Database with your Windows Application to make Application for querying the database and retrieve the desired result from database . Database in widely used in management software's . Them main purpose of making Management software is to store the database of the work being done in the organisation in to a secure place and easily accessible place .

Database dependent applications are widely used in the market . ERP projects of organisation are highly Database dependent applications . The main two types of database that are widely used in .NET Applications :-

* Microsoft Access Database
* MSSQL Server ( Microsoft Structured Query Language )


The main Languages used in .NET Platform for connecting windows application to database are :-

* C#
* VB#

Microsoft Access Database is most simplest approach to connect your windows application to database . Microsoft is easy to use and very effective database Software that uses simple Query approach.  In old Microsoft Access Database is used with VB 6 to connect VB 6 Applications to Database and Microsoft also extend it for VB.NET to connect .NET Platform applications to Database

DOWNLOAD This Demo To Connect Access Database with C#


Steps to Make Microsoft Access Database:

1. Go to desired location you want to make your Database
2. Right click then click on new and 
3. Then click Microsoft Access 2007 Database
4. Create Desired Table with required Fields 
5. Save it as Microsoft Access database 2003 format 
6. Click OK 

DOWNLOAD THIS Demo Database To Connect Access Database with C#


Steps To Make This Demo Project :-


1. Start your Visual Studio 2010 
2. At start page click on Create New Project 
3. In Dialog Box provide Project name and path where to save this project and click ok
4. Now from Toolbox Drag four Textboxes 
5. Drag 1 Button and make design as show in below image

Design of Form 1 


6. Now copy the code given in code section below :-


Code To Connect Access Database with C#


using System;
using System.Collections.Generic;
using System.ComponentModel;
using System.Data;
using System.Drawing;
using System.Linq;
using System.Text;
using System.Windows.Forms;
using System.Data.OleDb;
namespace access_db_csharp
{
    public partial class Form1 : Form
    {
        public Form1()
        {
            InitializeComponent();
        }
        OleDbConnection con=new OleDbConnection ();
        OleDbCommand cmd=new OleDbCommand ();
        string connectionstring = @"Provider=Microsoft.Jet.OLEDB.4.0;Data Source = C:\test.mdb";
                
               private void button1_Click(object sender, EventArgs e)
        {
            cmd.CommandText = "insert into info_table values (" + textBox1 .Text + ",'" + textBox2.Text + "','" + textBox3.Text + "'," + textBox4.Text + ")";
            cmd.CommandType = CommandType.Text;
            cmd.Connection = con;
            cmd.ExecuteNonQuery();
            MessageBox.Show("Done");


                    }

        private void Form1_Load(object sender, EventArgs e)
        {
            con.ConnectionString = connectionstring;
            con.Open();
        }
    }
}

Explanation of Code


Imports System.Data.OleDb


This line of code tells we are importing Oledb Namespace. Oledb stands for Object Linking and Embedding . For using Access database with .net applications we have to inherit classes from this oledb Namespace . Oledb Namespace contains all classes that are required to connect vb.net/c# application to Microsoft Access
Database


Public Class Form1
    Dim connection As New OleDbConnection
    Dim command As New OleDbCommand
    Dim ConnectionString = "Provider=Microsoft.Jet.OLEDB.4.0;Data Source=" & "C:\test.mdb
End Class

Now In These lines of code we declared 3 things
1. OledbConnection :- OledbConnection is a class contained in System.Data.Oledb Namespace and it is used to make connectivity to Access Database . It receives the connection string that tells the path of Microsoft Access Database to connect to it. In this line of code we have created instance of Oledbconnection class

2. OledbCommand :- OledbCommand is a class contained in S
ystem.Data.Oledb Namespace and it is used to define or specify the command that we are going to execute on Microsoft Access Database. In this line of code we are creating instance of OledbCommand to use this instance in further code

3. Connection string :- Now we are creating a variable named connectionString that will receive the string or path that tell how we connect to our Access database. It receives two parameters :-

Provider=Microsoft.Jet.OLEDB.4.0 -- 
Data Source=" & "C:\test.mdb

Now Provider is main part here in connection string . Provider is different for different approaches used for connecting data to database . The Connection string contains information that the Provider needs to know to connect to database Once connected then rest of job is done by provider


    Private Sub Form1_Load(ByVal sender As System.Object, ByVal e As System.EventArgs) Handles MyBase.Load

        connection.ConnectionString = ConnectionString
        connection.Open()
    End Sub

Now in this block of code we have initialized our OledbConnection instance with connection string variable that we have initialized in previous step. So in this code we have given the Oledbconnectin instance means connection some information about Provider to use and location of database file on computer

Then we have used connection.open() method opens port for Enter into Access Database. this opens a pipe to execute query in database 

Private Sub Button1_Click(ByVal sender As System.Object, ByVal e As System.EventArgs) Handles Button1.Click

        command.CommandText = "insert into info_table values (" & TextBox1.Text & ",'" & TextBox2.Text & "','" & TextBox3.Text & "'," & TextBox4.Text & ")"
        command.CommandType = CommandType.Text
        command.Connection = connection
        command.ExecuteNonQuery()
        MsgBox("Record inserted ")
    End Sub


Now at last we have used insert query that is coded on Button Click Event . In this code I have told which commandtext to choose and what will be commandType test or storeprocedure . and also we have initialized the command with Oledbconnection instance. Then we have execute command using ExecuteNonQuery() method. This method returns the number of rows affected the database 

Tuesday 1 October 2013

Sunday 22 September 2013

string to double in vb.net

DEMO PROJECT TO CONVERT STRING VALUE TO DOUBLE USING VB2010


To convert a string  to double in .net there are many methods available . A string value is collection of number of characters within a string variable eg:-

Dim a as string = " A String Value "

Double values are  floating point numbers . These are values with precession To convert a string value to double value the main avaliable methods are :-

* CDBL Method    :-                 Cdbl ( string_value ) 

* Convert . ToDouble   :-          Convert . ToDouble ( string_value )  

* TryParse Method 

The Best Method to convert string value to double from methods given above is TryParse . TryParse will first check whether given string value can be converted to double or not If these values cannot be converted into Double then it does not return anything . TryParse method is used with if condition to check whether string value can be converted to double or not If it cannot be converted to Double value then we can Pass string in message box that "This Value Cannot Be Converted To  Double"

Design of Project string to double in vb.net


Code for string to double in vb.net


Public Class Form1

    Private Sub Button1_Click(ByVal sender As System.Object, ByVal e As System.EventArgs) Handles Button1.Click

        Dim string_value As String
        string_value = TextBox1. Text
        Dim double_value As Double
        If Double.TryParse(string_value, double_value) Then
            MsgBox(double_value)
        Else
MsgBox("This String Value Cannot Be Converted To Double")
        End If
    End Sub

End Class

Explanation of Code :- string to double in vb.net


  1. Public class Form1
    In first line, i have declared a class . The access specifier of class is Public so that in case of using inheritance other class can easily access this class by using an instance or object of this class
  2.  Private Sub Button1_Click(ByVal sender As System.Object, ByVal e As System.EventArgs) Handles Button1.Click
  3. Here, We have declared a Private Sub Procedure name Button1. This sub-procedure is of object Named or control named Button1 . 
  • Button1_Click , Here we are declaring an Event for Button Control. We are using click event so that the procedure will execute or code that is written under this Button1 control will run when click the button at runtime.
  • Dim String_value as string , In this line of code we have simply declared a variable named "string_value" . Dim is a keyword that is used in visual basic to declare a variable . followed by name of variable by keeping in mind the rules for declaring the variable in visual baisc. Then 'as ' is also a keyword this keyword is used to specify followed by it that what type of data we are going to store in the variable that we are creating now. Then we will provide the datatype of variable

     4. " string_value = TextBox1. Text" :- Now we are simply assigning the value that we enter in the textbox at runtime into string variable we have created in previous step

    5.  Dim double_value As Double , In this line of code we have simply declared a variable named "double_value" . Dim is a keyword that is used in visual basic to declare a variable . followed by name of variable by keeping in mind the rules for declaring the variable in visual baisc. Then 'as ' is also a keyword this keyword is used to specify followed by it that what type of data we are going to store in the variable that we are creating now. Then we will provide the datatype of variable

    6. In code below we have used Try.Parse this is mainly used to try that the value given as parameter of type string can be converted into double value or not . If this value cannot be converted from string to double in .net then it will execute the else statement telling the Trying to Parse string value into double value is unsuccessfull . If given value can be converted then it will convert it and given the message along with string to double converted value
     If Double.TryParse(string_value, double_value) Then
                MsgBox(double_value)
            Else
    MsgBox("This String Value Cannot Be Converted To Double")
            End If

    7. Then End Sub will close the Button1_click subprocedure  and End Class will end the class form1

Tuesday 10 September 2013

delete record from access database

To delete Record from Access database we have used Dataset and Oledbdataadapters 

DataAdapter :- DataAdapter  is like a pipeline or path or bridge that is used to execute the given query on database table . DataAdapter that we have used is OledbdataAdapter as we are using MS-Access as database . Data Adapter first takes the command to be executed on table data from Oledbcommand object and this object contains the query that is to be executed on database . Then it execute query on Database table data and store resultant data in form of rows and columns or Tabulated form in Dataset

Dataset :- Dataset is generally a memory area where the result of the query that we have executed on database is placed . When a query is passed by using Oledbdataadapter to execute that query on database specified table . Then the result of the query has to be placed some to use it . Like to show it in Datagridview or to show that result data in Textboxes or to manupulate the data and then save that manipulated data again to Table in database

DOWNLOAD this Demo Project from my gmail upload link :-

Steps to Make Microsoft Access Database:

1. Go to desired location you want to make your Database
2. Right click then click on new and 
3. Then click Microsoft Access 2007 Database
4. Create Desired Table with required Fields 
5. Save it as Microsoft Access database 2003 format 
6. click ok 

DOWNLOAD THIS Demo Database from my gmail upload link :-


Steps To Make This Demo Project :-


1. Start your Visual Studio 2010 
2. At start page click on Create New Project 
3. In Dialog Box provide Project name and path where to save this project and click ok
4. Now from Toolbox Drag one ComboBox , one Label and One Button
5. Now Change Label 'Text' Property to "ID_num"
6. Now Change Button 'Text' Property to "Delete"
7. Make Design as shown below

Design of Form 1 


8.  In Below image you can see there are two records in Data base Table 'info_table ' .


9. Now Run the Application 
10. Click on Down arrow of combobox Your ID-num will be shown as image below


11. Now select an id_num from combobox items and then click on Delete


12. Now Record will be deleted from database table as shown below


Code for Application 


Imports System.Data.OleDb


'http://www.geeksprogrammings.blogspot.in

Public Class Form1
    Dim connection As New OleDbConnection
    Dim Del_command As New OleDbCommand
    Dim select_command As New OleDbCommand
    Dim ConnectionString = "Provider=Microsoft.Jet.OLEDB.4.0;Data Source=" &
        "C:\test.mdb"
    Private Sub Form1_Load(ByVal sender As System.Object, ByVal e As System.EventArgs) Handles MyBase.Load
        connection.ConnectionString = ConnectionString
        connection.Open()
        select_command.CommandText = "select id_num from info_table"
        select_command.CommandType = CommandType.Text
        Dim adapter As New OleDbDataAdapter("select id_num from info_table", connection)
        'adapter.SelectCommand = select_command
        Dim dt As New DataTable
        adapter.Fill(dt)
        select_command.Connection = connection
        select_command.ExecuteNonQuery()
        Dim i As New Integer
        For i = 0 To dt.Rows.Count - 1
            ComboBox1.Items.Add(dt.Rows(i).Item(0))
        Next
    End Sub

    Private Sub Button2_Click(ByVal sender As System.Object, ByVal e As System.EventArgs) Handles Button2.Click
        Del_command.CommandText = "delete from info_table where id_num=@id_num"
        Del_command.Parameters.AddWithValue("@id_num", ComboBox1.SelectedItem)
        Del_command.CommandType = CommandType.Text
        Del_command.Connection = connection
        Del_command.ExecuteNonQuery()
        MsgBox("Record Deleted ")
    End Sub


Explanation of Code


Imports System.Data.OleDb


This line of code tells we are importing Oledb Namespace. Oledb stands for Object Linking and Embedding . For using Access database with .net applications we have to inherit classes from this oledb Namespace . Oledb Namespace contains all classes that are required to connect vb.net/c# application to Microsoft Access
Database


Public Class Form1
    Dim connection As New OleDbConnection
    Dim command As New OleDbCommand
    Dim ConnectionString = "Provider=Microsoft.Jet.OLEDB.4.0;Data Source=" & "C:\test.mdb
End Class

Now In These lines of code we declared 3 things
1. OledbConnection :- OledbConnection is a class contained in System.Data.Oledb Namespace and it is used to make connectivity to Access Database . It receives the connection string that tells the path of Microsoft Access Database to connect to it. In this line of code we have created instance of Oledbconnection class

2. OledbCommand :- OledbCommand is a class contained in S
ystem.Data.Oledb Namespace and it is used to define or specify the command that we are going to execute on Microsoft Access Database. In this line of code we are creating instance of OledbCommand to use this instance in further code

3. Connection string :- Now we are creating a variable named connectionString that will receive the string or path that tell how we connect to our Access database. It receives two parameters :-
Provider=Microsoft.Jet.OLEDB.4.0 -- 
Data Source=" & "C:\test.mdb

Now Provider is main part here in connection string . Provider is different for different approaches used for connecting data to database . The Connection string contains information that the Provider needs to know to connect to database Once connected then rest of job is done by provider


    Private Sub Form1_Load(ByVal sender As System.Object, ByVal e As System.EventArgs) Handles MyBase.Load

        connection.ConnectionString = ConnectionString
        connection.Open()
    End Sub

Now in this block of code we have initialized our OledbConnection instance with connection string variable that we have initialized in previous step. So in this code we have given the Oledbconnectin instance means connection some information about Provider to use and location of database file on computer

Then we have used connection.open() method opens port for Enter into Access Database. this opens a pipe to execute query in database

How To Use Access database with vb.net

Sunday 8 September 2013

Saturday 7 September 2013

Access database with vb.net


Microsoft Access database is a Database Management System developed By Microsoft and it is very simple and easy to use for windows application and web application development with Dotnet . Platform. . It supports Microsoft Jet Database Engine . It supports Graphical User Interface with Professional Development tools.

Microsoft is well supported database to be used in Microsoft Visual Studio to develop applications. It is very easy to connect .net either vb.net or C#.net application with Microsoft Access Database

DOWNLOAD this Demo Project from my gmail upload link :-


Steps to Make Microsoft Access Database:

1. Go to desired location you want to make your Database
2. Right click then click on new and 
3. Then click Microsoft Access 2007 Database
4. Create Desired Table with required Fields 
5. Save it as Microsoft Access database 2003 format 
6. click ok 

DOWNLOAD THIS Demo Database from my gmail upload link :-

Steps To Make This Demo Project :-


1. Start your Visual Studio 2010 
2. At start page click on Create New Project 
3. In Dialog Box provide Project name and path where to save this project and click ok
4. Now from Toolbox Drag four Textboxes 
5. Drag 1 Button and make design as show in below image

Design of Form 1 


6. Now copy the code given in code section below :-


Code of Form1


Imports System.Data.OleDb

Public Class Form1

    Dim connection As New OleDbConnection
    Dim command As New OleDbCommand
    Dim ConnectionString = "Provider=Microsoft.Jet.OLEDB.4.0;Data Source=" & "C:\test.mdb"

    Private Sub Button1_Click(ByVal sender As System.Object, ByVal e As System.EventArgs) Handles Button1.Click

        command.CommandText = "insert into info_table values (" & TextBox1.Text & ",'" & TextBox2.Text & "','" & TextBox3.Text & "'," & TextBox4.Text & ")"
        command.CommandType = CommandType.Text
        command.Connection = connection
        command.ExecuteNonQuery()
        MsgBox("Record inserted ")
    End Sub

    Private Sub Form1_Load(ByVal sender As System.Object, ByVal e As System.EventArgs) Handles MyBase.Load

        connection.ConnectionString = ConnectionString
        connection.Open()
    End Sub

End Class


Explanation of Code


Imports System.Data.OleDb


This line of code tells we are importing Oledb Namespace. Oledb stands for Object Linking and Embedding . For using Access database with .net applications we have to inherit classes from this oledb Namespace . Oledb Namespace contains all classes that are required to connect vb.net/c# application to Microsoft Access
Database


Public Class Form1
    Dim connection As New OleDbConnection
    Dim command As New OleDbCommand
    Dim ConnectionString = "Provider=Microsoft.Jet.OLEDB.4.0;Data Source=" & "C:\test.mdb
End Class


Now In These lines of code we declared 3 things
1. OledbConnection :- OledbConnection is a class contained in System.Data.Oledb Namespace and it is used to make connectivity to Access Database . It receives the connection string that tells the path of Microsoft Access Database to connect to it. In this line of code we have created instance of Oledbconnection class

2. OledbCommand :- OledbCommand is a class contained in S
ystem.Data.Oledb Namespace and it is used to define or specify the command that we are going to execute on Microsoft Access Database. In this line of code we are creating instance of OledbCommand to use this instance in further code

3. Connection string :- Now we are creating a variable named connectionString that will receive the string or path that tell how we connect to our Access database. It receives two parameters :-

Provider=Microsoft.Jet.OLEDB.4.0 -- 
Data Source=" & "C:\test.mdb

Now Provider is main part here in connection string . Provider is different for different approaches used for connecting data to database . The Connection string contains information that the Provider needs to know to connect to database Once connected then rest of job is done by provider


    Private Sub Form1_Load(ByVal sender As System.Object, ByVal e As System.EventArgs) Handles MyBase.Load

        connection.ConnectionString = ConnectionString
        connection.Open()
    End Sub

Now in this block of code we have initialized our OledbConnection instance with connection string variable that we have initialized in previous step. So in this code we have given the Oledbconnectin instance means connection some information about Provider to use and location of database file on computer

Then we have used connection.open() method opens port for Enter into Access Database. this opens a pipe to execute query in database 

Private Sub Button1_Click(ByVal sender As System.Object, ByVal e As System.EventArgs) Handles Button1.Click

        command.CommandText = "insert into info_table values (" & TextBox1.Text & ",'" & TextBox2.Text & "','" & TextBox3.Text & "'," & TextBox4.Text & ")"
        command.CommandType = CommandType.Text
        command.Connection = connection
        command.ExecuteNonQuery()
        MsgBox("Record inserted ")
    End Sub

Now at last we have used insert query that is coded on Button Click Event . In this code I have told which commandtext to choose and what will be commandType test or storeprocedure . and also we have initialized the command with Oledbconnection instance. Then we have execute command using ExecuteNonQuery() method. This method returns the number of rows affected the database

Delete Record from Access Database

Wednesday 4 September 2013

Text-To-Speech .NET

This post is to introduce you with SAPI that allows a user to make an automated system that will send the input given by user to speakers and then Speakers will speak or output that text

* SAPI Stands for Speech Application Programming Interface . It is an API developed by Microsoft
to allow users to develop speech recognition systems. 

* The first version of SAPI was released in 1995. This is a program that offers Text-To-Speech and speech Recognition Capabilities. 

* SAPI interfaces are provided for C,C++,C# and visual Basic Languages. 

* SAPI is most widely used application program interface ( API ) used today

CODE For Text - To - Speech in  VB.NET 


Dim SAPI
SAPI = CreateObject ( "sapi.spvoice" ) 
SAPI.speak( TextBox2.Text )

In order to Use SAPI we have to create object of SAPI . In Code Above in line 2 we have created object assigned it SAPI . SAPI is a simple variable nothing more than that there is no need to be confused about that . Then we have used speak ( )  method to give or direct the input to speakers to speak or output all given input.


DEMO APPLICATION FOR SAPI

DEMO APPLICATION 1


DOWNLOAD DEMO APPLICATION FROM LINK BELOW


CODE  FOR DEMO APPLICATION :- 


Public Class Form1

    Private Sub TextBox1_KeyPress(ByVal sender As Object, ByVal e As System.Windows.Forms.KeyPressEventArgs) Handles TextBox1.KeyPress

        Dim i As Integer
        i = 0
        Dim ch As Char
        ch = e.KeyChar

        If ch = " " Then
            Dim SAPI
            SAPI = CreateObject("sapi.spvoice")
            SAPI.speak(TextBox2.Text)
            TextBox2.Text = ""

        Else
TextBox2.text = TextBox2.text + ch;
        End If

    End Sub

Explanation Of Code

In this code I have taken a variable i of type integer and initialized it to Zero . I have taken a  char type variable that will take character typed or cached by keypress event. 

First in If ( ) codition  i have checked whether the entered character is a blank space or not .If entered character is not a blank space then this code just add the entered character to the TextBox and If user has pressed a space then the complete word will be spoken by SAPI object .

This code spoke the words not only characters entered by user it first takes the characters and then collect them and after completion of word it passes it to SAPI object and SAPI will give that word as output to speaker to spoke it

DEMO APPLICATION 2


DOWNLOAD DEMO APPLICATION 2 FROM LINK BELOW


DEMO APPLICATION 3


DOWNLOAD DEMO APPLICATION 3 FROM LINK BELOW
https://docs.google.com/file/d/0ByR2IblIaEGyOGpuT0NiaTZIZHM/edit