Showing posts with label c#. Show all posts

Wednesday 6 July 2016

Object Pooling in Csharp


What is Object Pooling in Csharp ?

Object Pooling is Technique for Efficient Resource Allocation.A Performance Optimization Technique that is based on using Pool of Pre-Allocated Resources Such of Objects For Efficient Resource Allocation . It refers to Reusing of Allocated Memory again and again instead of demanding for more memory as there are chances that more required  memory may be not available at runtime (In Running Application) 

Why We Need Object Pooling & How It Works?

Have you Heard about Car Pooling ? Let me tell you about that . Car Pooling and Object Pooling is based on Same Concept . 

Both are based on Re-using / Proper Utilization of Resource . Instead of Having or using new Resource Each Time We Require . 

In Car Pooling We Use Same Resource Car for Multiple Person Instead of Using Car for Each Person . If 4 Person are going to office instead of going from their own car . Car Pooling Tells to Use one car For all 4 People That will save various Natural Resource and money .

Similarly In Object Pooling Memory is assigned to Program Execution and When more objects are required to initialized then instead of demanding and getting more memory resources it waits for previous memory block to get free to be used .

Didn't Got it Don't Worry See Below  


Real Time Example of Object Pooling  ?

Problem :
Let’s assume we are running an application which needs allocation of memory for its execution and this application is using Multithreading. This means more than one threads can allocate the same amount of memory simultaneously . 

Consider that the application needs 100K memory for its execution and there are 50 threads running simultaneously. All 50 threads will call a method of the application simultaneously.

All the threads will try to allocate 100000 bytes in the heap simultaneously. The OS may not get enough time to swap pages. Thus the application will be under heavy concurrent access, and the application may fail due to misleading memory management!

Solution :

WE can also create a pool of large Memory Block as much we can according to how much memory we require, at startup. That way, say we create 100 times 100K bytes in memory at startup. If it fails, well enough - we know that right at startup! So there is no surprise at runtime, when the application is live! So we can reduce that number to 75 (from 100) and try again to start our application. Once up and running, we know that there will be barely a need for it to allocate more memory at runtime, as we already have the memory for 75 or 100 arrays allocated. It just uses that as "an object pool", pulls from it, and when done, returns the byte arrays for subsequent use. Chances are that unless truly "concurrent", the already allocated byte arrays will be re-used over and over again, and at runtime, no extra memory will be allocated. If all 75 or 100 arrays are in use, and a 101st request comes in, it will need to allocate an additional memory of only one array - which is easy for the OS to manipulate in RAM.

Still Din't Got Don't Worry Feel Free! To Comment  

Monday 23 May 2016

Abstract Class vs interface in Csharp


Abstract Class
Abstract Class is a class that is used as a base class and contains common methods that can be defined by class that inherits from this Base Class .  We can only inherit abstract class But We cannot instantiate Abstract Class . Abstrac classes contains both incomplete & complete methods . Means it can contains functions with definitions as well as abstract methods with only declarations . It can also contains Data Members along with subs , propreties and methods .

Interface :
Interfaces Contains only Declaration / Signature of Functions and does not contains definition of functions . Unlike Abstract classes Interfaces cannot contain complete methods or methods with definition it only contains signature of methods means only declarations
Interface also supports multiple inheritance that is not supported by Abstract classes

Difference Between Abstract Class and Interface -


Abstract Class
1. Abstract Class Can Contain Complete (functions with definitions) or Incomplete(Abstract) Members
2. Abstract Class cannot be instantiated
3. Abstract Class Can contain Data members
4. Abstract Class Can have Constructors . We Can Have Parameterized Constructors also in Abstract Class

Example :-
public abstract class ABC
{

int _a;
   
  //Parameterized Abstract Class Constructor
  public ABC(int a)
  {
    _a = a;

   }

  //Default Constructor
  public ABC()
  {
   // Code Logic

   }
public abstract void computeA(); };
public class Foo : ABC
{
    // Always pass 123 to the base class constructor
    public Foo() : base(123)
    {
    }
}
5. Incomplete members of Abstract class Means Abstract Members are Virtual Means it can be overridden by Derived Members
6. Abstract Members Cannot be Static
7. Complete Members Can be Static
8. Abstract Members can use Access Specifiers

All Private , Protected and Public Access Specifiers can be used with Abstract Class Methods . Purpose of Create Private Methods in Abstract Class is similar to normal class . These methods are used by other public methods of Abstract class as we know we can also define methods in abstract class.

Interface
1. Interface Can only Contain only Incomplete Methods that means methods with only Declaration without any definition
2. Interface cannot be Instantiated
3. Interface cannot contain data members
4. Interface cannot have constructors
5. there is no virtual member in interface as we cannot provide definition of member function in interface only inheriting class can define that function
6. Interace Cannot have Static Members
7. Complete Member does not exist in Interface
8. Interface member are public and we cannot set any access modifier to interface members

Sunday 22 May 2016

Difference Between Generic and Collections in C#


Difference Between Array - Generic - Collections in Csharp

Array :

An Array is Fixed Size Data Type . For Storing data in Array you need to define the size of array and Also Type of Array ( int, string , float etc )

Depending on Memory Allocation Data Types are of Two Types -

  • Value Type 
  • Reference Type 

See Difference Between Value Type and Reference Type in Link Below - 
http://geeksprogrammings.blogspot.in/2015/09/value-types-vs-reference-types-dotnet.html

Array is a Value Type that needs to define its size in order to allocate space to it in memory . This is little problem with array as sometimes we need Dynamic Size to store large number of values

Collections :
Collections are Defined in System.Collections Namespace . Collections Are Variable Sized . We Can add / remove items from collection with any restriction of defining size and type of data

Example :- Arraylist are Collections .

Logically Collections are Referency Types . Now Question is Why Collections are Referencec Types ?

Collections are of Variables Sized So Whenever Some Type is Variable Sized It needs to be stored in head instead of Memory Stack give to application . and poiter to that heap is set in the top of stack . it is stored in heap because main memory is valuable and we don't exactly know that How much size variable sized Collection will take so it is allocated disk space as heap instead of storing it directly in main memory Pointer to heap location is set to top of stack so whenever we require it we can use that pointer to get / set that value .

See Difference Between Value Type and Reference Type ( Stack & Heap ) in Link Below - 
http://geeksprogrammings.blogspot.in/2015/09/value-types-vs-reference-types-dotnet.html

Example of Collections - 

ArrayList arrList = new ArrayList();
arrList.Add(007);
arrList.Add("Heemanshu Bhalla");
arrList.Add(DateTime.Now);

If we want to loop that arrList then we can do it as below -

foreach (object o in arrList)
{

}

But there is one problem we always need to parse each element in collection using object as we don't know the type of data that it contains and that could create problem on runtime

Problem With Collections & Evolution of Generics

Generic Types Solves This problem check Generic Types Below  -

Generic Types :
Generic Types Contained in System.Collections.Generic Namespace . It removes the problem of Unknown Data types exist in Collections

Generic List ( List <T> ) , Here T means datatype that could be Int , String , DateTime etc . So We can define the type of data that we want to store and we can also parse the data simple as type is already known . SO it is Type Safe . If you Create Int Generic List or Generic Type and try to store some different type then it will give compilation Error and does not allow you to store data of Another Type that is not allowed .

Example of Generic List below - 

List<string> lstString = new List<string>();
lstString.Add("Heemanshu Bhalla");
lstString.Add("I am A Geek");

List<int> lstInt = new List<int>();
lstInt.Add(007);
lstInt.Add(786);

Friday 1 May 2015

Using Report Viewer with Dataset Asp.net Csharp and vb


For Using Report Viewer in Asp.net or Desktop Application using Csharp or Visual basic I am today providing a simple step by step solution -

Demo File is also available to Download so that you can have a demo for how to use or Use Reports With Dataset in Asp.net . I have provided Both Csharp and Vb code

Step 1 - First of Start a C# Project or Vb Project and then Add an Empty Webform to it .


Step 2 :- Now Right Click on Solution in Solution Explorer and Click on Add then click on New Item . Then Click On DataSet and Give a Name and Click Ok . This will add a Dataset in your Project . I will recommend it give dataset a name similar to database table whose data you want to show in Report Viewer

Using Report Viewer with Dataset Asp.net Csharp and vb , Using Reporting in asp .net dotnet


Step 3 :- Now After Dataset is added Right Click on Dataset Page and Click on Add then click on DataTable It will add a DataTable

Using Report Viewer with Dataset Asp.net Csharp and vb , Using Reporting in asp .net dotnet


Step 4:- Now Add Columns to DataTable and Must Ensure that the name of these DataTable column must be same to Names of Columns in Database that Corresponds to this DataTable

Using Report Viewer with Dataset Asp.net Csharp and vb , Using Reporting in asp .net dotnet

Step 5 :- Now Again Right click on solution in Solution Explorer and Click on Add then click on New and then click on Report give it a name and click on ok . This will add a Report to your Project

Using Report Viewer with Dataset Asp.net Csharp and vb , Using Reporting in asp .net dotnet

Step 6 :- Now From You Controls Toolbox in Visual Studio . Place a Report Viewer Control on your WebPage as shown in image below


Using Report Viewer with Dataset Asp.net Csharp and vb , Using Reporting in asp .net dotnet


 Step 7 :- Now Open your Recently Added Report file you will see it same as shown below


Using Report Viewer with Dataset Asp.net Csharp and vb , Using Reporting in asp .net dotnet


Step 8 :- Now we need to Add the Previously added dataset or need to link the dataset we added in previous steps to the report file

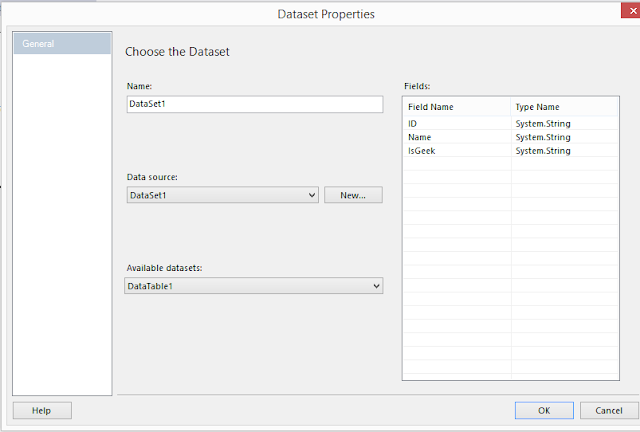
Step 9 :- So for that linking Right Click on Dataaset folder in sidebar of Report Then Click on Add Dataset then you will see the following screen

Step 10 :- Now select the Added Dataset from Combox for DataSource and then after that Choose the DataTable from Next Last Combobox


Using Report Viewer with Dataset Asp.net Csharp and vb , Using Reporting in asp .net dotnet

Step 11  :- Now Dataset Fields will be added Under Dataset folder in Left Sidebar of Report . Now you can Drag drop fields from Left Sidebar and also Place the Textbox for Labelling like I have added for ID,Name and heading etc


Using Report Viewer with Dataset Asp.net Csharp and vb , Using Reporting in asp .net dotnet

Step 13:-  Now we need to Add the Code so Open Cshar Code side of Webpage where you have added the Report viewer control And Add the following code according to your choose language c# or vb

Now At Page_Load Event of your WebPage Add the Following Code According to C# or VB


Imports System.Data
Imports System.Data.SqlClient
Imports Microsoft.Reporting.WebForms

        'VB CODE
        ReportViewer1.ProcessingMode = Microsoft.Reporting.WebForms.ProcessingMode.Local
        ReportViewer1.LocalReport.ReportPath = Server.MapPath("~/Report.rdlc")

        Dim dsUsersInfo As New DataSet1
        Dim con As New SqlConnection("Your Connection String")
        Dim cmd As New SqlCommand("select * from YourTableName", con)
        Dim da As New SqlDataAdapter()
        da.SelectCommand = cmd

        'DataTable1 is the DataTable we have created in Dataset1 that contains our columns
        da.Fill(dsUsersInfo, "DataTable1")


        Dim datasource As New ReportDataSource("DataSet1", dsUsersInfo)
        ReportViewer1.LocalReport.DataSources.Clear()
        ReportViewer1.LocalReport.DataSources.Add(datasource)


        'CSharp Code
        'ReportViewer1.ProcessingMode = Microsoft.Reporting.WebForms.ProcessingMode.Local
        'ReportViewer1.LocalReport.ReportPath = Server.MapPath("~/Report.rdlc")

        ' DataSet1 dsUsersInfo = new DataSet1();

        '        SqlConnection con = new SqlConnection("Your Connection String"));

        '            con.Open();
        '            SqlCommand cmd1 = new SqlCommand("select * from TableName", con);

        '            SqlDataAdapter da = new SqlDataAdapter(cmd1);
        '            da.Fill(dsUsersInfo, "DataTable1");
        '            con.Close();

        '        ReportDataSource datasource = new ReportDataSource("DataSet1", dsUsersInfo.Tables[0]);

        'ReportViewer1.LocalReport.DataSources.Clear()
        'ReportViewer1.LocalReport.DataSources.Add(datasource)


Step 12 :- Now when you run the Page where you have added the Report viewer control It will show the Report with data from database


Wednesday 11 February 2015

HTTP Error 500-22 - Internal Server Error The page cannot be displayed because an internal server error has occurred


Now At 11:47 PM I am going to write about how to solve HTTP 500.22 - Internal Server Error . This error is really very Bad Boy . It only display Error Message and does not give any detailed information about error as we don't normally allow for that . So Now I am going to give information how today Solved this error and what will be sure short and easy steps to solve this error so that you save your time .

I First tried to set CustomErrors="Off" in web.congig file just after <system.web> tag start But it does not helped so first i need to find way to see the error . So only way to see the error is through log file . I was using azure so I decided to turn on azure logging to check what is error

Enable Logging In Microsoft Azure Portal -


- Enable Application Diagnostics Logging 


1. Login to Azure Portal . In sidebar click on websites . Click on desired website
2. Now click on configure In Top Menu and scroll down and find 'Application Diagnostics'
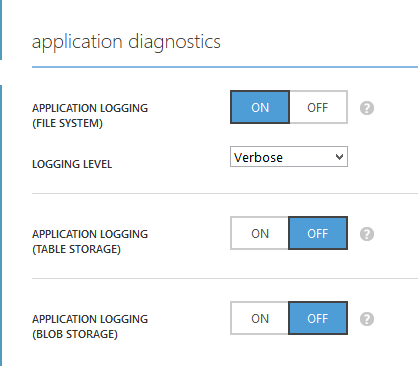
3. Once found Do configuration as shown below -

Application Diagnostics For Application Logging - Windows Azure

- Enable Web Server Logging 


1. Login to Azure Portal . In sidebar click on websites . Click on desired website
2. Now click on configure In Top Menu and scroll down and find 'Web Server Logging'
3. Once found Do configurations as shown below -

Web Server Logging - Windows Azure

4. After Doing Both Diagnostics Configuration . you must Save and Restart Azure Website .

How To Find Error In Azure Website Log


1. Now after Enabling Log you can see your log by logging in your FTP Client like CuteFTP or      FileZilla( In my case) . First login to your FTP Client of that website

2. Now at root you can see a folder named LogFiles as shown below -

LogFile In windows Azure


3. Open the folder and then find a folder named 'DetailedErrors' Now open the folder here you can 4. see all your errors details for that particular website . as shown below -


Azure Website Log File Detailed Errors


5. So choose the latest file and download it to your computer and open it in browser and It will show you error in your azure website in Detail so that we can know error information to solve the error . In my case error was HTTP Error 500.22 error as shown by log file below snapshot -


Find Error Using Logs in windows Azure


 Cause of  HTTP Error 500-22 - Internal Server Error


The Main cause of  "HTTP Error 500-22 - Internal Server Error  The page cannot be displayed because an internal server error has occurred" is Managed Pipeline Mode in Application Pool . Integrated Pipeline Mode of Application Pool does not support some services and functionalities 

Solution For HTTP Error 500-22 - Internal Server Error  


Step 1- Change Application Pool From Integrated Pipeline Mode To Classic Pipeline Mode


FOR IIS USERS ON Windows Server


1. Open Control Panel Then GoTo Administrative Tools
2. Then choose IIS Manager
3. Now Change  App site's Managed Pipeline from Integrated to Classic.

FOR AZURE PORTAL USERS 


1. Login to your Azure Portal . In sidebar click on websites . Click on desired website
2. Now click on configure In Top Menu and Under General Section find 'Managed Pipeline Mode'
3. Once Found Change mode from Integrated To Classic Pipeline Mode  as shown in snapshot below

Enable Classic Pipeline Mode Application Pool IIS and Windows Azure

Now after this change No other change will be required Everything is solved now . browse your website everything will be fine .

In case you face some Problem or Same Error Persist You may try the following solutions that can help in resolving issue 

 Changes in Web.Config File (Optional )


1. First open your Web.Config file and Search for <Configuration> Tag opening part and then insert following code in it and it should look like below --

<configuration>
    <system.webServer>
        <validation validateIntegratedModeConfiguration="false"/>
    </system.webServer>
</configuration>

Friday 2 January 2015

Nopcommerce Developer Guide


Internship - Day 1


Today was first day of my internship Period of 6 months . I am very happy to start my internship with Abax Technologies . Abax technologies is a recognized IT company Situated in Noida . It deals with Desktop , web and Mobile application development and providing solutions to market .

Mr. Rohit Jain is CEO of Company and I am doing Internship under their guidance .

Now came to work -- On 2nd January - 8:23 am Rohit Sir posted my first task on skype . My first task was first to learn more about Nopcommerce , Its Architecture , Plugin development , Module Development , Theme development and widget development .

First i need to download the source code for Nopcommerce form Nopcommerce office webiste then using that source code to compile it , set up its database then run a demo site in nopcommerce .

After setup the demo site for nopcommerce it started exploring its source code architecture and learn more about it from its developer's documentation

I have previously done a ecommerce website in Nopcommerce but at that time i used Nopcommerce 1.9 version that was asp.net version of nopcommerce Now i am going to use Nopcommerce 3.2 and this version is really cool . It is MVC version of nopcommerce using Linq queries instead of using sql and using Razor view engines and more flexibility . Actually I liked this version .

Important Links that i have studied and explored today -

Link for Nopcommerce Developer's Documentation
Nopcommerce Developer Documentation


Nopcommerce uses code first approach for each and every development component in nopcommerce so i decided to first give a look at code first approach to revise my concepts about codefirst approach

Code First Approach Documentation MVC


After Reading about code first approach of Nopcommerce I reached a Nerd Dinner app that is MVC app that uses code first approch for MVC application development
Nerd Dinner MVC App with Code First Approach

So that was it for the day i learned number of things today

Today I have explored following Modules -


1. Nopcommerce Installation v3.20 (mvc)
2. Explored Nopcommerce Developers Documentation
3. Exploring Nopcommerce Architecture
4. Explored Nopcommerce Theme CUstomization and Creating Own Theme
5. Exploring Plugin Development Documentation
     -- Created simple hello world Plugin

Next I will explore create plugins with database access and various nopcommerce inbuilt modules

Tuesday 11 November 2014

Difference Between ViewState and Session in Asp.Net

"View State and Session "
  The Two main State Management things used in Asp.net Web applications . We cannot even think of an application without ViewState and Session . So today i decided to gave an overview of what is the difference between viewstate and session why these two terms exist and what are their usage To clearify this difference i am giving some points below

1. So First of all what is a Session ? -- A Session is a Time or a span of time upto which user used that webapplication or for how much session of how much period of time user has used your webapplication will be called session . Session contains some values that will be used throughout the user interaction with the webapplication and used in more than one webpage that user navigate So we can say that it is a variable in simple sense that takes our value from one page to another and Session got distroyed or killed automatically after a particular span or time or it is automatically destroyed or cleared when like user signout of application or when user close the browser

A live example would be a web application where a user login . Each user that logs into your system will have a unique session. We can hold additional data into the session which can be used as the user browses your site. We can hold the username, userrole, userpermissions simply by adding it to the session:


Session[“userrole”] = “programmer”; 
Session[“username”] = “Ageek”; 
Session[“userpermissions"] = “cangotohell”; 

A Session  stores the information on the server side  . It stores the values or it uses server memory for storage of data that it holds in . Session variables will use different new and unique session variables for each different user that logs in to web application . large amount of data can be stored on the session, web sites that have a large amount of traffic not use this method, because it will put a severe load on the server memory.

2. Now What is ViewState ? -- so we are clear with session now comes the turn of viewstate . So ViewState is also used for holding our important data But in case of viewstate data is kept in the single viewstate page . It means viewstate data is not taken from one page to another page in this point it is different from session . 

ViewState is only used to Track to analyse the changes that occur to current page during postbacks of data to pages .The viewstate of page can be viewed if you right click on webpage and then clickon view page source then you will see some code of lines similar to below code --

<input type="hidden" name="__VIEWSTATE" id="__VIEWSTATE" value=””></input>

If you are having large number of viewstate fields then it will make the postbacks very slow as all viewstate values will be needed to updated during postbacks so it will make the webpage open slower

Data can be written into viewstate like we do in sessions . But it can retain that data only with life cycle of page after that it will be changed or updated .If you closes that page or redirects to another page then viewstate data will be reset .

How to fill data in viewstate and how to access that data 
ViewState[“PreviousPage”] = “http://www.google.com”; 

Retrieving data form ViewState:
string PreviousPage = ViewState[“PreviousPage”].ToString();  

Saturday 25 October 2014

How to use Login Dialog Box in Android Mono C#


For This small demo project we require the following file structure

Main.axml file that contains code for hello world button on which we place button that will further generate the Dialog Box for Login Activity

Main.cs file Now this file will contain the code for Main.axml actions and events

Login.axml file that will contain the code that will contain the style or pattern how the login dialog will look all .axml design code for login form will reside here


AXML Code For Login  Dialog Box  ( login .axml ) file code

Design Look -


It is a simple code that contains a linear layout that will place all controls in linear order as they are placed in it Then we have placed two Edittext for allowing the user to enter username in first and Password in second . Then we have placed two buttons One for login and second for cancellation of login .

<?xml version="1.0" encoding="utf-8"?>
<LinearLayout xmlns:android="http://schemas.android.com/apk/res/android"
    android:orientation="vertical"
    android:layout_height="match_parent"
    android:paddingLeft="10dp"
    android:paddingRight="10dp"
    android:background="#fff"
    android:layout_width="300dp"
    android:paddingTop="10dp">
    <EditText
        android:layout_height="wrap_content"
        android:id="@+id/txtUsername"
        android:layout_width="match_parent">
        <requestFocus />
    </EditText>
    <EditText
        android:layout_height="wrap_content"
        android:inputType="textPassword"
        android:id="@+id/txtPassword"
        android:layout_width="match_parent" />
    <LinearLayout
        android:layout_width="match_parent"
        android:layout_height="wrap_content"
        android:id="@+id/linearLayout1">
        <Button
            android:layout_width="wrap_content"
            android:layout_height="wrap_content"
            android:layout_weight="0.5"
            android:id="@+id/btnLogin"
            android:text="Login" />
        <Button
            android:layout_width="wrap_content"
            android:layout_height="wrap_content"
            android:layout_weight="0.5"
            android:id="@+id/btnCancel"
            android:text="Cancel" />
    </LinearLayout>
</LinearLayout>

XAML code for Main .axml file 

Design Look -


<?xml version="1.0" encoding="utf-8"?>
<LinearLayout xmlns:android="http://schemas.android.com/apk/res/android"
    android:orientation="vertical"
    android:layout_height="match_parent"
    android:paddingLeft="10dp"
    android:paddingRight="10dp"
    android:background="#fff"
    android:layout_width="300dp"
    android:paddingTop="10dp">
 
        <Button
            android:layout_width="wrap_content"
            android:layout_height="wrap_content"
            android:layout_weight="0.5"
            android:id="@+id/hello"
            android:text="Hello world!" />
 
</LinearLayout>


C# Code for Main.cs file 


 protected override void OnCreate(Bundle bundle)
{
 base.OnCreate(bundle);
 SetContentView(Resource.Layout.Main);
 TextView hellobtn = FindViewById<TextView>(Resource.Id.hello);
 hellobtn.Click += btnclick;
}

void btnclick(object sender, EventArgs e)
        {

            Dialog login = new Dialog(this);
            login.SetContentView(Resource.Layout.login);
            login.Show();
}

Explanation of Code 

PART I

protected override void OnCreate(Bundle bundle)
{
 base.OnCreate(bundle);
 SetContentView(Resource.Layout.Main);
 TextView hellobtn = FindViewById<TextView>(Resource.Id.hello);
 hellobtn.Click += loginclick;
}

In above code First i have used OnCreate Method that is startup method when an android application starts it first load up everything in OnCreate Method and Create their space in memory

SetContentView(Resource.Layout.Main);

Then at this line i have set what layout will this code is meant for I have choosen Main layout in Resource folder whose design preview is shown in images above

 Button loginbtn = FindViewById<Button>(Resource.Id.btnLogin);

Then at this line i have made instance of button and set that textview to the hello world button that i have placed on Main form I have used FindviewById method to find the button and then assign that button to hellobtn

Then at this line i have assigned click event to button by using following line of code

 hellobtn.Click += btnclick;

Then i have given definition to btnclick funtion in code below

PART I

void btnclick(object sender, EventArgs e)
        {

            Dialog login = new Dialog(this);
            login.SetContentView(Resource.Layout.login);
            login.Show();
}

In this code i have made Instance of Dialog class for showing dialog box on screen i have created new class instance then i have set what view will be shown on dialog that is going to appear i have set the view contentview to login.axml content view that i have designed earlier in this article then i have used show( ) function to show login dialog box


Friday 24 October 2014

Star Pattern Programs Cplusplus

Program To Print Following Star Pattern in Cpluplus


Star Pattern in Cpluplus


#include<iostream.h>
void main()
{
   int i,j,k,n;
   cout<<"\Enter the number of lines to be printed: ";
    cin>>n;
   for(i=0;i<n;i++)
   {
      for(j=0;j<(n-i-1);j++)
 cout<<" ";
      for(k=0;k<(2*i+1);k++)
 cout<<"*";
      cout<<endl;
   }
      for(i=0;i<n-1;i++)
   {
      for(j=0;j<=i;j++)
cout<<" ";
      for(k=(2*n-2*i-3);k>0;k--)
   cout<<"*";
      cout<<endl;
   }
}


Program To Print Following Star Pattern in Cpluplus

Star Pattern in Cpluplus

Star Pattern in Cpluplus


#include<iostream.h>
void main()
{
 int i,j,k,n;
 cout<<"\Enter the number of lines to be printed: ";
 cin>>n;
 for(i=0;i<n;i++)
 {
       for(j=n-i-1;j>0;j--)
     cout<<" ";
       cout<<"*";
       for(k=2*i-1;k>0;k--)
     cout<<" ";             //code for upper triangle
       if(i!=0)
     cout<<"*";
       cout<<endl;
  }
  for(i=n-1;i>0;i--)
  {
       for(j=0;j<n-i;j++)
     cout<<" ";
       cout<<"*";                  //code for lower triangle
for(k=2*i-3;k>0;k--)
    cout<<" ";
       if(i!=1)
     cout<<"*";
       cout<<"\n";
    }
}


Program To Create Circular Loading Bar using Graphics.h


#include<graphics.h>

#include<dos.h>

void main()
{
int gd=DETECT,gm; 
              // variable to detect graphics driver and graphic mode

 int counter;   

//Below is code to initialize the graphics with parameters for graphics initgraph(&gd,&gm,"c:\\turboc3\\bgi");

//Loop to show the loading circle for(counter=0;counter<=360;++counter)
{
circle(300,200,80);
pieslice(300,200,0,counter,80);
outtextxy(200,320,"Loading....Please Wait!");
delay(20);
}
closegraph();
}

OUTPUT :
Program To Create Circular Loading Bar graphics.h cplusplus


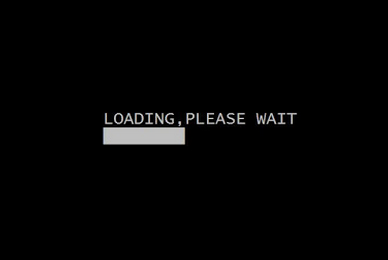
Program To Create Loading Bar using Graphics.h


#include<iostream.h>
#include<conio.h>
#include<graphics.h>
#include<dos.h>

void main()
{
 int x=170,i,gdriver=DETECT,gmode;
  // variable to detect graphics driver and graphic mode

//Below is code to initialize the graphics with parameters for graphics
 initgraph(&gdriver,&gmode,"c:\\tc\\bgi");

 settextstyle(DEFAULT_FONT,HORIZ_DIR,2);

//Outtextxy is used to print the given text at specified x and y pixel position 
//It will print given text at pixel position 170,180
 outtextxy(170,180,"LOADING,PLEASE WAIT");

  for(i=0;i<300;++i)
 {
  delay(30);
  line(x,200,x,220);
  x++;
 }
 getch();

//close the graph that was initialized
 closegraph();  

}

OUTPUT :
Program To Create Loading Bar using Graphics.h Cplusplus


Program To Print Star Triangle Pattern in Cplusplus


#include<iostream.h>
#include<conio.h>

void main()
{
clrscr(); //to clear the screen
int i,j,k,num;

cout<<"Tell How many lines you want";
cin>>num;

num*=2;
for(i=0;i<num;i+=2)
{
cout<<"\n";

for ( j = num; j > i; j -= 2 )
cout<<" ";

for( k=0; k<=i; ++k )
cout<<"*";
}
getch(); //to stop the screen
}
OUTPUT


Program To Print Star Triangle Pattern Cplusplus

Program To Print Alphabets in Cplusplus ( I have printed A to H ) 


#include<iostream>

using namespace std;

int main()
{
int i,j,k=1;
char ch;
cout<<"Input an Alphabet in capital letters that you want to print:";
cin>>ch;
cout<<"\n\n\n\n";
switch(ch)
{
case 'A':
cout<<"\t\t\t    ";
for(i=1;i<=40;++i)
{
for(j=0;j<=22;++j)
{
if(i==1||i==2||i==21||i==20)
cout<<"*";
else
{
if(j==0||j==20)
cout<<"**";
else
cout<<" ";
}
}
cout<<"\n\t\t\t    ";

}
break;


case 'B':
cout<<"\t\t\t\t";

while(k<=2)
{
for(i=1;i<=9;++i)
{
for(j=0;j<=i;++j)
{
if(j==0||j==i)
cout<<"**";
else
cout<<" ";
}

cout<<"\n\t\t\t\t";

}
for(i=1;i<=10;++i)
{
if(i==1||i==10)
cout<<"**";
else
cout<<" ";
}
cout<<"\n\t\t\t\t";

for(i=1;i<=10;++i)
{
if(i==1||i==10)
cout<<"**";
else
cout<<" ";
}
cout<<"\n\t\t\t\t";

for(i=9;i>=1;--i)
{
for(j=0;j<=i;++j)
{
if(j==0||j==i)
cout<<"**";
else
cout<<" ";
}
cout<<"\n\t\t\t\t";
}
++k;
}
 break;

 case'C':
cout<<"\t\t\t    ";

for(i=1;i<=40;++i)
{
for(j=0;j<=22;++j)
{
if(i==1||i==2||i==39||i==40)
cout<<"*";
else
{
if(j==0)
cout<<"**";
else
cout<<" ";
}
}
cout<<"\n\t\t\t    ";

}
break;

 case'D':
 cout<<"\t\t\t\t";
 for(i=1;i<=18;++i)
 {
for(j=0;j<=i;++j)
{
if(j==0||j==i)
cout<<"**";
else
cout<<" ";
}
cout<<"\n\t\t\t\t";
 }
 while(k<=4)
 {
for(i=1;i<=19;++i)
{
if(i==1||i==19)
cout<<"**";
else
cout<<" ";
}
cout<<"\n\t\t\t\t";
 ++k;
 }
 for(i=18;i>=1;--i)
 {
for(j=0;j<=i;++j)
{
if(j==0||j==i)
cout<<"**";
else
cout<<" ";
}
 cout<<"\n\t\t\t\t";
 }
 break;

 case'E':

 cout<<"\t\t\t\t";
 for(i=1;i<=39;++i)
 {
for(j=1;j<=20;++j)
{
if(i==1||i==2||i==20||i==21||i==38||i==39)
cout<<"*";
else
{
if(j==1)
cout<<"**";
else
cout<<" ";
}
}
 cout<<"\n\t\t\t\t";
 }
 break;

 case'F':

 cout<<"\t\t\t\t";

for(i=1;i<=40;++i)
{
for(j=1;j<=20;++j)
{
if(i==1||i==2||i==18||i==19)
cout<<"*";
else
{
if(j==1)
cout<<"**";
else
cout<<" ";
}
}
cout<<"\n\t\t\t\t";
}
break;

 case'G':

cout<<"\t\t\t";
for(i=1;i<=25;++i)
{
for(j=1;j<=20;++j)
{
if(i==1||i==2)
cout<<"*";
else
{
if(j==1)
cout<<"**";
else
cout<<" ";
}
}
cout<<"\n\t\t\t";
}
for(i=1;i<=10;++i)
{
for(j=1;j<=20;++j)
{
if(i==1||i==2)
{ if(j==1||j==14||j==15||j==16)
cout<<"**";
  else
  cout<<" ";
}
else
{
if(i==9||i==10)
cout<<"*";
else
{  if(j==1||j==18)
  cout<<"**";
  else
  cout<<" ";
}
}
}
cout<<"\n\t\t\t";
}
break;


 case'H':

cout<<"\t\t\t";
for(i=1;i<=40;++i)
{
for(j=1;j<=21;++j)
{
if(i==20||i==21)
cout<<"*";
else
{
if(j==1||j==19)
cout<<"**";
else
cout<<" ";
}
}
cout<<"\n\t\t\t";
}
break;

return 0;
}

OUTPUT :