Saturday 27 August 2016

Javascript Event Propagation vs Event PreventDefault


Event Propagation vs Event PreventDefault

Event Propagation

Event Propagation Stops the Event from bubbling or making the event Chain . 

Example : -  A Click Event on a <td> tag will also fire click event on it's parent <tr> and this event chain also continues to parent <table> tag of that <tr> this makes a event chain in order to stop this event Chain propagation we can Use StopPropagation that Prevents this from happening.

StopPropagation ( ) will stop that event from happening on parent (the entire ancestors). When We Use StopPropagation only < td > Event will fire as per our Example above its parent < tr > or            < table > Click event will not fire .

StopPropagation ( ) Tells downward propagation of the event is stopped and also its upward propagation

Event PreventDefault

Event PreventDefault () Prevents the Default Browser Action In Response the Event Triggered . The preventDefault method prevents an event from carrying out its default functionality

Example : If we want to Stop Form Submit on click of Submit Button in form we can use PreventDefault to stop the default form submit behaviour of submit button in form .

As its name tells it just prevent occurence of the default behavior of event like if you need to prevent the click to occur on click event or stop entering of symbols in textbox if its character then make a check it entered character is symbol on keypress press and execute preventdefault ( ) to prevent default behavior of execution of  event on keypress and nothing will enter in textbox if its symbol .


CODE EXAMPLE For StopPropagation


<div onclick='executeParent()'>
<a href='http://google.com'>Click here to visit google.com</a>
</div>
<script>
$('a').click(function(event) {
event.stopPropagation();
$('a').text('Click event is going to be executed');
$('a').contents().unwrap();
});
function executeParent() {
alert('here');
}
</script>


CODE EXPLANATION For StopPropagation


If you execute the code above, the function executeParent() will not be called and you will not get the javascript alert this time. This is due to us having prevented the propagation to the parent div using event.stopPropagation() method. Next you will see the hyperlink ‘Click here to visit google.com‘ replaced by the text ‘Click event is going to be executed‘ and immediately you will be redirected to google.com. This is because we haven’t prevented the default click action from triggering this time using event.preventDefault() method.


CODE EXAMPLE For PreventDefault


<div onclick='executeParent()'>
<a href='http://google.com'>Click here to visit google.com</a>
</div>
<script>
$('a').click(function(event) {
event.preventDefault();
event.stopPropagation();
$('a').text('Click event prevented');
$('a').contents().unwrap();
});
function executeParent() {
alert('here');
}
</script>


CODE EXPLANTION For PreventDefauls

If you execute the code above, the function executeParent() will not be called and you will not get the javascript alert. This is due to us having prevented the propagation to the parent div using event.stopPropagation() method. Next you will see the hyperlink ‘Click here to visit google.com‘ replaced by the text ‘Click event prevented‘ and you will not be redirected to google.com. This is because we have prevented the default click action from triggering this time using event.preventDefault() method.


Javascript Event StopPropagation


Event Propagation

Event Propagation Stops the Event from bubbling or making the event Chain . 

Example : -  A Click Event on a <td> tag will also fire click event on it's parent <tr> and this event chain also continues to parent <table> tag of that <tr> this makes a event chain in order to stop this event Chain propagation we can Use StopPropagation that Prevents this from happening.

StopPropagation ( ) will stop that event from happening on parent (the entire ancestors). When We Use StopPropagation only < td > Event will fire as per our Example above its parent < tr > or            < table > Click event will not fire .

StopPropagation ( ) Tells downward propagation of the event is stopped and also its upward propagation

CODE EXAMPLE 

<div onclick='executeParent()'>
<a href='http://google.com'>Click here to visit google.com</a>
</div>
<script>
$('a').click(function(event) {
event.stopPropagation();
$('a').text('Click event is going to be executed');
$('a').contents().unwrap();
});
function executeParent() {
alert('here');
}
</script>

CODE EXPLANATION
If you execute the code above, the function executeParent() will not be called and you will not get the javascript alert this time. This is due to us having prevented the propagation to the parent div using event.stopPropagation() method. Next you will see the hyperlink ‘Click here to visit google.com‘ replaced by the text ‘Click event is going to be executed‘ and immediately you will be redirected to google.com. This is because we haven’t prevented the default click action from triggering this time using event.preventDefault() method.

Event Prevent Default in Javascript


Event PreventDefault

Event PreventDefault () Prevents the Default Browser Action In Response the Event Triggered . The preventDefault method prevents an event from carrying out its default functionality

Example : If we want to Stop Form Submit on click of Submit Button in form we can use PreventDefault to stop the default form submit behaviour of submit button in form .

As its name tells it just prevent occurence of the default behavior of event like if you need to prevent the click to occur on click event or stop entering of symbols in textbox if its character then make a check it entered character is symbol on keypress press and execute preventdefault ( ) to prevent default behavior of execution of  event on keypress and nothing will enter in textbox if its symbol .

CODE EXAMPLE


<div onclick='executeParent()'>
<a href='http://google.com'>Click here to visit google.com</a>
</div>
<script>
$('a').click(function(event) {
event.preventDefault();
event.stopPropagation();
$('a').text('Click event prevented');
$('a').contents().unwrap();
});
function executeParent() {
alert('here');
}
</script>

CODE EXPLANTION

If you execute the code above, the function executeParent() will not be called and you will not get the javascript alert. This is due to us having prevented the propagation to the parent div using event.stopPropagation() method. Next you will see the hyperlink ‘Click here to visit google.com‘ replaced by the text ‘Click event prevented‘ and you will not be redirected to google.com. This is because we have prevented the default click action from triggering this time using event.preventDefault() method.


Saturday 13 August 2016

Difference Between http get and jsonp


An HTTP GET request is what you get when you enter a URI in your browser or when you click on a link on a web page. Certain HTML elements, like also generate GET requests. GET requests a resource from the server. You can pass additional information to a server-side script by adding 'query parameters' after the script, such as Example Domain.
Say you're on domain www.example.com, and you want to make a request to domainwww.example.net. To do so, you need to cross domain boundaries, a no-no in most of browserland.
Enter JSONP. When you make your request to a server that is JSONP enabled, you pass a special parameter that tells the server a little bit about your page. That way, the server is able to nicely wrap up its response in a way that your page can handle.
For example, say the server expects a parameter called "callback" to enable its JSONP capabilities. Then your request would look like:
  1. http://www.example.net/sample.aspx?callback=mycallback
Without JSONP, this might return some basic JavaScript object, like so:
  1. { foo: 'bar' }
However, with JSONP, when the server receives the "callback" parameter, it wraps up the result a little differently, returning something like this:
  1. mycallback({ foo: 'bar' });
As you can see, it will now invoke the method you specified. So, in your page, you define the callback function:
  1. mycallback = function(data){ alert(data.foo); };
Major issue with JSONP
you lose a lot of control of the request that creates doubts in maintaining security

Thursday 11 August 2016

Angularjs Vs Jquery


Answer Angularjs Vs Jquery On Quora 
Angularjs Vs Jquery

jQuery will be used for things like higher level APIs, updating DOM elements, adding classes and wrapping XHR calls up nicely. Angular 1.x actually uses jQuery lite (jQLite) inside itself, or can use the full jQuery library if it's present before Angular at runtime. Using jQuery with Angular will unleash more power to Angular core as it knows you're using it, so it binds onto jQuery and passes you the full jQuery API instead of it's built-in jQLite.Remember that Angular is a data-binding MVVM framework, of which jQuery is not.

See The Major Benefits in Angular JS as Compared To Jquery

Below is Table List of Difference between jquery and Angularjs . See the Point search what that point means then analyze do you need the power or usage of that point in the project . On the basis of that Analyze Which one of them you need in your project

Difference between on and bind in jQuery


The .bind() method registers the event and event handler directly to the DOM element.This method is still very handy when wiring-up event handlers, but there are various performance concerns as are listed below.
Internally .bind() maps to .on() as per current version of Jquery .bind may be removed from future versions at any time. There is no reason to keep using .bind and every reason to prefer .on instead.
The .bind() method will attach the event handler to all of the anchors that are matched! That is not good. Not only is that expensive to implicitly iterate over all of those items to attach an event handler, but it is also wasteful since it is the same event handler over and over again.

Problems
  1. The method attaches the same event handler to every matched element in the selection.
  2. It doesn’t work for elements added dynamically that matches the same selector.
  3. There are performance concerns when dealing with a large selection.
  4. The attachment is done upfront which can have performance issues on page load.
The on() method as being “overloaded” with different signatures, which in turn changes how the event binding is wired-up. The .on method bring a lot of consistency to the API and hopefully makes things slightly less confusing.

Cons 1. Brings confusion because the behavior changes based on how you call the method.

Thursday 4 August 2016

Fix For Leverage Browser Cache

1. Create a New File Website Root Directory with name '.htaccess'
2. Put below Code in Top of '.htaccess' File
3. Code :-

# Enable Compression
<IfModule mod_deflate.c>
  AddOutputFilterByType DEFLATE application/javascript
  AddOutputFilterByType DEFLATE application/rss+xml
  AddOutputFilterByType DEFLATE application/vnd.ms-fontobject
  AddOutputFilterByType DEFLATE application/x-font
  AddOutputFilterByType DEFLATE application/x-font-opentype
  AddOutputFilterByType DEFLATE application/x-font-otf
  AddOutputFilterByType DEFLATE application/x-font-truetype
  AddOutputFilterByType DEFLATE application/x-font-ttf
  AddOutputFilterByType DEFLATE application/x-javascript
  AddOutputFilterByType DEFLATE application/xhtml+xml
  AddOutputFilterByType DEFLATE application/xml
  AddOutputFilterByType DEFLATE font/opentype
  AddOutputFilterByType DEFLATE font/otf
  AddOutputFilterByType DEFLATE font/ttf
  AddOutputFilterByType DEFLATE image/svg+xml
  AddOutputFilterByType DEFLATE image/x-icon
  AddOutputFilterByType DEFLATE text/css
  AddOutputFilterByType DEFLATE text/html
  AddOutputFilterByType DEFLATE text/javascript
  AddOutputFilterByType DEFLATE text/plain
</IfModule>
<IfModule mod_gzip.c>
  mod_gzip_on Yes
  mod_gzip_dechunk Yes
  mod_gzip_item_include file .(html?|txt|css|js|php|pl)$
  mod_gzip_item_include handler ^cgi-script$
  mod_gzip_item_include mime ^text/.*
  mod_gzip_item_include mime ^application/x-javascript.*
  mod_gzip_item_exclude mime ^image/.*
  mod_gzip_item_exclude rspheader ^Content-Encoding:.*gzip.*
</IfModule>

# Leverage Browser Caching
<IfModule mod_expires.c>
  ExpiresActive On
  ExpiresByType image/jpg "access 1 year"
  ExpiresByType image/jpeg "access 1 year"
  ExpiresByType image/gif "access 1 year"
  ExpiresByType image/png "access 1 year"
  ExpiresByType text/css "access 1 month"
  ExpiresByType text/html "access 1 month"
  ExpiresByType application/pdf "access 1 month"
  ExpiresByType text/x-javascript "access 1 month"
  ExpiresByType application/x-shockwave-flash "access 1 month"
  ExpiresByType image/x-icon "access 1 year"
  ExpiresDefault "access 1 month"
</IfModule>
<IfModule mod_headers.c>
  <filesmatch "\.(ico|flv|jpg|jpeg|png|gif|css|swf)$">
  Header set Cache-Control "max-age=2678400, public"
  </filesmatch>
  <filesmatch "\.(html|htm)$">
  Header set Cache-Control "max-age=7200, private, must-revalidate"
  </filesmatch>
  <filesmatch "\.(pdf)$">
  Header set Cache-Control "max-age=86400, public"
  </filesmatch>
  <filesmatch "\.(js)$">
  Header set Cache-Control "max-age=2678400, private"
  </filesmatch>
</IfModule>

Wednesday 20 July 2016

Installing Asp.net Core


Steps To Install Asp.net Core


Step 1. Before Installing Asp.net Core Let Fulfill Its Prerequisites As Below -

First you need to Install Visual Studio 2015 . You Can Download Free Visual Studio Community Edition From Link below -
Download Visual Studio 2015

For Mac & Linux Users You Can Use Visual Studio Code -
Download Visual Studio Code & Read Its All Details 

Step 2. After Download & Installing Visual Studio 2015 you need to make sure you have Visual Studio 2015 Update 3 Installed . You Can Download Visual Studio 2015 Update 3 From Link Below -
Download Visual Studio 2015 Update 3

Real ALL Details About Visual Studio 2015 Update 3 Here -
What's New Added in Visual Studio Update 3

Step 3 -  Please Check Out All Dependencies of Asp.net Core Before Installing it . See All Dependencies of Asp.net Core For All OS -
Dependencies of Asp.net Core

Step 4 - Now Download & Install Asp.net Core From link below -
Download Asp.net Core

Step 5 - Now Asp.net Core is Setup Head Towards Next Post To Make First Sample App in Asp.net Core To Make Ensure its setup Correctly . Link TO Next Post is Below - 

Getting Started With Asp.net Core


Enjoy The New World Of Asp.net Core


Steps To Make & Run First Simple App In Asp.net Core

1. First Make Sure You Have Setup & Installed Asp.net Core . To See Steps To Install Asp.net Core See Link Below - 


2. If you are Done With Setting Up Asp.net Core . Press Windows Key + R to open Run Dialog . Type in cmd and Press Enter . It will Open Command Prompt 

3. Navigate To Directory Where you want to Save your Asp.net Core Project like - 
    
    CD My-Projects 
    ( It will change your Current Working Directory To My-Projects Folder / Directory )

4., Now Run Below Command One By One
     
     mkdir aspnetcoreapp
     ( If will make a new Folder with name aspnetcoreapp )
     cd aspnetcoreapp
     ( It Will change Current Directory to aspnetcoreapp)
.
     dotnet new
     ( It will create a new Asp.net Core app for you ) . 

    What is Donet Command ? - 

    Don't Worry About Dotnet Command With Installation of Asp.net Core you can use dotnet  command . It is new gift of Asp.net Core RC2 for CLI . 

It will Give Detailed Post About DNX & Dotnet Commands in CLI In coming Post 


Tuesday 19 July 2016

How Microsoft Magic Mirror Works

What is Magic Mirror See Video Below - 


Microsoft Introduced 'Magic Mirror' in the InnovFest Unbound conference . This Device is Useful for People With Time Crunch in Morning . Most of People have Shortage of Time in Morning To Get Ready to Get out of Door for work .

Magic Mirrror is Connected To Internet . Magic Mirror will Recognize their Face in Morning and Welcoming them with Personalized Hello Message . It uses Windows Hello Technology For Facial Recognition. It will also show More Daily updates Like Weather Conditions , Personalized Latest News Updates that will be shown on Upper Portion of Mirror . It Can also record you commute to office and Can also Tell whether there is less Traffic or Traffic Jam on that Way .

Main Highlights or Magic Mirror Are - 

1. Magic Mirror is 23.6 inch LCD screen
2. It's having black background with White UI Elements
3. It is Powered By Rasberry PI and Windows Hello for Facial Recognition
4. It Can show Weather Conditions Today
5. It Can also Show Latest News Updates
6. It Can also Show Feeds From Facebook and Twitter
7. It uses Windows Hello Technology For Facial Recognition.

“Imagine when you wake up in the morning, you’re able to use the mirror to style your hair, do your makeup, and while doing that, you can also view the weather,” explained Izzat Khair of Microsoft's developer experience team. 

Magic Mirror Can also be used for Direct Advertisements to Person. The facial recognition feature could also provide real-time information to advertisers on how people are reacting to an advertisement displayed on the smart mirror.

The Magic Mirror’s facial recognition system can recognize eight different emotions, including anger, happiness and surprise. Microsoft’s Cognitive Services Face API matches a person’s face to their profile, and allows the mirror to display information relevant to that person’s mood.

Magic Mirror is powered with low-cost and readily-available Raspberry Pi running Windows 10 IoT Core. To provide the interface and basic functionality, Microsoft decided to use a simple Hosted Web App. In fact, the company has open-sourced the application source code and bill of materials on GitHub for you to give it a go yourself.

The web app is created in HTML, CSS, and JavaScript and served from a Node instance hosted on Azure. Using the Hosted Web apps bridge, Microsoft converted their web app into a Universal Windows App which provided access to Windows Native APIs and enabled it to run across Windows-powered devices, such as the Raspberry Pi 3.

Magic Mirror is still in development stage and no commercial release date is announced

Friday 15 July 2016

Grunt vs Gulp


  • Gulp and Grunt are both Automated Task Runner . Major Difference Between Gulp and Grunt Lies in How They Deal With Automation of Tasks Internally .

    Gulp Uses Node Streams For running different tasks and Grunt use temp files for the same work .
  • Grunt runns tasks using Temporary files which are disk I/O operations. Your SASS file is compiled and then written to a temporary file. The temporary file is used by the autoprefixer and then the final product is written to the destination file.

    Working of Grunt

    Gulp runs task all in main memory. Your SASS file is compiled in main memory, then the result is passed to the autoprefixer without being written to a file and the destination file is then written out.

    Working of Gulp
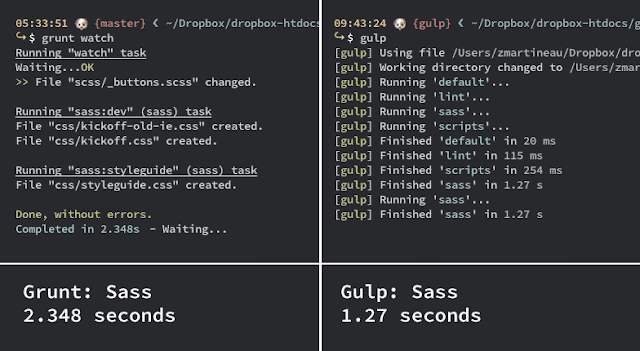
  • In-memory operations are faster as compared to disk writes which means that Gulp has a big speed advantage.
  • Speed Comparison Of Gulp Vs Grunt Can be Found Here - http://tech.tmw.co.uk/2014/01/speedtesting-gulp-and-grunt/
  • Speed Difference


    Source : http://tech.tmw.co.uk/2014/01/speedtesting-gulp-and-grunt/

Thursday 14 July 2016

What is Gulp and Grunt


Front-End Developers Tend To Deal with many things that include : - 


  • Decrease http request by concatinating CSS FIles and JS Files Together for showing on website
  • Compressing and Minifying CSS and JS Files
  • Optimizing Image to reduce their size by maintaining Quality of image
  • Saas authoring
  • Rendering DOM 
This is just an overview of task that needs to be run there is large list of tasks needs to be done . Grunt and Gulp are tools that does these tasks for us and don't bother us to do them . After setting up Grunt or Gulp all these list of tasks can be done automatically without bothering you about any of them and everything managed automatically and efficiently

Why Do I Need Gulp Or Grunt

Things that gulp and grunt do are not that you can't do without gulp and grunt . There are number of tasks you need to do you can also manually do all of them manually using number of availale tools But Gulp and Grunt Has kept them all under one roof and you manually need not to do anything it automatically do all these tasks and manages everything

Do I Need To Learn NODE For Using Gulp / Grunt

You just need to install node and not need to do anything more . Like we use mailing platform gmail or We use wordpress for blogging but don't do coding in that on non-developer part

Working of GRUNT

Grunt runns tasks using Temporary files which are disk I/O operations. Your SASS file is compiled and then written to a temporary file. The temporary file is used by the autoprefixer and then the final product is written to the destination file.


Working of Gulp
Gulp runs task all in main memory. Your SASS file is compiled in main memory, then the result is passed to the autoprefixer without being written to a file and the destination file is then written out.