Sqlite Database is the best way of providing portability to our database . Sqlite database is well know for the conditions when developers don't want to mess up with installation of database on the client machine . In case of Desktop applications or Web Applications We often require database . It does not matter any database we use We need to install it .
We can use database for application by install it on Client's machine that may be some messy work that take some time and could be problematic and The Second condition is to host the database to Database Server and client is given the access to that Database But that may include some Usage or disk cost of Database Server that could be costly as the database goes on increasing day by day
So solution to these type of problems is SQLite Database . Actually Sqlite Database is very popular database used in Handheld or mobile applications . The main purpose of using Sqlite Database for these conditions is that Sqlite Database Simply includes the All sql queries that are used to create table in between the application source code and it create a file of database with .mdf extension on client's machine in given location and all data is saved to that location so it can be easily backed up by employee by using simple method of uploading this database file to his / her Mail Account or save it in somewhere else .
Download the Sqlite DLL And sourcecode that will be required in this Application
Download System.Data.Sqlite Dll File
DOWNLOAD SOURCECODE ZIP FILE
Adding System.Data.Sqlite Dll File To Visual Studio
Adding Data_Connection Class
Data_connection class will be used to give location where the Sqlite Database .mdf file will be created We are creating class for this as it will be used in number of location that is called code reuse
Steps To Add Class :-
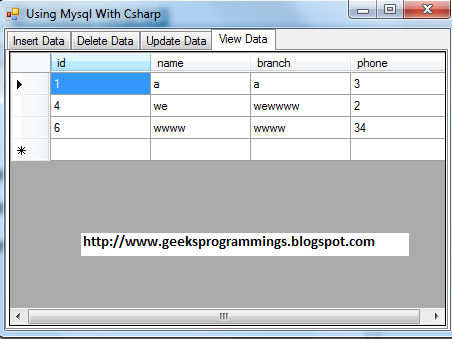
Adding Code for Creating Table , Inserting Data and Showing Inserted Data
Now we are going to create table using csharp code by passing queries into the code then we pass insert query then we show the result
Add the code similar to following code to your form :-
Main Terms Used in Code
1. SQLiteConnection :- This is class that is used to establish connection to the sqlite database for creating table , inserting data or to pass any query to database we must first establish connection to database and open the port for connection this is accomplished by making object of this class
2. SQLcommand :- This class is used to pass the sql queries . This requires the Sqlconnect object to be passed also to open to tell the command which instance of database is used for executing the queries that are passed to it .
3. SqlDataAdapter :- This class is used to store the result of executed query and hold to put it in some other variable or datatable
ERROR INFORMATION :- It may be possible that you may go through an error that always exist when we you are attempting first time with sqlite database The error details is shown in image below and Its solution is given in link below

CLICK HERE FOR ERROR SOLUTION
ERROR SOLUTION
Csharp ( C# ) CODE :-
We can use database for application by install it on Client's machine that may be some messy work that take some time and could be problematic and The Second condition is to host the database to Database Server and client is given the access to that Database But that may include some Usage or disk cost of Database Server that could be costly as the database goes on increasing day by day
So solution to these type of problems is SQLite Database . Actually Sqlite Database is very popular database used in Handheld or mobile applications . The main purpose of using Sqlite Database for these conditions is that Sqlite Database Simply includes the All sql queries that are used to create table in between the application source code and it create a file of database with .mdf extension on client's machine in given location and all data is saved to that location so it can be easily backed up by employee by using simple method of uploading this database file to his / her Mail Account or save it in somewhere else .
Download the Sqlite DLL And sourcecode that will be required in this Application
Download System.Data.Sqlite Dll File
DOWNLOAD SOURCECODE ZIP FILE
Adding System.Data.Sqlite Dll File To Visual Studio
- Open Visual Studio and Create a New C# Desktop Application Project by giving it a legal name .
- Now In Right Side you can see Solution Explorer
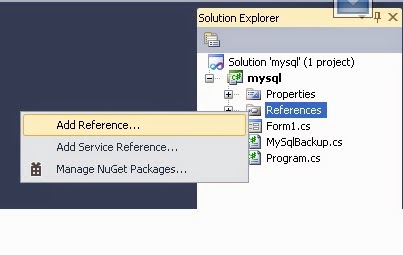
- In Solution Explorer Right Click on Reference and Click on Add Reference

- Now Click on Browse and then Click on Browse button to choose Dll file from your computer where you have downloaded it .

- Now click on OK after adding dll file .

- Now Dll file is successfully Added
- Now Finally Add Namespace Using System.Data.Sqlite in top line of your form's .Cs file
Adding Data_Connection Class
Data_connection class will be used to give location where the Sqlite Database .mdf file will be created We are creating class for this as it will be used in number of location that is called code reuse
Steps To Add Class :-
- Right click on Project's folder in solution explorer
- In pop-up menu click on Add Then click on Class
- Now a Window appear give a name like Data_connection.cs and Hit ok
- Now add the code similar to following code to the class :-
using System;

using System.Collections.Generic;

using System.Linq;

using System.Text;


using System.Data.SQLite;

using System.Data;

using System.Windows.Forms;

namespace useSqlitecsharp

{

    class Data_connection

    {

        public string datalocation()

        {

            string dir = Environment.GetFolderPath(Environment.SpecialFolder.MyDocuments);

            return "Data Source=" + dir + "\\DBgeeksprogrammings.mdf;";

        }


    }

}
5. Now Save allAdding Code for Creating Table , Inserting Data and Showing Inserted Data
Now we are going to create table using csharp code by passing queries into the code then we pass insert query then we show the result
Add the code similar to following code to your form :-
Main Terms Used in Code
1. SQLiteConnection :- This is class that is used to establish connection to the sqlite database for creating table , inserting data or to pass any query to database we must first establish connection to database and open the port for connection this is accomplished by making object of this class
2. SQLcommand :- This class is used to pass the sql queries . This requires the Sqlconnect object to be passed also to open to tell the command which instance of database is used for executing the queries that are passed to it .
3. SqlDataAdapter :- This class is used to store the result of executed query and hold to put it in some other variable or datatable
ERROR INFORMATION :- It may be possible that you may go through an error that always exist when we you are attempting first time with sqlite database The error details is shown in image below and Its solution is given in link below
CLICK HERE FOR ERROR SOLUTION
ERROR SOLUTION
Csharp ( C# ) CODE :-
using System;

using System.Collections.Generic;

using System.ComponentModel;

using System.Data;

using System.Drawing;

using System.Linq;

using System.Text;

using System.Threading.Tasks;

using System.Windows.Forms;

using System.Data.SQLite;


namespace useSqlitecsharp

{

    public partial class Form1 : Form

    {

        Data_connection dbobject = new Data_connection();

        SQLiteConnection SQLconnect = new SQLiteConnection();

        public Form1()

        {

            InitializeComponent();

        }


        private void button1_Click(object sender, EventArgs e)

        {

            SQLiteCommand SQLcommand = new SQLiteCommand();

            SQLcommand = SQLconnect.CreateCommand();

            SQLcommand.CommandText = "CREATE TABLE IF NOT EXISTS "+textBox1.Text+"( Username TEXT, Password TEXT);";

            SQLcommand.ExecuteNonQuery();

            SQLcommand.Dispose();


            MessageBox.Show("Table Created");

        }


        private void Form1_Load(object sender, EventArgs e)

        {

            SQLconnect.ConnectionString = dbobject.datalocation();

            SQLconnect.Open();

        }


        private void button2_Click(object sender, EventArgs e)

        {

            SQLiteCommand cmd = new SQLiteCommand();

            cmd = SQLconnect.CreateCommand();

            cmd.CommandText = "insert into " + textBox1.Text + " (Username,Password)  values (@username,@password)";

            cmd.Parameters.AddWithValue("@username", textBox2.Text);

            cmd.Parameters.AddWithValue("@password", textBox3.Text);

            cmd.ExecuteNonQuery();

            cmd.Dispose();


            MessageBox.Show("Data Inserted");

        }


        private void button3_Click(object sender, EventArgs e)

        {

            SQLiteCommand cmd = new SQLiteCommand("select * from "+textBox1.Text , SQLconnect);

            SQLiteDataAdapter da = new SQLiteDataAdapter();

            DataTable dt = new DataTable();

            da.SelectCommand = cmd;

            da.Fill(dt);

            if (dt.Rows.Count > 0)

            {

                dataGridView1.DataSource = dt;

            }

            else

            {

                MessageBox.Show("No Data Exist in Table");

            }

        }


    }

}