Showing posts with label monoandroid. Show all posts

Tuesday, 23 December 2014

Pass Data between Activity in Android


Hello Friends ,

Today I got one message from a person to tell him how to pass data between android activities So, I am going to give a simple way for how we can transfer data or how we can pass data across activities in android . In android we use activity for  each layout code .

I am using Mono Android for this article but that will similar functions in Dalvik android that is used with java based android applications .

Here are simple Steps How to Pass data between Activities in Android Using Csharp -

  1. Open Visual Studio . Click on File --> New Project -->
  2. Now choose Mono For Android and click on Android Application . Now Simple Android application will be created
  3. This project will create a single activity named MainActivity (MainActivity.cs), which contains a button.
  4. Add a second New activity class named Activity2 to the project. by right click on Solution Name and click on New then click on Android Activity leave the name as default and click on Ok  This class must inherit from Android.App.Activity .
  5. right click on layout folder inside Resource folder then click new and choose Android Layout give it a name and leave as default and click ok .
  6. In the button.Click handler in MainActivity.cs , create an intent for Activity2 , and add data to the intent by calling PutExtra and this data given in Put Extra will be transfered to Activity2 . Add the Code Below for that :-
 button.Click += delegate {
               // button.Text = string.Format("{0} clicks!", count++);
                var activity2 = new Intent(this, typeof(Activity2));
                activity2.PutExtra("MyData", "Data from Activity1");
                StartActivity(activity2);
            };
      
      7. Now Open you layout.xm file in Resource --> layout folder ( layout folder under resource folder ) . Add code below to it for Adding button under <linearlayout> tag :-

        <Button
        android:id="@+id/MyButton"
        android:layout_width="fill_parent"
        android:layout_height="wrap_content"
        android:text="@string/Hello" />    string text = Intent.GetStringExtra

    8. Now add code below to Newly added Activity - activity2.cs under Activiy.Oncreate Method :-
            ("MyData") ?? "Data not available";
            string text1 = Intent.GetStringExtra("MyData");
            Button button = FindViewById<Button>(Resource.Id.MyButton);
            button.Text = text;

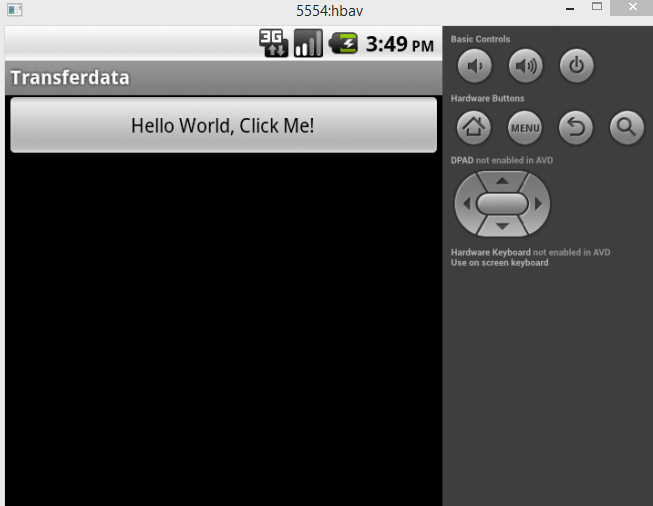
       9. Now Run the app by pressing F5 and see the output in emulator as below -
Pass Data between Activity in android 
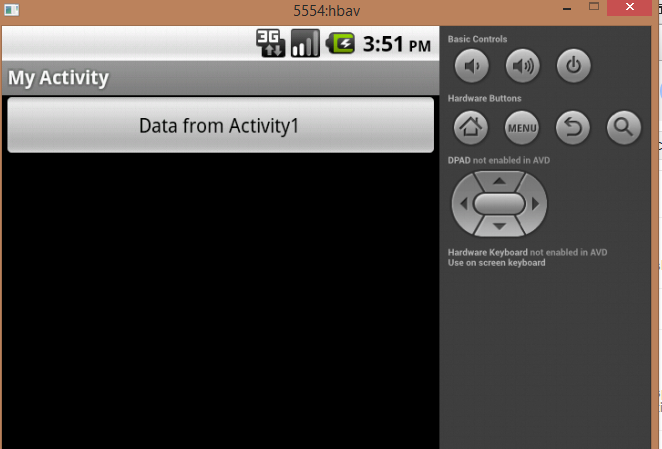
10. Now click on button saying "Hello World,Click Me!" Now you will see New Avtivity Activity2 as below that contain the text that we have passed from activity Activity1

Pass Data between Activity in android 


Saturday, 25 October 2014

How to use Login Dialog Box in Android Mono C#


For This small demo project we require the following file structure

Main.axml file that contains code for hello world button on which we place button that will further generate the Dialog Box for Login Activity

Main.cs file Now this file will contain the code for Main.axml actions and events

Login.axml file that will contain the code that will contain the style or pattern how the login dialog will look all .axml design code for login form will reside here


AXML Code For Login  Dialog Box  ( login .axml ) file code

Design Look -


It is a simple code that contains a linear layout that will place all controls in linear order as they are placed in it Then we have placed two Edittext for allowing the user to enter username in first and Password in second . Then we have placed two buttons One for login and second for cancellation of login .

<?xml version="1.0" encoding="utf-8"?>
<LinearLayout xmlns:android="http://schemas.android.com/apk/res/android"
    android:orientation="vertical"
    android:layout_height="match_parent"
    android:paddingLeft="10dp"
    android:paddingRight="10dp"
    android:background="#fff"
    android:layout_width="300dp"
    android:paddingTop="10dp">
    <EditText
        android:layout_height="wrap_content"
        android:id="@+id/txtUsername"
        android:layout_width="match_parent">
        <requestFocus />
    </EditText>
    <EditText
        android:layout_height="wrap_content"
        android:inputType="textPassword"
        android:id="@+id/txtPassword"
        android:layout_width="match_parent" />
    <LinearLayout
        android:layout_width="match_parent"
        android:layout_height="wrap_content"
        android:id="@+id/linearLayout1">
        <Button
            android:layout_width="wrap_content"
            android:layout_height="wrap_content"
            android:layout_weight="0.5"
            android:id="@+id/btnLogin"
            android:text="Login" />
        <Button
            android:layout_width="wrap_content"
            android:layout_height="wrap_content"
            android:layout_weight="0.5"
            android:id="@+id/btnCancel"
            android:text="Cancel" />
    </LinearLayout>
</LinearLayout>

XAML code for Main .axml file 

Design Look -


<?xml version="1.0" encoding="utf-8"?>
<LinearLayout xmlns:android="http://schemas.android.com/apk/res/android"
    android:orientation="vertical"
    android:layout_height="match_parent"
    android:paddingLeft="10dp"
    android:paddingRight="10dp"
    android:background="#fff"
    android:layout_width="300dp"
    android:paddingTop="10dp">
 
        <Button
            android:layout_width="wrap_content"
            android:layout_height="wrap_content"
            android:layout_weight="0.5"
            android:id="@+id/hello"
            android:text="Hello world!" />
 
</LinearLayout>


C# Code for Main.cs file 


 protected override void OnCreate(Bundle bundle)
{
 base.OnCreate(bundle);
 SetContentView(Resource.Layout.Main);
 TextView hellobtn = FindViewById<TextView>(Resource.Id.hello);
 hellobtn.Click += btnclick;
}

void btnclick(object sender, EventArgs e)
        {

            Dialog login = new Dialog(this);
            login.SetContentView(Resource.Layout.login);
            login.Show();
}

Explanation of Code 

PART I

protected override void OnCreate(Bundle bundle)
{
 base.OnCreate(bundle);
 SetContentView(Resource.Layout.Main);
 TextView hellobtn = FindViewById<TextView>(Resource.Id.hello);
 hellobtn.Click += loginclick;
}

In above code First i have used OnCreate Method that is startup method when an android application starts it first load up everything in OnCreate Method and Create their space in memory

SetContentView(Resource.Layout.Main);

Then at this line i have set what layout will this code is meant for I have choosen Main layout in Resource folder whose design preview is shown in images above

 Button loginbtn = FindViewById<Button>(Resource.Id.btnLogin);

Then at this line i have made instance of button and set that textview to the hello world button that i have placed on Main form I have used FindviewById method to find the button and then assign that button to hellobtn

Then at this line i have assigned click event to button by using following line of code

 hellobtn.Click += btnclick;

Then i have given definition to btnclick funtion in code below

PART I

void btnclick(object sender, EventArgs e)
        {

            Dialog login = new Dialog(this);
            login.SetContentView(Resource.Layout.login);
            login.Show();
}

In this code i have made Instance of Dialog class for showing dialog box on screen i have created new class instance then i have set what view will be shown on dialog that is going to appear i have set the view contentview to login.axml content view that i have designed earlier in this article then i have used show( ) function to show login dialog box


Saturday, 4 October 2014

\adt-bundle-windows-x86_64-20130219\sdk\platform-tools\aapt.exe is invalid

When your are using Android with Csharp or when you are using Monoandroid you will be facing some some error related to aapt.exe missing or aapt.exe invalid . These are common error to Monoandroid developer that almost every one that uses Monoandroid will face .

So Today I decided to get the actual reason of this problem and I sit on my chair to find out the reason and possible solution to this error that may work for everyone . I suffered from this error number of times before but i tried the ways to get rid of it But not today this is the day to get solution of this error .

What are Possible Errors :


  • Error MSB6004: The specified task executable location "C:\Program


  • Files\adt-bundle-windows-x86_64-20130219\sdk\platform-tools\aapt.exe" is 


invalid. (MSB6004) (TaskyAndroid)

The specified task executable location "D:\android-sdk\platform-tools

\aapt.exe" is invalid.


Reason of Above Errors 


This issue is caused by Google changing around the directory structure of the Android SDK with their latest updates and due to these updates old directory structures are creating problem Most probably these error comes after you update your android So when you update your android-sdk then it update the directory structure of android-sdk to new structure of google that allows
aapt.exe to be must present in android-sdk/platform-tools/ but that will be not there because in old directory structure that monoandroid is using aapt.exe is in android-sdk/build-tools/ that's why this error is coming and MonoAndroid Team is applying these changes so  before that we need to figure out this issue to continue our development

Error Solution aapt.exe Invalid


Steps :-

1.  Copy the aapt.exe file from folder \android-sdk\build-tools\17.0.0 to \android-sdk\platform-tools . Here 17.0.0 is your android api you have installed in your sdk it will be what version you installed like :- 8.0.0, 18.0.0

2. Now Also Copy \android-sdk\build-tools\17.0.0\lib folder to \android-sdk\platform-tools\ As there is a file in that directory dx.jar which is also Needed by xamarin

3. Now Everything will be fine ........Cheers!


There is one more error which can let you suffer it is :-

java exited with code 1


Reason of Error java exited with code 1

The reason of this error is in our previous error solution When you copy the aapt.exe file from  \android-sdk\build-tools\17.0.0 to \android-sdk\platform-tools .  and forger to copy or don't copy folder  \android-sdk\build-tools\17.0.0\lib folder to \android-sdk\platform-tools\ then this error comes this is main reason of this error

Error Solution java exited with code 1


 Also Copy \android-sdk\build-tools\17.0.0\lib folder to \android-sdk\platform-tools\ As there is a file in that directory dx.jar which is also Needed by xamarin after copying aapt.exe file

Tuesday, 29 July 2014

How to use XML Parsing And TableLayout in Mono Android


In order to start with XML Parsing or XML data Handling in Microsoft .NET Framework first we need to know about what classes or namespaces are available to us for using or dealing with XML Document or XML Data in .Net So Here is list of XML Namespaces available for XML Processing and Handling :-


  • System.Xml;
  • System.Schema;
  • System.Xml.Serialization;
  • System.Xml.XPath;
  • System.Xml.Xsl;


Here , Out of these classes System.Xml class is major class that is responsible or must for XML Data Processing and this is the namespace that we are going to use in our tutorial today . The System.Xml namespace contains number of classes that are used for reading and writting Xml data from XML Documents . System.Xml contains :-


  • XmlReader for Reading Xml Documents we are not going to use it in our tutorial today
  • XmlWritter For Writting Xml Documents we are not going to use it in our tutorial today

There is another important class that we will use in our XML Parsing today . This is XmlNode It plays important role for getting xml data node by node This class represents every single node of the XML Document


OUTPUT SCREEN WITH RESULT 
I have used API 8 for building this app you Download the Application complete code from here :-
Download Xml Parser Android with TableLayout -- geeksprogrammings


Main.Xaml CODE MONO ANDROID

<?xml version="1.0" encoding="utf-8"?>
<LinearLayout xmlns:android="http://schemas.android.com/apk/res/android"
    android:layout_width="match_parent"
    android:layout_height="match_parent"
    android:layout_gravity="center_horizontal"
    android:orientation="vertical">
    <TableLayout
        android:id="@+id/main_table"
        android:layout_weight="1"
        android:layout_height="wrap_content"
        android:layout_width="match_parent"
        android:layout_marginTop="0.0dp"
        android:scrollbars="vertical" />
</LinearLayout>

using System;
using Android.App;
using Android.Content;
using Android.Runtime;
using Android.Views;
using Android.Widget;
using Android.OS;
using Android.Graphics;
using System.Xml;

XAML CODE EXPLANATION MONO ANDROID

step 1
In first line i have declared the xml version and encoding type this denotes that  this is an xml file code . In android xml code is used for creating design or layout of mono Android Apps

step 2
Now We have added a Linear Layout this is a default layout for Mono Android Application all controls or other layouts that we will use in our Mono Android Application will reside under this LinearLayout Tag
It contains Starting and Ending Tag .

<LinearLayout xmlns:android="http://schemas.android.com/apk/res/android"
    android:layout_width="match_parent"
    android:layout_height="match_parent"
    android:layout_gravity="center_horizontal"
    android:orientation="vertical">

</LinearLayout>

step 3
Now Under LinearLayout we have included a Table layout We have included Table layout because we in this tutorial of xml parsing is going to parse xml and then view the retrieved xml data in table view . We have used following code for styling or placing table layout

<TableLayout
        android:id="@+id/main_table"
        android:layout_weight="1"
        android:layout_height="wrap_content"
        android:layout_width="match_parent"
        android:layout_marginTop="0.0dp"
        android:scrollbars="vertical" />


Csharp Code For XML Parsing MONO ANDROID

namespace AndroidApplication5
{
    [Activity(Label = "AndroidApplication5", MainLauncher = true, Icon = "@drawable/icon")]
    public class Activity1 : Activity
    {
        int count = 1;

        protected override void OnCreate(Bundle bundle)
        {
            base.OnCreate(bundle);
            SetContentView(Resource.Layout.Main);

            XmlDocument doc = new XmlDocument();
            doc.LoadXml("<Product>    <ID>1</ID>    <SeqNo>1</SeqNo>    <Stage>Stage</Stage> <Observation>Observation</Observation><CHK></CHK> </Product>");
   
            XmlNode node = doc.DocumentElement.SelectSingleNode("/Product/ID");
            XmlNode node1 = doc.DocumentElement.SelectSingleNode("/Product/SeqNo");
            XmlNode node2 = doc.DocumentElement.SelectSingleNode("/Product/Stage");
            XmlNode node3 = doc.DocumentElement.SelectSingleNode("/Product/Observation");
            XmlNode node4 = doc.DocumentElement.SelectSingleNode("/Product/CHK");

            TableLayout ll = FindViewById<TableLayout>(Resource.Id.main_table);
         
     
            for (int i = 0; i < 10; i++)
            {
                TableRow row = new TableRow(this);
                TableRow.LayoutParams lp = new TableRow.LayoutParams(TableRow.LayoutParams.FillParent);
             
                row.LayoutParameters = lp;
                row.SetGravity(GravityFlags.CenterHorizontal);
             
            TextView checkBox = new TextView(this);
             TextView   tv = new TextView(this);
             TextView addBtn = new TextView(this);
             TextView rcf = new TextView(this);
             CheckBox verified = new CheckBox(this);
             TextView ver = new TextView(this);
             TextView    qty = new TextView(this);
             
                if (i == 1)
                {
                    checkBox.Text = node.Name.ToUpper().ToString();
                    checkBox.SetBackgroundColor(Color.AliceBlue);
                    checkBox.SetTextColor(Color.Black);
                    checkBox.SetPadding(7,9,7,9);

                    qty.Text = node1.Name.ToUpper().ToString();
                    qty.SetBackgroundColor(Color.AliceBlue);
                    qty.SetTextColor(Color.Black);
                    qty.SetPadding(7, 9, 9, 9);

                    tv.Text = node2.Name.ToUpper() .ToString();
                    tv.SetBackgroundColor(Color.AliceBlue);
                    tv.SetTextColor(Color.Black);
                    tv.SetPadding(7, 9, 9, 9);

                    addBtn.Text = node3.Name.ToUpper().ToString();
                    addBtn.SetBackgroundColor(Color.AliceBlue);
                    addBtn.SetTextColor(Color.Black);
                    addBtn.SetPadding(9, 9, 9, 9);

                    ver.Text = node4.Name.ToUpper().ToString();
                    ver.SetBackgroundColor(Color.AliceBlue);
                    ver.SetTextColor(Color.Black);
                    ver.SetPadding(9, 9, 9, 9);
                 
                }
                else if (i == 0)
                {
                    checkBox.Text = "Inspection";
                    checkBox.SetBackgroundColor(Color.AliceBlue);
                    checkBox.SetTextColor(Color.Black);
                    checkBox.SetPadding(9, 9, 9, 9);

                    qty.Text = "Details";
                    qty.SetBackgroundColor(Color.AliceBlue);
                    qty.SetTextColor(Color.Black);
                    qty.SetPadding(9, 9, 9, 9);

                    tv.Text = "Rail";
                    tv.SetBackgroundColor(Color.AliceBlue);
                    tv.SetTextColor(Color.Black);
                    tv.SetPadding(9, 9, 7, 9);

                    addBtn.Text = "Coach";
                    addBtn.SetBackgroundColor(Color.AliceBlue);
                    addBtn.SetTextColor(Color.Black);
                    addBtn.SetPadding(7, 9, 9, 9);

                    ver.Text = "";
                    ver.SetBackgroundColor(Color.AliceBlue);
                    ver.SetTextColor(Color.Black);
                    ver.SetPadding(9, 9, 9, 9);
                }
                else
                {
                    checkBox.Text = (i-1).ToString();
                    checkBox.SetBackgroundColor(Color.Black);
                    checkBox.SetTextColor(Color.White);
                    checkBox.SetPadding(7,9,9,9);

                    qty.Text = (i - 1).ToString();
                    qty.SetBackgroundColor(Color.Black);
                    qty.SetTextColor(Color.White);
                    qty.SetPadding(7,9,9,9);

                    tv.Text = node2.InnerText+(i-1).ToString ();
                    tv.SetBackgroundColor(Color.Black);
                    tv.SetTextColor(Color.White);
                    tv.SetPadding(9, 9, 9, 9);

                    addBtn.Text = node3.InnerText + (i-1).ToString();
                    addBtn.SetBackgroundColor(Color.Black);
                    addBtn.SetTextColor(Color.White);
                    addBtn.SetPadding(9, 9, 9, 9);
                    verified.Checked = true;
                }

                checkBox.Gravity = GravityFlags.CenterHorizontal;
                tv.Gravity = GravityFlags.CenterHorizontal;
                qty.Gravity = GravityFlags.CenterHorizontal;
                addBtn.Gravity = GravityFlags.CenterHorizontal;

                row.AddView(checkBox);
                row.AddView(qty);
                row.AddView(tv);
                row.AddView(addBtn);

                if (i == 1)
                {
                    row.AddView(ver);
                }
                else if(i>1)
                {
                    row.AddView(verified);

                }
                ll.AddView(row, i);
            }
   
   }
            }
    }

CsharpCode Explanation For XML Parsing MONO ANDROID

step1 

we start with main login of xml parsing that we are covering in our this tutorial here we have first include System.Xml namespace at top of our code document then we have used a XmlDocument class by making an instance of that class then we have passed the static Xml data to instance of XmlDocument by using LoadXml class that receives the xml data . you can see code below :-

 XmlDocument doc = new XmlDocument();
            doc.LoadXml("<Product>    <ID>1</ID>    <SeqNo>1</SeqNo>    <Stage>Stage</Stage> <Observation>Observation</Observation><CHK></CHK> </Product>");

Step 2

After passing the xml data now we are going to filter the xml data with respect to nodes of xml In our xml data Product is Parent node and it contains other child node like ID,SeqNo ..........
As we have loaded the xml data in doc we have used doc.Documentelement.SelectSingleNode that will select the single node of 'ID' that is child of Parent node 'Product'
You can see the code below :-

            XmlNode node = doc.DocumentElement.SelectSingleNode("/Product/ID");
            XmlNode node1 = doc.DocumentElement.SelectSingleNode("/Product/SeqNo");
            XmlNode node2 = doc.DocumentElement.SelectSingleNode("/Product/Stage");
            XmlNode node3 = doc.DocumentElement.SelectSingleNode("/Product/Observation");
            XmlNode node4 = doc.DocumentElement.SelectSingleNode("/Product/CHK");

step 3

With these lines of code below we are select the table layout that we have added in our xml code in layout file . You can see the code below :-

            TableLayout ll = FindViewById<TableLayout>(Resource.Id.main_table);

Step 4

This is main logic of code where we are reading xml data and then adding dynamic rows to table layout

 for (int i = 0; i < 10; i++)    // starting loop form 0 -9 to display 10 rows in table dynamically
            {
//creating a new tablerow
                TableRow row = new TableRow(this);    

//Setting tablerow hight , width parameters
                TableRow.LayoutParams lp = new   TableRow.LayoutParams(TableRow.LayoutParams.FillParent);
             
assigning the layoutparameters to row
                row.LayoutParameters = lp;

//setting row to alignment to center horizontal
                row.SetGravity(GravityFlags.CenterHorizontal);
             
//Adding some required TextView
            TextView checkBox = new TextView(this);
             TextView   tv = new TextView(this);
             TextView addBtn = new TextView(this);
             TextView rcf = new TextView(this);
             CheckBox verified = new CheckBox(this);
             TextView ver = new TextView(this);
             TextView    qty = new TextView(this);
             
                if (i == 1)        // this is for second row of table to display column names not values
                {
                    checkBox.Text = node.Name.ToUpper().ToString();
                    checkBox.SetBackgroundColor(Color.AliceBlue);
                    checkBox.SetTextColor(Color.Black);
                    checkBox.SetPadding(7,9,7,9);

                    qty.Text = node1.Name.ToUpper().ToString();
                    qty.SetBackgroundColor(Color.AliceBlue);
                    qty.SetTextColor(Color.Black);
                    qty.SetPadding(7, 9, 9, 9);

                    tv.Text = node2.Name.ToUpper() .ToString();
                    tv.SetBackgroundColor(Color.AliceBlue);
                    tv.SetTextColor(Color.Black);
                    tv.SetPadding(7, 9, 9, 9);

                    addBtn.Text = node3.Name.ToUpper().ToString();
                    addBtn.SetBackgroundColor(Color.AliceBlue);
                    addBtn.SetTextColor(Color.Black);
                    addBtn.SetPadding(9, 9, 9, 9);

                    ver.Text = node4.Name.ToUpper().ToString();
                    ver.SetBackgroundColor(Color.AliceBlue);
                    ver.SetTextColor(Color.Black);
                    ver.SetPadding(9, 9, 9, 9);
                 
                }
                else if (i == 0)      //this is for first row to display Heading
                {
                    checkBox.Text = "Inspection";
                    checkBox.SetBackgroundColor(Color.AliceBlue);
                    checkBox.SetTextColor(Color.Black);
                    checkBox.SetPadding(9, 9, 9, 9);

                    qty.Text = "Details";
                    qty.SetBackgroundColor(Color.AliceBlue);
                    qty.SetTextColor(Color.Black);
                    qty.SetPadding(9, 9, 9, 9);

                    tv.Text = "Rail";
                    tv.SetBackgroundColor(Color.AliceBlue);
                    tv.SetTextColor(Color.Black);
                    tv.SetPadding(9, 9, 7, 9);

                    addBtn.Text = "Coach";
                    addBtn.SetBackgroundColor(Color.AliceBlue);
                    addBtn.SetTextColor(Color.Black);
                    addBtn.SetPadding(7, 9, 9, 9);

                    ver.Text = "";
                    ver.SetBackgroundColor(Color.AliceBlue);
                    ver.SetTextColor(Color.Black);
                    ver.SetPadding(9, 9, 9, 9);
                }
//else is used for all other rows to be added dynamically except 0,1 row
                else
                {
                    checkBox.Text = (i-1).ToString();
                    checkBox.SetBackgroundColor(Color.Black);
                    checkBox.SetTextColor(Color.White);
                    checkBox.SetPadding(7,9,9,9);

                    qty.Text = (i - 1).ToString();
                    qty.SetBackgroundColor(Color.Black);
                    qty.SetTextColor(Color.White);
                    qty.SetPadding(7,9,9,9);

                    tv.Text = node2.InnerText+(i-1).ToString ();
                    tv.SetBackgroundColor(Color.Black);
                    tv.SetTextColor(Color.White);
                    tv.SetPadding(9, 9, 9, 9);

                    addBtn.Text = node3.InnerText + (i-1).ToString();
                    addBtn.SetBackgroundColor(Color.Black);
                    addBtn.SetTextColor(Color.White);
                    addBtn.SetPadding(9, 9, 9, 9);
                    verified.Checked = true;
                }

                checkBox.Gravity = GravityFlags.CenterHorizontal;
                tv.Gravity = GravityFlags.CenterHorizontal;
                qty.Gravity = GravityFlags.CenterHorizontal;
                addBtn.Gravity = GravityFlags.CenterHorizontal;

                row.AddView(checkBox);
                row.AddView(qty);
                row.AddView(tv);
                row.AddView(addBtn);

                if (i == 1)
                {
                    row.AddView(ver);
                }
                else if(i>1)
                {
                    row.AddView(verified);

                }
                ll.AddView(row, i);
            }
Thursday, 24 July 2014

Install MonoAndroid Tools in Visual Studio 2012

Mono came as a Revolution in the IT Market for CSharp Application Development . Csharp was introduced by Microsoft and it was mainly used in Visual Studio IDE by Microsoft . As Csharp all came with .Net Framework and .Net Framework . So nothing works Cross-Platform neither in linux nor in OSx . So Then Came the Another remarkable solution to this problem That called "MONO"  . Mono introduced with several thing that can be used with .net framework .

One of these was Mono Android Tools . These Tools allows the Csharp Developers to develop Android Applications using Csharp Code . They can choose Any IDE Either it could be Microsoft Visual Studio or Monodevelop . This has Increased the popularity of .NET Technology in the Market and It asked the Developers to think more n more about .NET Technology As With Mono .Net Technology Can Be used in Any Platform Availailble It can be used in Microsoft Windows , Linux operating Systems like -Ubuntu and also it can be used in OSx . And it can also be used in Mobile Applications Development like for Developing Android Applications , Windows Phone Applications and IOS Applications .

Now We are going to install Mono Android in Visual Studio 2012 ( comment for any help below)

System Requirements 

Operating Systems
Windows XP (32-bit), Vista (32- or 64-bit), or Windows 7 (32- or 64-bit)

Development tools
JDK 6 (JRE alone is not sufficient)

 Steps For Mono Android Installation

1. First Install Java Jdk ( Java development Kit )
2. Then Install Java Sdk ( software development Kit )
3. Install Microsoft Visual Studio ( If Visual Studio is previously installed then skip this step )
4. Install Mono Android Setup file To integrate it in Visual Studio
5. Place , Configure SDK and Create AVD ( emulator ) .
6. Configuring Visual Studio  For Android Use

Step 1 -- Install Java Jdk 

Java Development Kit contains set of tools that allows to run the java Development tools on the particular platform with jdk we cannot do java development and Android development on that particular machine .
In Order To install android Java jdk Go to link below and you can find different versions of java jdk availaible there I am installing jdk-6u31 from link below 

Download Android Jdk -- geeksprogrammings

Step 2 -- Install Java Sdk 

For Installation of Java SDK we must ensure that java Jdk is installed properly else Android SDK Will not install .

Java SDK provide the Set of tools that allows the software development using java To Download Java SDK you can follow the link on oracle website :-

Download Android SDK --geeksprogrammings
Go to link accept the license and Click on Download

After Download Android Sdk Zip file Now Extract that file and place the extracted folder in somewhere like :- c:\android-sdk

Step 3 -- Intall Microsoft Visual Studio  ( skip this step if you have already installed visual studio )


Download Visual Studio 2012 -- geeksprogrammings

After Downloading Visual studio you can a similar intallation procedure here :-

How To install Visual Studio


Step 4 :- Now We are going to install Mono Tools for Mono Android to integrate with Visual Studio 

Download the following file to mono android integration in visual studio 2012

Download mono-android-4.4.54.208556545

After Downloading it Install the msi file .After its Installation now you mono android is intall and your Visual Studio is ready for creating Mono Android or Android Applications


Step 5 :- Place , Configure SDK and Create AVD ( emulator ) .


Now Everything is installed now the game of configuration starts . First We remember that we have placed the android-sdk folder in C:\android-sdk


  1. So open Android Sdk folder you can see SDK Manager there Double click on it


  2. It will open Android SDK Manager it will show all Android Version with their respective API versions and you can see none of it will be installed by default you have to install it
  3. So I have installed Android 4.4 ( API 19 ) or you can also install Android 4.0 ( API 14 ) To install it just click on Check box at begin of it and then click on Install packages verify all other checkbox except these are unchecked .

  4. It may take more time according to your internet connection 
  5. After installation completes Click on Tools menu at top bar of SDK Manager

  6. Click on Manage AVD
  7. Then create an AVD like i have shown below :-

Then after creating AVD  select that AVD and click start button Then you can see AVD emulator that will appear on screen .


STEP 6 -- Configure Visual Studio For Android Application Development 


In Visual Studio We just need to configure one thing that is we have to configure proper path for android SDK Here is simple steps to configure or write proper sdk path .

Steps To configure Android SDK location :-

1. Open Visual Studio 2012
2. Click on Tools Menu 
3. Then click on Options
4. Then Options window appear if your Android SDK Location is not filled or not correct click on change button
5. Then click on browse button and choose android sdk path like :- C:\android-sdk and click OK If your path will be correct then you will see image as below in image my android sdk folder path is (c:\Program Files\Android\android-sdk ) and  it can be according to your sdk path . like C:\android-sdk

6. Then click ok to close options window
7. Now click on New Project
8. Then click on Mono For Android Then you will see following Screen This means Everything is good and Installed Correctly


In Next Article I will give introduction to App Development using CSharp in mono Android 


Tuesday, 3 June 2014

create you first app in Monodevelop csharp


  1. After Successfull Installation of MonoDevelop We will start with making our first Hello World App in MonoDevelop . If you have not Installed MonoDevelop you can get Installation Guide here

    Installation Guide For MonoDevelop
  2. Start you M onoDevelop that you have installed already. It opens with following screen
      Gtk# version 2.12.9 or greater must be installed

  3. Now to create a simple app in MonoDevelop Click on File Menu --> Then click on Solution
    Gtk# version 2.12.9 or greater must be installed

  4. Then a window appears Click on Gtk# project and give Project a Name and click oK
    Gtk# version 2.12.9 or greater must be installed

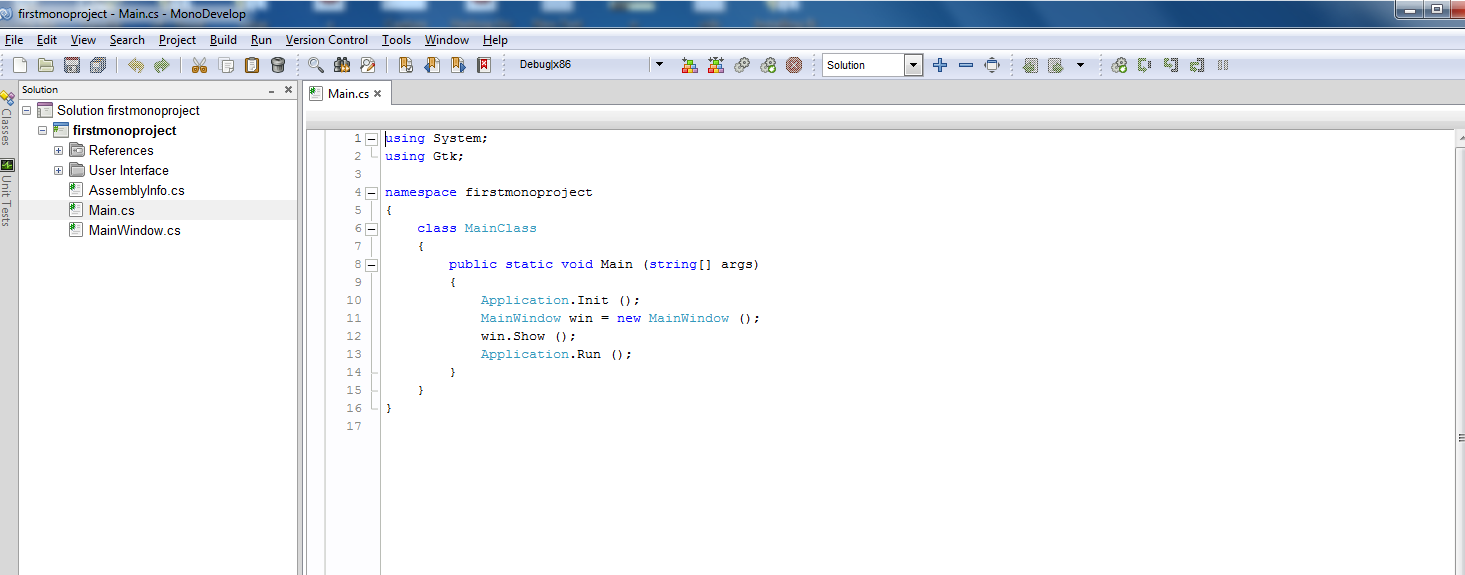
  5. Now your project open with a code window with Main.cs file as below
    Gtk# version 2.12.9 or greater must be installed

  6. Now right click on your proect in sidebar then click on Add and in Submenu click on New File
    Gtk# version 2.12.9 or greater must be installed

  7. Then click on Window give it a name and click ok
    Gtk# version 2.12.9 or greater must be installed

  8. You can see you have two views Designer and source view .Designer view will be used for Designing GUI for your application and source will be used for coding
    Gtk# version 2.12.9 or greater must be installed

  9. Now open new window file you have added and goto design view
  10. now from Toolbar in right sidebar Go to containers section and double click on Fixed Container to get it on your window
    Gtk# version 2.12.9 or greater must be installed

  11. Now take a button from Toolbar
    Gtk# version 2.12.9 or greater must be installed

  12. select the button Now click on properties window and click on Signals Tab
    Gtk# version 2.12.9 or greater must be installed

  13. Now click on Clicked property and give a valid name for click event function and Hit Enter
    Gtk# version 2.12.9 or greater must be installed

  14. Now first add reference to system.windows.forms Namespace for that Right click on project in sidebar and click on Edit Reference
    Gtk# version 2.12.9 or greater must be installed

  15. Search for system.windows.forms in search box and click check mark on check Box and click ok
    Gtk# version 2.12.9 or greater must be installed

  16. Now come to Souce view and you will see code like below

    protected void clickevent (object sender, EventArgs e)
    {
    throw new System.NotImplementedException ();
    }
  17. Remove " throw new System.NotImplementedException ();" line and Add line as below

    MessageBox.Show("Hello Welcome To Mono World");
  18. Now Save All your project change by pressing Ctrl + s
  19. Now Press F5 To Run your project and It will show output below
    Gtk# version 2.12.9 or greater must be installed