Monday 29 December 2014

Jan Creater of Whatsapp

From Welfare to WhatsApp

Jan ( co-founder whatsapp) , who turns 38 this year, was just a teenager when he emigrated to the U.S. from a small village outside Kiev, Ukraine. Life in rural Kiev, a city that is currently rife with political tension and mass protests, was not easy. Jan's home had no hot water, and his parents refused to use the phone, which was tapped by the government. Once in the U.S., he taught himself computer networking by reading manuals bought from a used bookstore.
In 1997, he met his future WhatsApp cofounder, Brian, who convinced Jan to join Yahoo! even though he was still in college. Jan became an infrastructure engineer at Yahoo! and dropped out of San Jose State University. The two still describe themselves as "two guys who spent combined 20 years doing geeky stuff at Yahoo! Inc. before starting WhatsApp Inc." on the company's About page.
The Forbes piece includes a photo of Jan signing the billion-dollar Facebook deal on the doors of his old welfare office in Mountain View, Calif.—a perfect full-circle summation of his rags-to-riches journey.

whatsapp


A Company With A Unique Vision


WhatsApp had a completely refreshing outlook on messaging between smartphones. Privacy was Jan's priority, first and foremost. The service has remained largely the same since 2009, with just a few more bells and whistles in its latest incarnation.
A user does not have to submit information like his or her name, gender, address, or age—just a phone number. No fancy username is required for WhatsApp; users log in with a 10-digit number. WhatsApp borrowed elements from instant messaging like status updates and "read" receipts (long before iMessage incorporated that feature).
Jan was interested in disrupting the way cell phone carriers nickeled-and-dimed customers for text messaging, which was especially useful for those looking to connect with loved ones overseas. The app quickly built a following in Europe and other international communities. By early 2011, WhatsApp was an App Store superstar, reaching the top 20, and has remained in the top 10 free apps ever since.

story of creater of whatsapp


REJECTED BY FACEBOOK
REJECTED BY TWITTER
CREATED WHATsAPP

Brian Acton ....A Person that is Vice President of Engineering At Yahoo . Left the job then Applied for Facebook Rejected there then started working on world's best messaging app


A FAILURE NOT A DEFEAT

This Amazing pic above tells you everything . The person in the pic is 'BRIAN ACTON' The Creater of WhatsApp ( The Best cross-platform Mobile Messaging App ) .

It is the destiny that a person that applied for job in Facebook is rejected in 2009 and The same person with his team and with an awesome Idea Sold WhatsApp To Facebook for jaw-dropping deal of $19 billion

It clearly states Intelligence can never be stopped . IF you can think then that's all that you need to have .......


So from the pic all is clerified . Yes two months before Rejection from Facebook , Brian Acton The Creater of WhatsApp was Rejected from Twitter . That means Failures and Failures don't mean Defeat .

But the app's success did not come at a small price. Founders Jan Koum and Brian Acton are no strangers to failure, and their incredible journey speaks volumes about the value of tenacity and vision. Today, Jan and Brian's app is now the most valuable messaging platform on the planet

Also Read -
whatsapp -- A Company With A Unique Vision

Jan - Creater of Whatsapp

Don't Forget to Subscribe and Share Us.

Thursday 25 December 2014

Microsoft HTTP/API port 80 is actually used


Microsoft HTTP/API 2.0 Using Port 80,
WAMP - Your port 80 is actually used , change port number in wamp


After Installation of Wamp you may suffer from an Error that says that Your Port 80 is actually used , change port number in wamp
I decided to sit and give a search on this error to finally find and share an optimal solution to this error . This error may come if you have already Installed IIS Server on your windows Computer .
you may see one of these Errors :

 "Microsoft HTTP/API 2.0" Using Port 80

 WAMP - Your port 80 is actually used 

Steps For Optimal Solution to this Error -


1.  Updating/configuring httpd.conf file
2.  Updating/configuring wampmanager.tpl file
3.  Updating/configuring testport.php file
4.  Updating/configuring testportForInstall.php file
5.  Checking http.exe Application

 Updating/configuring httpd.conf file

httpd.conf file is http configuration file for apache server . All apache configuration in wamp are stored in this file . This file contains the information regarding which port and server is to connect for making connection to Server .

As this error states the port 80 is already used so follow the steps below to change the port that apache is using currently

Steps For Change Apache Port Number In WAMP

  • Click on Wamp Icon on quick Launch Bar 
  • In popup Menu click on Apache and then in further menu click on httpd.conf
  • It will open httpd.conf file in your editor like you can use Notepad
  • Now Press Ctrl + f and find for lines given below :


#Listen 12.34.56.78:80
Listen 0.0.0.0:80
Listen [::0]:80

ServerName localhost:8080
  • Now Replace these lines with given below :

#Listen 12.34.56.78:8484
Listen 0.0.0.0:84
Listen [::0]:84

ServerName localhost:8484
  • Now it's done . Press Ctrl +s  to save all changes and close the httpd.conf file
  • Now again click on wamp icon in Quick Launch Bar and click On Restart All Services 

Updating/configuring wampmanager.tpl file

1. In order to find wampmanager.tpl file you need to go to following location .Like we have installed wamp in C drive then your wampmanager.tpl file location will be c:\wamp\wampmanager.tpl
2. Now open wampmanager.tpl file and press ctrl + f and find for 'testPort84' without quotes
3. Then replace -
testPort80 with atestPort84
4. Press ctrl + s to save changes and Close the File .

Updating/configuring testport.php file

Now we need to make changes to testport.php file . This file tests for whether the port 80 is available to install the apache service to that port . 

This file checks the socket port 80 for installation of apache service . use the simple steps below to configure testport.php file 

1. I will give you simple way to configure it Just open the file testport.php . File location will be available at C:\wamp\scripts\testport.php . Just open the file and replace all the test with text given below -

<?php
$fp = @fsockopen("127.0.0.1", 84, $errno, $errstr, 1);
   $out = "GET / HTTP/1.1\r\n";
   $out .= "Host: 127.0.0.1\r\n";
   $out .= "Connection: Close\r\n\r\n";
if ($fp)
{
    echo  'Your port 84 is actually used by :';
   fwrite($fp, $out);
   while (!feof($fp)) 
   {
        $line = fgets($fp, 128);
        if (ereg('Server: ',$line))
        {
           
            echo $line;
            $gotInfo = 1;
        }  
        }
    fclose($fp);
    if ($gotInfo != 1)
        echo 'Information not available (might be Skype).';
}
else
{
    echo 'Your port 84 is not actually used.';
}
echo 'Press Enter to exit...';
trim(fgets(STDIN));
?> 

 Updating/configuring testportForInstall.php file

Now we need to make changes to testportForInstall.php file . This file tests for whether the port 80 is available to install the apache service to that port . 

This file checks the socket port 80 for installation of apache service . use the simple steps below to configure testportForInstall.php file 

1. I will give you simple way to configure it Just open the file testport.php . File location will be available at C:\wamp\scripts\testportForInstall.php . Just open the file and replace all the test with text given below -

<?php
$fp = @fsockopen("127.0.0.1", 84, $errno, $errstr, 1);
   $out = "GET / HTTP/1.1\r\n";
   $out .= "Host: 127.0.0.1\r\n";
   $out .= "Connection: Close\r\n\r\n";
if ($fp)
{
           echo  'Your port 84 is actually used by :

';
   fwrite($fp, $out);
   while (!feof($fp)) 
   {
        $line = fgets($fp, 128);
        if (ereg('Server: ',$line))
        {
            echo $line;
            $gotInfo = 1;
        }
    
    }
    fclose($fp);
    if ($gotInfo != 1)
        echo 'Information not available (might be Skype).';
    echo '
Cannot install the Apache service, please stop this application and try again.

Press Enter to exit...';
trim(fgets(STDIN));
}
else
{
    echo 'Your port 84 is available, Install will proceed.';
    echo '

Press Enter to continue...';
    trim(fgets(STDIN));
}
?> 

Checking http.exe Application

you can find httpd.exe file at location - C:\wamp\bin\apache\apache2.4.9\bin\httpd.exe , if C is installed at C drive .

Double click on file it will open for a slight small amout of time and show you any error in first line if exist otherwise everything will be fine . If error exist then try to ensure you have done previous steps completely . As these are the final possible steps that may solve this problem


Tuesday 23 December 2014

Pass Data between Activity in Android


Hello Friends ,

Today I got one message from a person to tell him how to pass data between android activities So, I am going to give a simple way for how we can transfer data or how we can pass data across activities in android . In android we use activity for  each layout code .

I am using Mono Android for this article but that will similar functions in Dalvik android that is used with java based android applications .

Here are simple Steps How to Pass data between Activities in Android Using Csharp -

  1. Open Visual Studio . Click on File --> New Project -->
  2. Now choose Mono For Android and click on Android Application . Now Simple Android application will be created
  3. This project will create a single activity named MainActivity (MainActivity.cs), which contains a button.
  4. Add a second New activity class named Activity2 to the project. by right click on Solution Name and click on New then click on Android Activity leave the name as default and click on Ok  This class must inherit from Android.App.Activity .
  5. right click on layout folder inside Resource folder then click new and choose Android Layout give it a name and leave as default and click ok .
  6. In the button.Click handler in MainActivity.cs , create an intent for Activity2 , and add data to the intent by calling PutExtra and this data given in Put Extra will be transfered to Activity2 . Add the Code Below for that :-
 button.Click += delegate {
               // button.Text = string.Format("{0} clicks!", count++);
                var activity2 = new Intent(this, typeof(Activity2));
                activity2.PutExtra("MyData", "Data from Activity1");
                StartActivity(activity2);
            };
      
      7. Now Open you layout.xm file in Resource --> layout folder ( layout folder under resource folder ) . Add code below to it for Adding button under <linearlayout> tag :-

        <Button
        android:id="@+id/MyButton"
        android:layout_width="fill_parent"
        android:layout_height="wrap_content"
        android:text="@string/Hello" />    string text = Intent.GetStringExtra

    8. Now add code below to Newly added Activity - activity2.cs under Activiy.Oncreate Method :-
            ("MyData") ?? "Data not available";
            string text1 = Intent.GetStringExtra("MyData");
            Button button = FindViewById<Button>(Resource.Id.MyButton);
            button.Text = text;

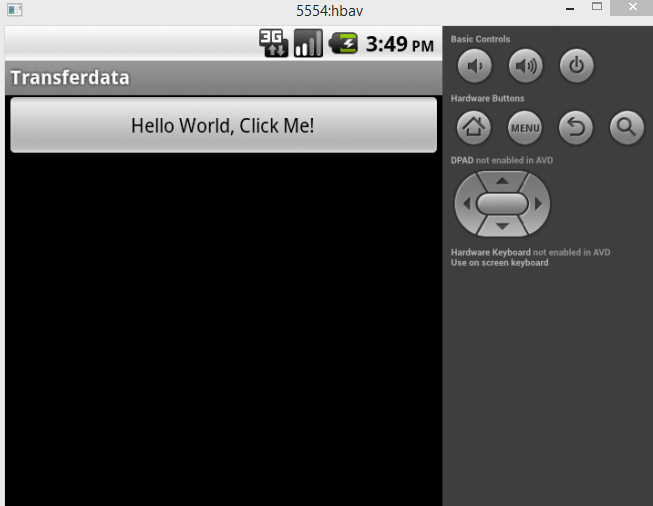
       9. Now Run the app by pressing F5 and see the output in emulator as below -
Pass Data between Activity in android 
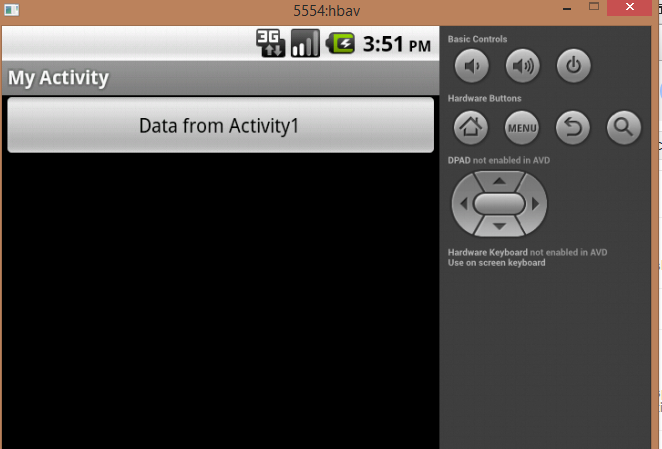
10. Now click on button saying "Hello World,Click Me!" Now you will see New Avtivity Activity2 as below that contain the text that we have passed from activity Activity1

Pass Data between Activity in android