Showing posts sorted by date for query asp.net. Sort by relevance Show all posts

Friday 1 May 2015

Using Report Viewer with Dataset Asp.net Csharp and vb


For Using Report Viewer in Asp.net or Desktop Application using Csharp or Visual basic I am today providing a simple step by step solution -

Demo File is also available to Download so that you can have a demo for how to use or Use Reports With Dataset in Asp.net . I have provided Both Csharp and Vb code

Step 1 - First of Start a C# Project or Vb Project and then Add an Empty Webform to it .


Step 2 :- Now Right Click on Solution in Solution Explorer and Click on Add then click on New Item . Then Click On DataSet and Give a Name and Click Ok . This will add a Dataset in your Project . I will recommend it give dataset a name similar to database table whose data you want to show in Report Viewer

Using Report Viewer with Dataset Asp.net Csharp and vb , Using Reporting in asp .net dotnet


Step 3 :- Now After Dataset is added Right Click on Dataset Page and Click on Add then click on DataTable It will add a DataTable

Using Report Viewer with Dataset Asp.net Csharp and vb , Using Reporting in asp .net dotnet


Step 4:- Now Add Columns to DataTable and Must Ensure that the name of these DataTable column must be same to Names of Columns in Database that Corresponds to this DataTable

Using Report Viewer with Dataset Asp.net Csharp and vb , Using Reporting in asp .net dotnet

Step 5 :- Now Again Right click on solution in Solution Explorer and Click on Add then click on New and then click on Report give it a name and click on ok . This will add a Report to your Project

Using Report Viewer with Dataset Asp.net Csharp and vb , Using Reporting in asp .net dotnet

Step 6 :- Now From You Controls Toolbox in Visual Studio . Place a Report Viewer Control on your WebPage as shown in image below


Using Report Viewer with Dataset Asp.net Csharp and vb , Using Reporting in asp .net dotnet


 Step 7 :- Now Open your Recently Added Report file you will see it same as shown below


Using Report Viewer with Dataset Asp.net Csharp and vb , Using Reporting in asp .net dotnet


Step 8 :- Now we need to Add the Previously added dataset or need to link the dataset we added in previous steps to the report file

Step 9 :- So for that linking Right Click on Dataaset folder in sidebar of Report Then Click on Add Dataset then you will see the following screen

Step 10 :- Now select the Added Dataset from Combox for DataSource and then after that Choose the DataTable from Next Last Combobox
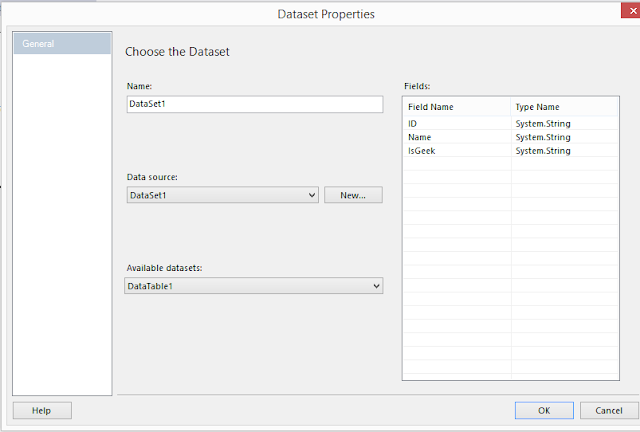

Using Report Viewer with Dataset Asp.net Csharp and vb , Using Reporting in asp .net dotnet

Step 11  :- Now Dataset Fields will be added Under Dataset folder in Left Sidebar of Report . Now you can Drag drop fields from Left Sidebar and also Place the Textbox for Labelling like I have added for ID,Name and heading etc


Using Report Viewer with Dataset Asp.net Csharp and vb , Using Reporting in asp .net dotnet

Step 13:-  Now we need to Add the Code so Open Cshar Code side of Webpage where you have added the Report viewer control And Add the following code according to your choose language c# or vb

Now At Page_Load Event of your WebPage Add the Following Code According to C# or VB


Imports System.Data
Imports System.Data.SqlClient
Imports Microsoft.Reporting.WebForms

        'VB CODE
        ReportViewer1.ProcessingMode = Microsoft.Reporting.WebForms.ProcessingMode.Local
        ReportViewer1.LocalReport.ReportPath = Server.MapPath("~/Report.rdlc")

        Dim dsUsersInfo As New DataSet1
        Dim con As New SqlConnection("Your Connection String")
        Dim cmd As New SqlCommand("select * from YourTableName", con)
        Dim da As New SqlDataAdapter()
        da.SelectCommand = cmd

        'DataTable1 is the DataTable we have created in Dataset1 that contains our columns
        da.Fill(dsUsersInfo, "DataTable1")


        Dim datasource As New ReportDataSource("DataSet1", dsUsersInfo)
        ReportViewer1.LocalReport.DataSources.Clear()
        ReportViewer1.LocalReport.DataSources.Add(datasource)


        'CSharp Code
        'ReportViewer1.ProcessingMode = Microsoft.Reporting.WebForms.ProcessingMode.Local
        'ReportViewer1.LocalReport.ReportPath = Server.MapPath("~/Report.rdlc")

        ' DataSet1 dsUsersInfo = new DataSet1();

        '        SqlConnection con = new SqlConnection("Your Connection String"));

        '            con.Open();
        '            SqlCommand cmd1 = new SqlCommand("select * from TableName", con);

        '            SqlDataAdapter da = new SqlDataAdapter(cmd1);
        '            da.Fill(dsUsersInfo, "DataTable1");
        '            con.Close();

        '        ReportDataSource datasource = new ReportDataSource("DataSet1", dsUsersInfo.Tables[0]);

        'ReportViewer1.LocalReport.DataSources.Clear()
        'ReportViewer1.LocalReport.DataSources.Add(datasource)


Step 12 :- Now when you run the Page where you have added the Report viewer control It will show the Report with data from database


Tuesday 28 April 2015

ASP.NET MVC Action Return View Not Changing URL

The return View(.......) in Action of Controller is the statement that we use to return the view View for a Particular Controller Request . But Return view will return the view exactly you want and render the view but it will not change or target the user to target url  . The simple solution is below -


Code For an Action -

[HttpPost]
public ActionResult Start(SomeViewModel someViewModel)
{
  ...
  return RedirectToAction("SomeOtherAction");

              
                             or


  return RedirectToAction("Action Name", "Controller Name");
}

So , In code above We are using RedirectToAction instead of using  return view this can be used in total of 6 variants .

I have give 2 of simple one . In Parameter to these actions you need to pass the controller and action name according to variant you choose


Sunday 25 January 2015

Why we should use AngularJS

What is AngularJS

Why Its Called AngularJS

Why To Use AngularJS

When To Use AngularJS

So , Today i started to explore the top-most question that always stuck our mind when we start with new technology . Like i already know my stuff then when i started with angular these above are basic questions that stuck my mind that what is angularjs and why i should use it and when  .

Today briefly I am going to give answers to these questions -

What is AngularJS ?

AngularJS is a javascript framework developed by Google's Employees . What so special about angularjs is it is client side . what all you need is Javascript and any programming language of your own choice to start with AngularJS that makes angular best . Like in my case I am Asp.net C# developer so I use my all logic like database connectivity in c# and all bindings are done by Angularjs and Let me tell you it is so fast in case of Searching and other type of operations required in Applications developement this is because everything in here is through javascript which is client side It has all inbuilt functions for different type of work that make it suitable for web development .

Why Its Called AngularJS ?

Now foremost question is why its called AngularJS this is because its main Namespace is ng and that sounds like Angular and JS is used with it that's why its called AngularJS .

Why To Use AngularJS

5 Main Points Why we should use AngularJS -

  1. Angular Provides Data-Binding:- binding is the coolest concept in AngularJS. It's a fascinating real-time concept. Just like desktop application, mobile apps user also wishes to witness swift changes in the UI. So AngularJS’ two-way data binding handles the synchronization between the DOM and the model, and vice versa. As a result, the UI changes based on other input components are very much smooth without any extra effort on the part of the developer
  2. Angular Enables Single Page Apps :- Single Page Applications are becoming more popular for a good reason. They fill a very specific need. More functionality is being moved to the web, and the browser is finally realizing its potential as a distributed computing node. By design, SPA applications are far more responsive (even though some of that is perception). They can provide an experience that feels almost like a native app in the web. By rendering on the client they cut down load on the server as well as reduce network traffic – instead of sending a full page of markup, you can send a payload of data and turn it into markup at the client. Of course, Angular doesn't force you into building a SPA app, it only provides plenty of built-in support
  3.  Angular Provides Dependency Injection :- AngularJS has a built-in dependency injection subsystem useful for developers as it makes application development easier including testing. Dependency Injection (DI) allows users to ask for dependencies, rather than having to go and look for them or make them on their own .

    for example, “Hey I need X’, and the DI is responsible for creating and providing it for you. If user wants to gain access to core AngularJS services, all they need to do is add service as a parameter. AngularJS will detect that users need that service and will provide it instantly.
  4.  AngularJS Directives :- Directives can create custom HTML tags that serve as new and custom widgets.Directives achieve this by allowing users to invent their own HTML elements. Putting DOM manipulation code into the directives makes it easy for the users to separate them out of MVC app and leaves MVC to update the view with new data, but how the view will behave is certainly up to directives
  5. AngularJS requires less coding :- The data-binding feature allows developers to stop providing data manually into the view. Filters allow you to manipulate the data on the view level without changing your controllers. As a result, developers need to write very little code to achieve the task, which is a great deal for the developers

     When To Use AngularJS ?

    AngularJS is a very good SPA framework. If we want to create a SPA application, then AngularJS is a good option for it.“SPA” refers to Single Page Application. A Single Page Application is one in which we have a shell page and we can load multiple views into that. So a traditional app, as you know you typically blink and load everything again.
    It’s not very efficient on the bandwidth, especially in the mobile world. In a SPA, we can load the initial content upfront and then the different views or the small kind of mini web pages can be loaded on the fly and embedded into the shell.


Wednesday 7 January 2015

Uncaught TypeError-undefined is not a function


Uncaught TypeError: undefined is not a functionUncaught TypeError: undefined is not a function in datepicker


This error takes my 2 hours today I was developing an asp.net application and I never gone through this error before First time i got this error and it shuffles me for two big hours

You will get number of solutions over forums
But sorry to say all these are workaround to get rid-off that error
very less tried to explain why this error came and what is meaning of this error .

Today after spending my 2 hours on this simple error i decided to write something about solution to this error

CAUSE OF ERROR :Uncaught TypeError: undefined is not a function


This error clearly means this is some function that is undefined in the class from which we are accessing it

Like in my case this error was coming at this line :-

$( "#datepicker" ).datepicker();
or
jquery( "#datepicker" ).datepicker();

The main reason behind this error is Jquery Multiple versions calling . If you are using jquery and you have refrenced multiple versions of jquery like Jquery1.10.2 and Jquery 2.0.1 in same file then mostly this error will come at runtime at that page .

The reason behind why it says Undefined TypeError because when multiple versions of jquery are called on same page then we are having two jquery script running and they are like -

1.  Jquery1_10_2
2.  Jquery2_0_1

and we are using only jquery or a '$' dollar symbol there and when browser is unable to find Jquery there then how can it find datepicker function or any other function that you are using at that time . This is main cause of error

Solution of Error : 

Uncaught TypeError: undefined is not a function

So let's talk about solutions to this error . I tried my best at 1:00 AM at Night to find solution to this error and then share it with my blog readers

Now we need to tell browser that we need to use specific version of juery only if we are using multiple versions of jquery on same page

Otherwise simple solution would be to remove the second refrenced version of jquery if possible

so in order to tell broser that we are using specific version of jquery we need to make some changes to our code

Like in my case i am using following code to put jquery datepicker on my website and i am using
jquery1_11_0 version of jquery
So here is my code i have replaced '$' or jquery with jquery1_11_0 and that's it the problem is solved

CODE -
<script src="//ajax.googleapis.com/ajax/libs/jquery/1.11.0/jquery.min.js"></script>
<link rel="stylesheet" href="//ajax.googleapis.com/ajax/libs/jqueryui/1.10.4/themes/smoothness/jquery-ui.css" />
<script src="//ajax.googleapis.com/ajax/libs/jqueryui/1.10.4/jquery-ui.min.js"></script>

<script type="text/javascript">
    var jQuery_1_11_0 = $.noConflict(true);
    jQuery_1_11_0(document).ready(function () {
        jQuery_1_11_0('#datepicker').datepicker();

    })
</script>

Friday 2 January 2015

Nopcommerce Developer Guide


Internship - Day 1


Today was first day of my internship Period of 6 months . I am very happy to start my internship with Abax Technologies . Abax technologies is a recognized IT company Situated in Noida . It deals with Desktop , web and Mobile application development and providing solutions to market .

Mr. Rohit Jain is CEO of Company and I am doing Internship under their guidance .

Now came to work -- On 2nd January - 8:23 am Rohit Sir posted my first task on skype . My first task was first to learn more about Nopcommerce , Its Architecture , Plugin development , Module Development , Theme development and widget development .

First i need to download the source code for Nopcommerce form Nopcommerce office webiste then using that source code to compile it , set up its database then run a demo site in nopcommerce .

After setup the demo site for nopcommerce it started exploring its source code architecture and learn more about it from its developer's documentation

I have previously done a ecommerce website in Nopcommerce but at that time i used Nopcommerce 1.9 version that was asp.net version of nopcommerce Now i am going to use Nopcommerce 3.2 and this version is really cool . It is MVC version of nopcommerce using Linq queries instead of using sql and using Razor view engines and more flexibility . Actually I liked this version .

Important Links that i have studied and explored today -

Link for Nopcommerce Developer's Documentation
Nopcommerce Developer Documentation


Nopcommerce uses code first approach for each and every development component in nopcommerce so i decided to first give a look at code first approach to revise my concepts about codefirst approach

Code First Approach Documentation MVC


After Reading about code first approach of Nopcommerce I reached a Nerd Dinner app that is MVC app that uses code first approch for MVC application development
Nerd Dinner MVC App with Code First Approach

So that was it for the day i learned number of things today

Today I have explored following Modules -


1. Nopcommerce Installation v3.20 (mvc)
2. Explored Nopcommerce Developers Documentation
3. Exploring Nopcommerce Architecture
4. Explored Nopcommerce Theme CUstomization and Creating Own Theme
5. Exploring Plugin Development Documentation
     -- Created simple hello world Plugin

Next I will explore create plugins with database access and various nopcommerce inbuilt modules

Tuesday 11 November 2014

Benefits of Html Helpers in Asp.Net MVC

So today i am going to give an overview on Html helpers in Asp.Net MVC . So first questions that stuck our mind are -

 What are Html helpers ?
 Why to use them instead of using simple Html coded controls
 What are their benefits in Asp.Net MVC

Html helpers are very much similar to Asp.Net web controls . But Html helpers are much more lightweight as compared to Asp.net Web forms Server controls . The similarity between server controls in Asp.net webforms and Html helpers in Asp.Net MVC are Viewstate . Means they both contain the ability to hold or update the data on postbacks using ViewStates for each controls .

Main  Benefits Of using Html Helpers in Asp.net MVC

  • MVC Html Helpers contains Overloaded Methods like IPostBackDataHandler that Pre-populate the values of html helpers means it works similar to as viewstates
  • Html Helpers is also having one more advantage It provide inbuilt Validation for html helpers textboxes 
Available HTML Helpers 

There following HTML helpers can be used to render (modify and output) HTML form elements:

  1. BeginForm()
  2. EndForm()
  3. TextArea()
  4. TextBox()
  5. CheckBox()
  6. RadioButton()
  7. ListBox()
  8. DropDownList()
  9. Hidden()
  10. Password()

Sample Code To Demonstrate Use of Html Helpers


ASPX CODE

<%= Html.ValidationSummary("Create was unsuccessful. Please correct the errors and try again.") %>
<% using (Html.BeginForm()){%>
<p>
<label for="FullName">FullName</label>
<%= Html.TextBox("FullName") %>
<%= Html.ValidationMessage("FullName", "*") %>
</p>
<p>
<label for="Username">Username</label>
<%= Html.TextBox("Username") %>
<%= Html.ValidationMessage("Username", "*") %>
</p>
<p>
<label for="Password">Password:</label>
<%= Html.Password("Password") %>
<%= Html.ValidationMessage("Password", "*") %>
</p>
<p>
<label for="Password">Confirm Password:</label>
<%= Html.Password("ConfirmPassword") %>
<%= Html.ValidationMessage("ConfirmPassword", "*") %>
</p>
<p>
<%= Html.CheckBox("ReceiveNewsletter") %>
<label for="ReceiveNewsletter" style="display:inline">Receive Newsletter?</label>
</p>
<p>
<input type="submit" value="Register" />
</p>
<%}%>

RAZOR CODE

@Html.ValidationSummary("Create was unsuccessful. Please correct the errors and try again.")
@using (Html.BeginForm()){ 
<p>
<label for="FullName">FullName</label>
@Html.TextBox("FullName")  
@Html.ValidationMessage("FullName", "*")  
</p>
<p>
<label for="Username">Username</label>
@Html.TextBox("Username")  
@Html.ValidationMessage("Username", "*")  
</p>
<p>
<label for="Password">Password:</label>
@Html.Password("Password")  
@Html.ValidationMessage("Password", "*")  
</p>
<p>
<label for="Password">Confirm Password:</label>
@Html.Password("ConfirmPassword")  
@Html.ValidationMessage("ConfirmPassword", "*")  
</p>
<p>
@Html.CheckBox("ReceiveNewsletter")  
<label for="ReceiveNewsletter" style="display:inline">Receive Newsletter?</label>
</p>
<p>
<input type="submit" value="Register" />
</p>

Advantage of Asp.Net MVC

Asp.net  is a part of .net platform for creating,building, deploying and running web applications using C#,VB etc .we can develop a web application by using Asp.Net Web Form and Asp.Net MVC. Asp.Net MVC is advanced technology that is most widely used nowadays . MVC is a great thing available for developers that makes work of developers easy and more flexible .

MVC stands for Model-View-Controller . MVC separates the code in 3 different things that make the code cleaner , flexible and easy to understand and modify . So Today I am going to tell some of big advantages or some good things that Asp.Net MVC provides as compared to Web-forms . This is not a comparison of Web-forms and MVC this is just overview or advantages or features that Asp.Net mvc provides us

1. Rapid Application Development ( RAD ) :- So first I will start with biggest advantage of Asp.net Mvc and this is the thing that is most in demand in Enterprises and everywhere in development area . This is Rapid application development . Asp.Net MVC provides Database First Approach for developing WebApplications . This approach is used with Scanfolding Technique this technique is like a magic provided in Asp.Net MVC . Scanfolding technique tells if you have designed your database in good manner that means if you have Created Normalized Database with all like Primary keys, foreign keys ,One-many , many-many relationships then you need not to do more effort for developing rest on your application in Asp.Net MVC Rest of things will be created with less efforts using scanfolding . With Asp.Net MVC you can have your simple basic website ready within 1 minute after you created your Database . So that was explanation to RAD in Asp.Net MVC

In Pic below we are choosing MVC5 scanfolding template


Then it automatically generate code for us


2. Partial Layouts :- In Asp.Net we ofter use User controls that were used for code reusability we create a user control then where we require that type of code that we coded in user control we call that user control there . In similar way Partial Layouts is provided in Asp.Net MVC .Partial Layouts are very useful things provided in Asp.Net MVC . Partial Layouts are like Master Pages that we use in Asp.Net web-forms . These are used as master pages or master layouts that can be called in any view in Asp.Net MVC . Like in php we use include ( "partialheader.php" ); to include some header in all pages or some specific pages so instead of writting that code in all pages we call then there . Similar in Asp.Net Web-Forms We use content placeholders and contentplaceholders are placed in Master Pages and when we call these master pages and use then in child forms then code of child forms is placed in content placeholder area In the similar way Partial layout works . The partial layout contains @Renderbody in Razor view then replace the child page or code of  page that is calling it

3. MVC Is  Stateless : Asp.Net was Statefull by using viewstates or sessions but Asp.net MVC is stateless . It will be wrong to say mvc is stateless it would say http is stateless . By stateless i mean there is nothing in http that holds the user session or that record the activity of user when user logged in etc so this was maintained or state was maintained using viewstate and sessions . This was used in asp.net Webforms because they contain server controls that contains viewstate and that postback the values and update viewstates But there is not server controls in Asp.Net MVC So it does not maintain states . It has divided the code in three patterns model-view-controller that handles everything That's why it says MVC is stateless But in actual http is stateless that why MVC is stateless

4. No Events : As we came to know there are no server controls in Asp.Net MVC so there are no events for any control as there are not server controls All this is handled by connection of controllers with views where views hold your html code or designing code and controller hold your logics code .


Difference Between ViewState and Session in Asp.Net

"View State and Session "
  The Two main State Management things used in Asp.net Web applications . We cannot even think of an application without ViewState and Session . So today i decided to gave an overview of what is the difference between viewstate and session why these two terms exist and what are their usage To clearify this difference i am giving some points below

1. So First of all what is a Session ? -- A Session is a Time or a span of time upto which user used that webapplication or for how much session of how much period of time user has used your webapplication will be called session . Session contains some values that will be used throughout the user interaction with the webapplication and used in more than one webpage that user navigate So we can say that it is a variable in simple sense that takes our value from one page to another and Session got distroyed or killed automatically after a particular span or time or it is automatically destroyed or cleared when like user signout of application or when user close the browser

A live example would be a web application where a user login . Each user that logs into your system will have a unique session. We can hold additional data into the session which can be used as the user browses your site. We can hold the username, userrole, userpermissions simply by adding it to the session:


Session[“userrole”] = “programmer”; 
Session[“username”] = “Ageek”; 
Session[“userpermissions"] = “cangotohell”; 

A Session  stores the information on the server side  . It stores the values or it uses server memory for storage of data that it holds in . Session variables will use different new and unique session variables for each different user that logs in to web application . large amount of data can be stored on the session, web sites that have a large amount of traffic not use this method, because it will put a severe load on the server memory.

2. Now What is ViewState ? -- so we are clear with session now comes the turn of viewstate . So ViewState is also used for holding our important data But in case of viewstate data is kept in the single viewstate page . It means viewstate data is not taken from one page to another page in this point it is different from session . 

ViewState is only used to Track to analyse the changes that occur to current page during postbacks of data to pages .The viewstate of page can be viewed if you right click on webpage and then clickon view page source then you will see some code of lines similar to below code --

<input type="hidden" name="__VIEWSTATE" id="__VIEWSTATE" value=””></input>

If you are having large number of viewstate fields then it will make the postbacks very slow as all viewstate values will be needed to updated during postbacks so it will make the webpage open slower

Data can be written into viewstate like we do in sessions . But it can retain that data only with life cycle of page after that it will be changed or updated .If you closes that page or redirects to another page then viewstate data will be reset .

How to fill data in viewstate and how to access that data 
ViewState[“PreviousPage”] = “http://www.google.com”; 

Retrieving data form ViewState:
string PreviousPage = ViewState[“PreviousPage”].ToString();  

Friday 1 August 2014

How To use Crystal Reports in Asp.net


Download zip code file  for Crystal Report Demo App
Download Code For How To use Crystal Reports in Asp.net

Setting Up Sql Server Database 

  1. Open you Sql Server Management Studio
  2. Connect to SQl Server
  3. Then  in Right panel Right click on Databases and Click on New Database
  4. Now A New Dialog Box Appears 
  5. Fill Database name: TestReports and Hit Enter . Now Table will be successfully created

  6. Now in the Query window execute the following scripts to create table

  7. After successfull creation of tables insert some dummy data in tables using following query code

  8. Now Our Database work is over Now we go to Visual Studio for code

Now Do Code in Visual Studio
Start your Visual Studio .Click on New project choose Asp.net Web Form  Application and Give a appropriate name and choose location and Hit Enter .


Getting Dataset Ready For Report

  1. Right click on Project Folder in solution Explorer and click on Add then in further sub-menu click on New item

  2. Now a Popup window appears scroll and choose DataSet give name "Customers" and Click on Ok to add DataSet
  3. Now Customers Dataset will be added in solution explorer . Now Double click on it 
  4. It will open DataSet Designer Now right click on and create new DataTable 
  5. After Creating DataTable it will be empty by default now we will add column to it similar to our column in table in database 
  6. Right click on DataTable that we have created and Create new Column and give it name try to give the name similar to name of columns in Table in Database


Adding Crystal Report

  1. Right click on Project Folder in solution Explorer and click on Add then in further sub-menu click on New item 
  2. Now a Popup window appears scroll and choose Crystal Report give it name and Click on Ok

  3. Now Crystal Report Gallery window popup after some time 
  4. Now choose "Using the Report Wizard"  and click ok

  5. Now a window will popup and tell you to choose your dataset that we have created in above steps
  6. Choose your Datatable under Customers DataSet and Click ok
  7. Now your Dataset fields will be added on Field Explorer . Field explorer is available on left side of visual studio window
  8. In Field explorer under Database Expert you all datatable fields will be available

  9. you can drag these fields to crystal Report Details Section When you add them in  Details Section Its Header will automatically added to Page Header Section
  10. you can do some design of your Crystal Report like shown below :-


Designing Form

  1. Now  we will add a Aspx form that will be used to view our Crystal Report
  2. Right click on Project Folder in solution Explorer and click on Add then in further sub-menu click on New item 
  3. Now a Popup window appears scroll and choose WebForm give it name and Click on Ok  
  4. Now delete the existing code Add Following Code To Aspx Form


<%@ Register Assembly="CrystalDecisions.Web, Version=13.0.2000.0, Culture=neutral, PublicKeyToken=692fbea5521e1304"
    Namespace="CrystalDecisions.Web" TagPrefix="CR" %>

<!DOCTYPE html PUBLIC "-//W3C//DTD XHTML 1.0 Transitional//EN" "http://www.w3.org/TR/xhtml1/DTD/xhtml1-transitional.dtd">
<html xmlns="http://www.w3.org/1999/xhtml">
<head runat="server">
    <title></title>
</head>
<body>
    <form id="form1" runat="server">
        <center>
    <CR:CrystalReportViewer ID="CrystalReportViewer1" runat="server" AutoDataBind="true" Width="1000" />
            </center>
    </form>
</body>
</html>


Adding Csharp ( C# ) Code


  1. Now go to Csharp code of New Added Webform and Add code similar to code below :-
  2. Add this code under your partial class -- 


protected void Page_Load(object sender, EventArgs e)
    {
        ReportDocument crystalReport = new ReportDocument();
        crystalReport.Load(Server.MapPath("~/CustomerReport.rpt"));
        Customers dsCustomers = GetData("select * from Testtable");
        crystalReport.SetDataSource(dsCustomers);
        CrystalReportViewer1.ReportSource = crystalReport;
    }

    private Customers GetData(string query)
    {
        string conString = ConfigurationManager.ConnectionStrings["constr"].ConnectionString;
        SqlCommand cmd = new SqlCommand(query);
        using (SqlConnection con = new SqlConnection(conString))
        {
            using (SqlDataAdapter sda = new SqlDataAdapter())
            {
                cmd.Connection = con;

                sda.SelectCommand = cmd;
                using (Customers dsCustomers = new Customers())
                {
                    sda.Fill(dsCustomers, "DataTable1");
                    return dsCustomers;
                }
            }
        }
    }

Sunday 20 July 2014

Install Monodevelop on Linux

MonoDevelop is a revolution in the era of Cross development by using Microsoft .NET programming language like Csharp ( C# ) , Visual Basic and Jsharp ( J# ) . Monodevelop has removed blame that Microsoft .NET software can only run on Windows platforms This makes possible to run .net applications and to build a .Net Application on any platform

MonoDevelop is a cross-platform IDE  developed for Csharp ( C# ) programming language  and other .NET programming languages. MonoDevelop allows programmers to program desktop softwares and ASP.NET Web applications and websites  on Linux, Windows  and Mac OSX. MonoDevelop  makes possible for .net programmers to run , create and deploy their .net software applications on cross-platforms Any  .NET application developed  with Visual Studio can be used in linux or Mac with the help of MonoDevelop

Windows platform is fully supported  for running MonoDevelop and it is fully accepted. In past there were many issues regarding Mono Development but now  Many Windows specific issues have been fixed, and ome add-ins such as debugging and subversion support have been written specifically for Windows and it is fully supported by windows

By developing with mono specifically, you will be able to run your executable on any platform that has mono available for it. That in and of itself is mono's biggest advantage over developing on MSFT's .Net platform. Said differently: If you build you assembly with mono, you're guarantee cross-platform support

Features Of MonoDevelop


  1. Multi-platform support

    It Supports Linux ( ubuntu etc ) , Windows( xp,7,8 etc ) and Mac OS X operating systems
  2. Advanced Text Editing Facilities

    It provides Code completion support for Csharp  4 that is lastest version for csharp
    It also provides  code templates and  code folding.
  3. Configurable workbench

    Fully customizable window layouts, user defined key bindings, external tools
  4. Multi-language programming Facilities

    Monodevelop supports various programming languages like - C#, Visual Basic.Net, C/C++, Vala

GTK# Visual Designer

Easily build GTK# applications

Installation Steps for MonoDevelop in Ubuntu 


You can also see installation of monodevelop on Windows Here :-
So, when you are going to start installation of monodevelop on ubuntu , i am trying it on ubuntu version 12.04 one thing you want to remember is you can install monodevelop on ubuntu with various methods it includes various packages and you should never install them one by one you should also go for a complete package for installation of monodevelop on ubuntu .
1. Press Ctrl + Alt + T and it will Opens Terminal Screen 

2. Type in the following command to install monodevelop :-

sudo apt-get install monodevelop
3. Then Hit Enter

4. If you got the following error :-

Error :- Unable to locate the package monodevelop

This is common error that number of users that are installing monodevelop on ubuntu face . So don't fear from this error this is simple error as it is unable to locate the monodevelop so it means there is need to update the software center or software repository of ubuntu to locate the monodevelop product

5. So simple solution of this error is open Terminal and fire the following command :-

sudo apt get update


and then Hit enter

6. This command requires internet connection and it may take some time to get completed and if this command completes successfully then now monodevelop would be located

7. Now run the following command to install monodevelop

sudo apt-get install monodevelop

8. First it will  prompt you for installation procedure of monodevelop Press y to conform 'Yes'

9. Then It will automatically install and files , packages required for mono
Now you will se a monodevelop icon on your ubuntu sidebar like below -- the blue monodevelop icon


10. click on blue monodevelop icon and you will be presented with monodevelop IDE


Sunday 13 July 2014

Getting Started and Deploy Asp.net App with Appharbor -- Cloud Platform as a service

CLOUD - So first thing we need to know here is what is a Cloud ? and how it is useful to us to use Cloud. Cloud is long network of interconnected computers that allow the avaliability of data over internet all the time .Cloud help to make our data secure and allow the user to run its application on cloud with full scalability and availaibility . We say it provides avalaibility of 100% because Cloud follows the approach of Replication of data to the other nodes to make ensuring the full availaibility of data even when the server that is actually assumed to have data or application is not availaible .

If we are accessing an Application on Cloud and at that particular time that server is down so how our Application Deployed on Server could be accessed Cloud Computing gives answer of this question By Cloud Computing when we deploy our application on cloud then cloud computing will replicate your application to other connected nodes also so that your application will be availabile when one of node is off and unable to provide the access to your application

AppHarbor is a fully hosted .NET Platform as a Service. AppHarbor can deploy and scale any standard .NET application to the cloud. AppHarbor is easy and simple to use . It provides number of additional addons for database and other applications to add it to your application. Here I am going to tell all the procedure to create and deploy asp.net application to appharbor cloud service.

Step1

Start your Browser and Put this Url in your address bar and Navigate to AppHarbor Website :- https://appharbor.com/ and Hit Enter

Step2
Click on  Get started Button . Then do simple signup procedure .Then Login to your AppHarbor Account.

Step3
After login Click on Your Applications Menu item on Top Menu Bar and Create a New application by supplying a name for the application Then Finally click on Create New Button


Step4
Now New application is successfully created on cloud . Now for deploying a .Net application with Sql Server database We require to add Sql server as a Addon to Our cloud App

Step5
Now click on Add Ons on sidebar Menu Then Scroll down and find Sql Server and Click on it.


Step6
Now SQL  SERVER Add details are shown Click on Free Install button . Then SQL SERVER add on will be installed for your application to use sql server database with .net application in cloud


Step7
Now on SQL SERVER Installation Success screen click on  sql server


Step8
Then click on Go To  Sql Server . Now your sql server Instance Details will be shown . The most important thing we need is connection string of database instance

Step9
Copy this connection string we will require it in Further steps

Step10
Now open your Visual Studio Command Prompt . It will be availaible in Microsoft visual studio 2010/2012 folder , if not found you can comment here on this post

Step11
Write the following command on this :-
 aspnet_regsql -A all -C "place your copied connection string here"     Now hit enter


Step12
Now Open Visual studio Click on File Click on New Project Choose ASP.NET WEB APPLICATION give it a Name and give proper save path like I give "C:/WindowsApplication3" and Hit Ok


Step13
Now Visual Studio will Present you with practice project already having some coded files .

Step14
Now open Web.Release.config file Uncomment the connectionstring tag and Replace the name of connection add tag to  "ApplicationServices" and Paste the connection we have copied earlier here and finally Press Ctrl + s to save all content . Now all work with visual studio is done.  Just  Run you application on localhost to know its working fine or not and it also compile all the code that is must required to deploy app on appharbor


 Step15
Now Open Git Bash If you have not installed it yet then wait for next article in which i will tell how to install Git Bash

Step16
After opening Git Bash Navigate to directory where you have saved your .net project like I have saved it in "C:/WebApplication3" . Use this command to go to this directory

cd c:/WebApplication3             Then Hit enter


Step17
Now Run following command to initialize Git Repository
 git init


Step18
Run following command to add repository to Git
git add .


Step19
Run following command to commit your data to Git repository
git commit -m "Added Project To Git:"


Step20
Sometime It may ask you for your Email Address pass it using following command
git config --global user.email "yourmail@example.com"

Step21
Now Clone your git Repository for that we require Repository Url for that Go to Appharbor.com then click on your applications Then Click on Application you have created Then in Sidebar click on   Repository Url then it will be automatically copied to your clipboard

 Step22
Now run the following command  :-
git remote add appharbor "paste copied url here"    ...........then hit enter


Step23
Now push your data or application to cloud or Git Repository by using following command
git push appharbor master

Step24
Now it will ask for password then enter password of your appharbor account and Hit Enter Now it will copy all files to Git Repository


Step25
Now your Application is successfully deployed to cloud To check it online you can first refresh your webpage where you have opened Appharbor account Then go to application we have created on appharbor and click on Hostnames and you can see a url there click on it or open it in new  tab it will show your website that you have uploaded

Tuesday 3 June 2014

MonoDevelop Cross Platform Using Csharp


MonoDevelop is a revolution in the era of Cross development by using Microsoft .NET programming language like Csharp ( C# ) , Visual Basic and Jsharp ( J# ) . Monodevelop has removed blame that Microsoft .NET software can only run on Windows platforms This makes possible to run .net applications and to build a .Net Application on any platform

MonoDevelop is a cross-platform IDE  developed for Csharp ( C# ) programming language  and other .NET programming languages. MonoDevelop allows programmers to program desktop softwares and ASP.NET Web applications and websites  on Linux, Windows  and Mac OSX. MonoDevelop  makes possible for .net programmers to run , create and deploy their .net software applications on cross-platforms Any  .NET application developed  with Visual Studio can be used in linux or Mac with the help of MonoDevelop

Windows platform is fully supported  for running MonoDevelop and it is fully accepted. In past there were many issues regarding Mono Development but now  Many Windows specific issues have been fixed, and ome add-ins such as debugging and subversion support have been written specifically for Windows and it is fully supported by windows

By developing with mono specifically, you will be able to run your executable on any platform that has mono available for it. That in and of itself is mono's biggest advantage over developing on MSFT's .Net platform. Said differently: If you build you assembly with mono, you're guarantee cross-platform support

Features Of MonoDevelop


  1. Multi-platform support

    It Supports Linux ( ubuntu etc ) , Windows( xp,7,8 etc ) and Mac OS X operating systems
  2. Advanced Text Editing Facilities

    It provides Code completion support for Csharp  4 that is lastest version for csharp
    It also provides  code templates and  code folding.
  3. Configurable workbench

    Fully customizable window layouts, user defined key bindings, external tools
  4. Multi-language programming Facilities

    Monodevelop supports various programming languages like - C#, Visual Basic.Net, C/C++, Vala
  1. GTK# Visual Designer

    Easily build GTK# applications


    Installation Steps for MonoDevelop in Windows

    1.   First you need to install GTK# for .NET, because the GTK# included with Mono is in Mono's      GAC
    2. Then After successfull Installation of Gtk# Now install Monodevelop. You can download Monodevelop from link below
      Download Monodevelop

    Installation Steps For Gtk# for MonoDevelop

    1. After Downloaded the Gtk# setup from link given in above section . Double click on setup and you will see the following startup screen

    MonoDevelop Cross Platform Using Csharp
  2. Click Next to proceed the installation
  3. Now here comes License Agreeement Click on Check Box to accept the license and click on Next Button
    MonoDevelop Cross Platform Using Csharp

  4. Now Choose or browse directory for Gtk# installation and click Next
    MonoDevelop Cross Platform Using Csharp

  5. In Next Window click install and you will the installtion progress
    MonoDevelop Cross Platform Using Csharp

    6. After full installation click on Finish

Installation Steps for Monodevelop


  1.  After Downloaded the MonoDevelop setup from link given in above section . Double click on setup and you will see the following startup screen
    MonoDevelop Cross Platform Using Csharp

  2. Click Next to proceed the installation 
  3. Now here comes License Agreeement Click on Check Box to accept the license and click on Next Button
    MonoDevelop Cross Platform Using Csharp


  4.  Now Choose or browse directory for  MonoDevelop installation and click Next
    MonoDevelop Cross Platform Using Csharp

  5. In Next Window click install and you will the installtion progress
    MonoDevelop Cross Platform Using Csharp


    MonoDevelop Cross Platform Using Csharp


  6. After full installation click on Finish


MonoDevelop Cross Platform Using Csharp

POSSIBLE ERRORS DURING MONO INSTALLATION


ERROR :- Gtk# version 2.12.9 or greater must be installed

Gtk# version 2.12.9 or greater must be installed

Go Here For Solution To this Error Fix Gtk# version 2.12.9 or greater must be installed