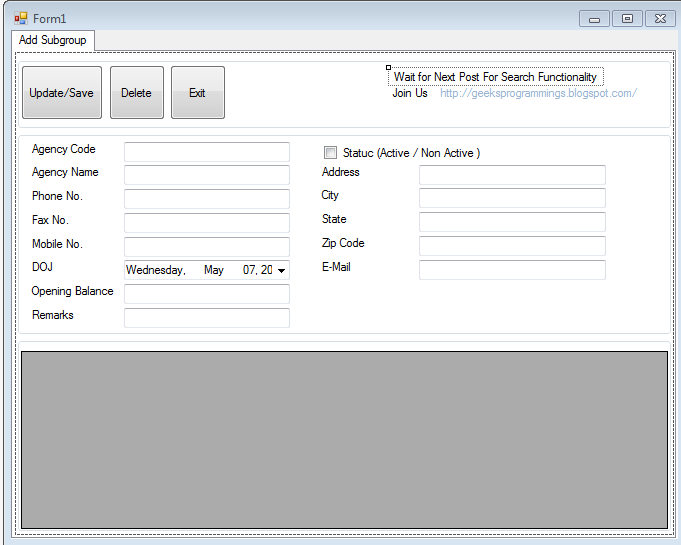
Showing posts sorted by relevance for query .net. Sort by date Show all posts

Thursday 27 June 2013

Saturday 1 August 2015

Jquery Full Calender Integrated With ASP.NET


Jquery Full Calender Integrated With ASP.NET


- First you need to define the function in Code-Behind using c# or vb.net that will make a Class that contains the similar properties that is required by Jquery full calendar to Fill the Calendar

- Then We Use Jquery Ajax and make request to that function that will pass some data that you can fill manually or you can also fetch that from database and then return that to this Ajax Request

- Now use the Code below to Plot then on Full Calendar

If you have any problem setting this please tell me in comments I am here to help you setting this up

Download Full Solution Code Here . Don't Forget to Share Us on Social Media

Code To Fetch Events Using Jquery


 <script type="text/javascript">
        $(document).ready(function () {
            $.ajax({
                type: "POST",
                contentType: "application/json",
                data: "{}",
                url: "Default.aspx/GetEvents",
                dataType: "json",
                success: function (data) {
                    $('div[id*=fullcal]').fullCalendar({

                      
                        header: {
                            left: 'prev,next today',
                            center: 'title',
                            right: 'month,agendaWeek,agendaDay'
                        },
                        editable: true,
                        events: $.map(data.d, function (item, i) {
                            var event = new Object();
                            event.id = item.EventID;
                            event.start = new Date(item.StartDate);
                            event.end = new Date(item.EndDate);
                            event.title = item.EventName;
                            event.url = item.Url;
                            event.ImageType = item.ImageType;
                            return event;
                        }), eventRender: function (event, eventElement) {
                            if (event.ImageType) {
                                if (eventElement.find('span.fc-event-time').length) {
                                    eventElement.find('span.fc-event-time')

.before($(GetImage(event.ImageType)));
                                } else {
                                    eventElement.find('span.fc-event-title')

.before($(GetImage(event.ImageType)));
                                }
                            }
                        },
                        loading: function (bool) {
                            if (bool) $('#loading').show();
                            else $('#loading').hide();
                        }
                    });
                },
                error: function (XMLHttpRequest, textStatus, errorThrown) {
                    debugger;
                }
            });
            $('#loading').hide();
            $('div[id*=fullcal]').show();
        });
        function GetImage(type) {
            if (type == 0) {
                return "<br/><img src = 'Styles/Images/attendance.png' style=

'width:24px;
height:24px'/><br/>";
            }
            else if (type == 1) {
                return "<br/><img src = 'Styles/Images/not_available.png' style=

'width:24px;
height:24px'/><br/>";
            }
            else
                return "<br/><img src = 'Styles/Images/not_available.png' style=

'width:24px;
height:24px'/><br/>";
        }

    </script>


Web Method In C# that Pass the Event to Jquery Ajax Request


  [WebMethod]
        public static IList GetEvents()
        {
            IList events = new List<Event>();
            for (int i = 0; i < DateTime.DaysInMonth(DateTime.Now.Year, 


DateTime.Now.Month); i++)

            {
                events.Add(new Event
                {
                    EventName = "My Event " + i.ToString(),
                    StartDate = DateTime.Now.AddDays(i).ToString("MM/dd/yyyy"),
                    EndDate = DateTime.Now.AddDays(i+1).ToString("MM/dd/yyyy"),
                    ImageType = i % 2,
                    Url = @"http://www.google.com"
                });
            }
            return events;
        }

Class To Define the Event


 public class Event
    {
        public Guid EventID { get { return new Guid(); } }
        public string EventName { get; set; }
        public string StartDate { get; set; }
        public string EndDate { get; set; }
        public int ImageType { get; set; }
        public string Url { get; set; }
    }

Friday 1 August 2014

How To use Crystal Reports in Asp.net


Download zip code file  for Crystal Report Demo App
Download Code For How To use Crystal Reports in Asp.net

Setting Up Sql Server Database 

  1. Open you Sql Server Management Studio
  2. Connect to SQl Server
  3. Then  in Right panel Right click on Databases and Click on New Database
  4. Now A New Dialog Box Appears 
  5. Fill Database name: TestReports and Hit Enter . Now Table will be successfully created

  6. Now in the Query window execute the following scripts to create table

  7. After successfull creation of tables insert some dummy data in tables using following query code

  8. Now Our Database work is over Now we go to Visual Studio for code

Now Do Code in Visual Studio
Start your Visual Studio .Click on New project choose Asp.net Web Form  Application and Give a appropriate name and choose location and Hit Enter .


Getting Dataset Ready For Report

  1. Right click on Project Folder in solution Explorer and click on Add then in further sub-menu click on New item

  2. Now a Popup window appears scroll and choose DataSet give name "Customers" and Click on Ok to add DataSet
  3. Now Customers Dataset will be added in solution explorer . Now Double click on it 
  4. It will open DataSet Designer Now right click on and create new DataTable 
  5. After Creating DataTable it will be empty by default now we will add column to it similar to our column in table in database 
  6. Right click on DataTable that we have created and Create new Column and give it name try to give the name similar to name of columns in Table in Database


Adding Crystal Report

  1. Right click on Project Folder in solution Explorer and click on Add then in further sub-menu click on New item 
  2. Now a Popup window appears scroll and choose Crystal Report give it name and Click on Ok

  3. Now Crystal Report Gallery window popup after some time 
  4. Now choose "Using the Report Wizard"  and click ok

  5. Now a window will popup and tell you to choose your dataset that we have created in above steps
  6. Choose your Datatable under Customers DataSet and Click ok
  7. Now your Dataset fields will be added on Field Explorer . Field explorer is available on left side of visual studio window
  8. In Field explorer under Database Expert you all datatable fields will be available

  9. you can drag these fields to crystal Report Details Section When you add them in  Details Section Its Header will automatically added to Page Header Section
  10. you can do some design of your Crystal Report like shown below :-


Designing Form

  1. Now  we will add a Aspx form that will be used to view our Crystal Report
  2. Right click on Project Folder in solution Explorer and click on Add then in further sub-menu click on New item 
  3. Now a Popup window appears scroll and choose WebForm give it name and Click on Ok  
  4. Now delete the existing code Add Following Code To Aspx Form


<%@ Register Assembly="CrystalDecisions.Web, Version=13.0.2000.0, Culture=neutral, PublicKeyToken=692fbea5521e1304"
    Namespace="CrystalDecisions.Web" TagPrefix="CR" %>

<!DOCTYPE html PUBLIC "-//W3C//DTD XHTML 1.0 Transitional//EN" "http://www.w3.org/TR/xhtml1/DTD/xhtml1-transitional.dtd">
<html xmlns="http://www.w3.org/1999/xhtml">
<head runat="server">
    <title></title>
</head>
<body>
    <form id="form1" runat="server">
        <center>
    <CR:CrystalReportViewer ID="CrystalReportViewer1" runat="server" AutoDataBind="true" Width="1000" />
            </center>
    </form>
</body>
</html>


Adding Csharp ( C# ) Code


  1. Now go to Csharp code of New Added Webform and Add code similar to code below :-
  2. Add this code under your partial class -- 


protected void Page_Load(object sender, EventArgs e)
    {
        ReportDocument crystalReport = new ReportDocument();
        crystalReport.Load(Server.MapPath("~/CustomerReport.rpt"));
        Customers dsCustomers = GetData("select * from Testtable");
        crystalReport.SetDataSource(dsCustomers);
        CrystalReportViewer1.ReportSource = crystalReport;
    }

    private Customers GetData(string query)
    {
        string conString = ConfigurationManager.ConnectionStrings["constr"].ConnectionString;
        SqlCommand cmd = new SqlCommand(query);
        using (SqlConnection con = new SqlConnection(conString))
        {
            using (SqlDataAdapter sda = new SqlDataAdapter())
            {
                cmd.Connection = con;

                sda.SelectCommand = cmd;
                using (Customers dsCustomers = new Customers())
                {
                    sda.Fill(dsCustomers, "DataTable1");
                    return dsCustomers;
                }
            }
        }
    }

Tuesday 10 September 2013

delete record from access database

To delete Record from Access database we have used Dataset and Oledbdataadapters 

DataAdapter :- DataAdapter  is like a pipeline or path or bridge that is used to execute the given query on database table . DataAdapter that we have used is OledbdataAdapter as we are using MS-Access as database . Data Adapter first takes the command to be executed on table data from Oledbcommand object and this object contains the query that is to be executed on database . Then it execute query on Database table data and store resultant data in form of rows and columns or Tabulated form in Dataset

Dataset :- Dataset is generally a memory area where the result of the query that we have executed on database is placed . When a query is passed by using Oledbdataadapter to execute that query on database specified table . Then the result of the query has to be placed some to use it . Like to show it in Datagridview or to show that result data in Textboxes or to manupulate the data and then save that manipulated data again to Table in database

DOWNLOAD this Demo Project from my gmail upload link :-

Steps to Make Microsoft Access Database:

1. Go to desired location you want to make your Database
2. Right click then click on new and 
3. Then click Microsoft Access 2007 Database
4. Create Desired Table with required Fields 
5. Save it as Microsoft Access database 2003 format 
6. click ok 

DOWNLOAD THIS Demo Database from my gmail upload link :-


Steps To Make This Demo Project :-


1. Start your Visual Studio 2010 
2. At start page click on Create New Project 
3. In Dialog Box provide Project name and path where to save this project and click ok
4. Now from Toolbox Drag one ComboBox , one Label and One Button
5. Now Change Label 'Text' Property to "ID_num"
6. Now Change Button 'Text' Property to "Delete"
7. Make Design as shown below

Design of Form 1 


8.  In Below image you can see there are two records in Data base Table 'info_table ' .


9. Now Run the Application 
10. Click on Down arrow of combobox Your ID-num will be shown as image below


11. Now select an id_num from combobox items and then click on Delete


12. Now Record will be deleted from database table as shown below


Code for Application 


Imports System.Data.OleDb


'http://www.geeksprogrammings.blogspot.in

Public Class Form1
    Dim connection As New OleDbConnection
    Dim Del_command As New OleDbCommand
    Dim select_command As New OleDbCommand
    Dim ConnectionString = "Provider=Microsoft.Jet.OLEDB.4.0;Data Source=" &
        "C:\test.mdb"
    Private Sub Form1_Load(ByVal sender As System.Object, ByVal e As System.EventArgs) Handles MyBase.Load
        connection.ConnectionString = ConnectionString
        connection.Open()
        select_command.CommandText = "select id_num from info_table"
        select_command.CommandType = CommandType.Text
        Dim adapter As New OleDbDataAdapter("select id_num from info_table", connection)
        'adapter.SelectCommand = select_command
        Dim dt As New DataTable
        adapter.Fill(dt)
        select_command.Connection = connection
        select_command.ExecuteNonQuery()
        Dim i As New Integer
        For i = 0 To dt.Rows.Count - 1
            ComboBox1.Items.Add(dt.Rows(i).Item(0))
        Next
    End Sub

    Private Sub Button2_Click(ByVal sender As System.Object, ByVal e As System.EventArgs) Handles Button2.Click
        Del_command.CommandText = "delete from info_table where id_num=@id_num"
        Del_command.Parameters.AddWithValue("@id_num", ComboBox1.SelectedItem)
        Del_command.CommandType = CommandType.Text
        Del_command.Connection = connection
        Del_command.ExecuteNonQuery()
        MsgBox("Record Deleted ")
    End Sub


Explanation of Code


Imports System.Data.OleDb


This line of code tells we are importing Oledb Namespace. Oledb stands for Object Linking and Embedding . For using Access database with .net applications we have to inherit classes from this oledb Namespace . Oledb Namespace contains all classes that are required to connect vb.net/c# application to Microsoft Access
Database


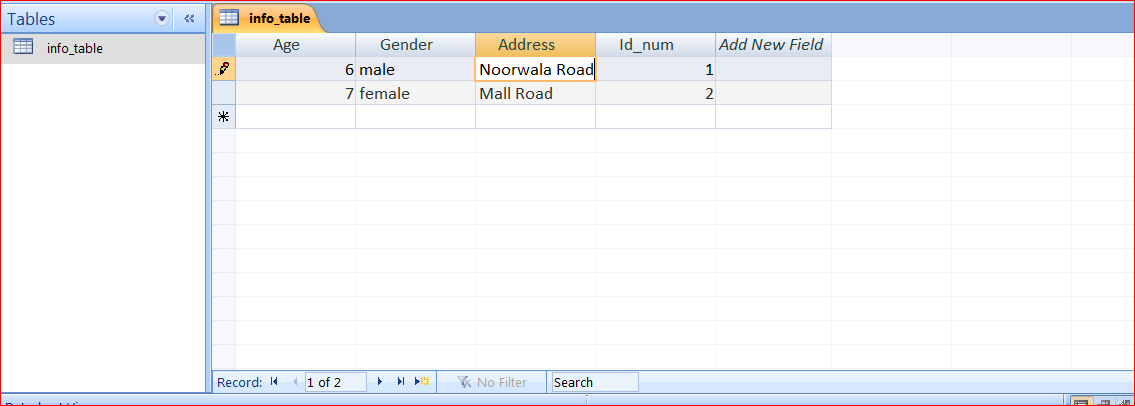
Public Class Form1
    Dim connection As New OleDbConnection
    Dim command As New OleDbCommand
    Dim ConnectionString = "Provider=Microsoft.Jet.OLEDB.4.0;Data Source=" & "C:\test.mdb
End Class

Now In These lines of code we declared 3 things
1. OledbConnection :- OledbConnection is a class contained in System.Data.Oledb Namespace and it is used to make connectivity to Access Database . It receives the connection string that tells the path of Microsoft Access Database to connect to it. In this line of code we have created instance of Oledbconnection class

2. OledbCommand :- OledbCommand is a class contained in S
ystem.Data.Oledb Namespace and it is used to define or specify the command that we are going to execute on Microsoft Access Database. In this line of code we are creating instance of OledbCommand to use this instance in further code

3. Connection string :- Now we are creating a variable named connectionString that will receive the string or path that tell how we connect to our Access database. It receives two parameters :-
Provider=Microsoft.Jet.OLEDB.4.0 -- 
Data Source=" & "C:\test.mdb

Now Provider is main part here in connection string . Provider is different for different approaches used for connecting data to database . The Connection string contains information that the Provider needs to know to connect to database Once connected then rest of job is done by provider


    Private Sub Form1_Load(ByVal sender As System.Object, ByVal e As System.EventArgs) Handles MyBase.Load

        connection.ConnectionString = ConnectionString
        connection.Open()
    End Sub

Now in this block of code we have initialized our OledbConnection instance with connection string variable that we have initialized in previous step. So in this code we have given the Oledbconnectin instance means connection some information about Provider to use and location of database file on computer

Then we have used connection.open() method opens port for Enter into Access Database. this opens a pipe to execute query in database

How To Use Access database with vb.net

Tuesday 6 December 2016

How To Redirect Non-www to www in Asp.net


Please Follow Below Set of Steps to Redirect Non-www To www for your domain in asp.net or asp classic Web Application : -

1. Open web.config file of your Web Application
2. Before Closing of </system.webserver> Add below code in order to redirect your domain
    from xyz.com to http://www.xyz.com for all pages of your website -


<system.webServer>
      <rewrite>
            <rules>
                  <rule name="Redirect domain.com to www" patternSyntax="ECMAScript" stopProcessing="true">
                  <match url=".*" />
                 <conditions>
                     <add input="{HTTP_HOST}" pattern="^xyz.com$" />
                  </conditions>
                  <action type="Redirect" url="http://www.xyz.com/{R:0}" />
              </rule>
    </rules>
</rewrite>
</system.webServer>

3. Save web.config file and Upload it to Hosting Server
4. Now every request to xy.com will be rewritten with http://www.xyz.com

Sunday 7 July 2013

Friday 3 June 2016

Difference Between MVC and webforms


The main advantages of The Official Microsoft ASP.NET Site MVC are:
  • Enables the full control over the rendered HTML.
  • Provides clean separation of concerns(SoC).
  • Enables Test Driven Development (TDD).
  • Easy integration with JavaScript frameworks.
  • Following the design of stateless nature of the web.
  • RESTful urls that enables SEO.
  • No ViewState and PostBack events
  • SEO friendly URL by design
  • No ViewState (this may seem a bit of moving backward to some), but overall a good design
    decision
  • Clean View Markup (no additional HTML emitted)
  • 100% extensible. You can add your own controller with IOC, switch view engines at will, control model binding at wish etc
  • Rich UI support (possible through client side JS libraries like jQuery UI and others)
  • Pluggable architecture
  • Out of the box minimal IOC support
  • Out of the box support for mitigating antiforgery attacks and XSS vulnerability
  • MVC is Faster by default because of lack of viewstate and clean markup. But performance is subject and MVC by design is more performant that traditional The Official Microsoft AspDotNet webforms
Limitation of MVC 
  • There is little Bit Long Learning Curve as compared to Asp.Net webforms 
The main advantage of Aspdotnet Web Form are:
  • It provides RAD development
  • Easy development model for developers those coming from winform development.

Difference Between MVC and webforms

Tuesday 11 November 2014

Difference Between ViewState and Session in Asp.Net

"View State and Session "
  The Two main State Management things used in Asp.net Web applications . We cannot even think of an application without ViewState and Session . So today i decided to gave an overview of what is the difference between viewstate and session why these two terms exist and what are their usage To clearify this difference i am giving some points below

1. So First of all what is a Session ? -- A Session is a Time or a span of time upto which user used that webapplication or for how much session of how much period of time user has used your webapplication will be called session . Session contains some values that will be used throughout the user interaction with the webapplication and used in more than one webpage that user navigate So we can say that it is a variable in simple sense that takes our value from one page to another and Session got distroyed or killed automatically after a particular span or time or it is automatically destroyed or cleared when like user signout of application or when user close the browser

A live example would be a web application where a user login . Each user that logs into your system will have a unique session. We can hold additional data into the session which can be used as the user browses your site. We can hold the username, userrole, userpermissions simply by adding it to the session:


Session[“userrole”] = “programmer”; 
Session[“username”] = “Ageek”; 
Session[“userpermissions"] = “cangotohell”; 

A Session  stores the information on the server side  . It stores the values or it uses server memory for storage of data that it holds in . Session variables will use different new and unique session variables for each different user that logs in to web application . large amount of data can be stored on the session, web sites that have a large amount of traffic not use this method, because it will put a severe load on the server memory.

2. Now What is ViewState ? -- so we are clear with session now comes the turn of viewstate . So ViewState is also used for holding our important data But in case of viewstate data is kept in the single viewstate page . It means viewstate data is not taken from one page to another page in this point it is different from session . 

ViewState is only used to Track to analyse the changes that occur to current page during postbacks of data to pages .The viewstate of page can be viewed if you right click on webpage and then clickon view page source then you will see some code of lines similar to below code --

<input type="hidden" name="__VIEWSTATE" id="__VIEWSTATE" value=””></input>

If you are having large number of viewstate fields then it will make the postbacks very slow as all viewstate values will be needed to updated during postbacks so it will make the webpage open slower

Data can be written into viewstate like we do in sessions . But it can retain that data only with life cycle of page after that it will be changed or updated .If you closes that page or redirects to another page then viewstate data will be reset .

How to fill data in viewstate and how to access that data 
ViewState[“PreviousPage”] = “http://www.google.com”; 

Retrieving data form ViewState:
string PreviousPage = ViewState[“PreviousPage”].ToString();  

Tuesday 17 May 2016

Tempdata vs Session in Asp.net MVC


Why Sessions are Not Recommended to use in MVC

One of the Fundamental Principal of Asp.Net MVC Framework is  Web is Stateless And AspDotNet MVC is Stateless AspDotnet WebForms is a try to make Stateful Modal But Its difficult to main it as this modal does not exist . Sessions Create lot of load on Cache that was biggest problem .

Using Session in AspDotNet MVC is like Putting APPLE Logo on Asus Laptop and Calling it Apple Laptop . Reality does not change .

What Is Alternative To Session in MVC

You can use TempData in place of Session . Tempdata is limited form of Session . Don’t Use Session in MVC as you are already having Tempdata and one benefit of Using Tempdata is They will automatically deleted no need to clear or remove them as we do with session

How To Use TempData In MVC

When Data is TempData is read it is immediately market for deletion at the end of request . That means you can use Value Tempdata In Tempdata Only at the Next Request . See Example Below - 

TempData is Filled With Data

TempData["SomeTemp"]= "Hey! This is MVC" ;

Tempdata Accessed in Second Request 

Object value = TempData["SomeTemp"] ;

Value in Tempdata will be Cleared After Above Line of Code . If you access in after that line of code after above line you will not found it there it will be deleted


Keep And Peek Methods 

Peek And keep methods are used to read value without marking it for deletion after reading its value . So it is acutally helping us to retain its after its first read instead of deleting tempdata

With Peek Method We get the value of Tempdata Without Marking it For Deletion . In this method we access the Tempdata value using Peek Method That tells it to Hold Value and does not mark it for deletion

With Keep Method we hold the Value of Tempdata that was marked for Deletion after its  first read . so it is using two different calls . First one is getting Tempdata Value then Second call is To Save Tempdata From Deletion

Wednesday 7 May 2014

sql insert , Update , delete using c#


To connect Database from your Windows Application is required  to make Application for querying the database and retrieve the desired result from database . Database in widely used in management software's  and various applications to save record and search the record .

Database dependent applications are widely used in the market . ERP projects of organisation are highly Database dependent applications . The main two types of databa se that are widely used in .NET Applications :-

* Microsoft Access Database
* MSSQL Server ( Microsoft Structured Query Language )


The main Languages used in .NET Platform for connecting windows application to database are :-

* C#
* VB#

Sql ( Structured Query Language ) is most widely used Database . It is free and Opensource Database . It has simple query structure to Manipulate data from database in Database applications 

To Learn About SQL and how to learn SQL you can go to following links first then go forward :-

SQL Tutorial with Examples and snapshots

insert , update , delete , select queries sql

Download Database Script file and execute it in your SQL Server

Steps To Execute this Script file -

1. Download Script file from link below .

2. Now open it with MsSql .
3. Now Create Database Named  'Accounts_database' in MsSql server 
4. Now select this database from Dropdown 
5. And Execute the Script code by clicking F5 .

Design of Form 

Download Complete Project File


1. In Design We have some Fields to be filled to insert Data To database

2. We are having 3 Buttons - One for Update and Insert Operation , Second For Delete Operation and Third for Exit or close form

3. We are using Datagrid View to Instantly Showing The data in database and it is updated when we insert new data to database or we delete data from database

                                                   Insertion/Updation In Database 


1. For insertion of data Fill the fields on form Only Code and Agency Name is required and rest of the fields are optional fields


2. Now you can see filled data is successfully inserted and it is immediately shown in below datagridview


CODE For Insert/Update


 try


 {
                SqlCommand cmd1 = new SqlCommand("select * from Agency_detail where  Agency_code=" + textBox1.Text, con);
                SqlDataAdapter da1 = new SqlDataAdapter();
                DataTable dt1 = new DataTable();
                da1.SelectCommand = cmd1;
                da1.Fill(dt1);
                if ((dt1.Rows.Count > 0) && (dt1.Rows[0][0].ToString() != ""))
                {
                    if (MessageBox.Show("ID Already Exist Do you want to Update It", "Confirm", MessageBoxButtons.YesNo, MessageBoxIcon.Question) == DialogResult.Yes)
                    {
                        SqlCommand cmdupdate = new SqlCommand("update Agency_detail set Agency_Name=@p1,Phone=@p2,fax=@p3,Mobile_Number=@p4,DOJ=@p5,opening=@p6,Remark=@p7,Address=@p8,city=@p9,state=@p10,zip_code=@p11,email=@p12 where Agency_code=" + textBox1.Text, this.con );
                        cmdupdate.Parameters.AddWithValue("@p1", textBox2.Text);
                        cmdupdate.Parameters.AddWithValue("@p2", textBox4.Text);
                        cmdupdate.Parameters.AddWithValue("@p3", textBox3.Text);
                        cmdupdate.Parameters.AddWithValue("@p4", textBox8.Text);
                        cmdupdate.Parameters.AddWithValue("@p5", dateTimePicker1.Value.Date);
                        cmdupdate.Parameters.AddWithValue("@p6", textBox6.Text);
                        cmdupdate.Parameters.AddWithValue("@p7", textBox5.Text);
                        cmdupdate.Parameters.AddWithValue("@p8", textBox17.Text);
                        cmdupdate.Parameters.AddWithValue("@p9", textBox16.Text);
                        cmdupdate.Parameters.AddWithValue("@p10", textBox15.Text);
                        cmdupdate.Parameters.AddWithValue("@p11", textBox14.Text);
                        cmdupdate.Parameters.AddWithValue("@p12", textBox13.Text);

                        //con.con.Open();
                        cmdupdate.ExecuteNonQuery();
                        MessageBox.Show("Updated");
                        retrieve_data();
                        clearall();
                    }
                    else
                    {

                    }
                }
                else
                {

                    if ((textBox1.Text != "") && (textBox2.Text != ""))
                    {
                        SqlCommand cmd = new SqlCommand("insert into Agency_detail values(@para1,@para2,@para3,@para4,@para5,@para6,@para7,@para8,@para9,@para10,@para11,@para12,@para13)", con);
                        cmd.Parameters.AddWithValue("@para1", Convert.ToInt64(textBox1.Text));
                        cmd.Parameters.AddWithValue("@para2", textBox2.Text);
                        cmd.Parameters.AddWithValue("@para3", Convert.ToInt64(textBox4.Text));
                        cmd.Parameters.AddWithValue("@para4", Convert.ToInt64(textBox3.Text));
                        cmd.Parameters.AddWithValue("@para5", Convert.ToInt64(textBox8.Text));
                        cmd.Parameters.AddWithValue("@para6", dateTimePicker1.Value);
                        cmd.Parameters.AddWithValue("@para7", Convert.ToDouble(textBox6.Text));
                        cmd.Parameters.AddWithValue("@para8", textBox5.Text);
                        cmd.Parameters.AddWithValue("@para9", textBox17.Text);
                        cmd.Parameters.AddWithValue("@para10", textBox16.Text);
                        cmd.Parameters.AddWithValue("@para11", textBox15.Text);
                        cmd.Parameters.AddWithValue("@para12", Convert.ToInt64(textBox14.Text));
                        cmd.Parameters.AddWithValue("@para13", textBox13.Text);
                        //con.con.Open();
                        cmd.ExecuteNonQuery();
                        retrieve_data();
                        clearall();
                    }
                    else { MessageBox.Show("Agency ID and Name Must Required"); }
                }
            }
            catch (Exception ex)
            {
                MessageBox.Show(ex.Message);
            }


Deletion Of Data


To Delete data or  record from database :- 

1. Enter the Required fields :- ID and Agency Name of Record to be deleted 

2. Then press delete button and data will be deleted

3. It will be immediately shown as deleted in datagridview


CODE For DELETE


 try
            {
                SqlCommand cmd = new SqlCommand("delete from Agency_detail where Agency_code =@code", this.con);
                cmd.Parameters.AddWithValue("@code", Convert.ToInt32(textBox1.Text));
                //con.con.Open();
                cmd.ExecuteNonQuery();
                retrieve_data();
                clearall();
            }
            catch (Exception ex)
            {
              MessageBox.Show(ex.Message);

            }


Tuesday 29 July 2014

How to use XML Parsing And TableLayout in Mono Android


In order to start with XML Parsing or XML data Handling in Microsoft .NET Framework first we need to know about what classes or namespaces are available to us for using or dealing with XML Document or XML Data in .Net So Here is list of XML Namespaces available for XML Processing and Handling :-


  • System.Xml;
  • System.Schema;
  • System.Xml.Serialization;
  • System.Xml.XPath;
  • System.Xml.Xsl;


Here , Out of these classes System.Xml class is major class that is responsible or must for XML Data Processing and this is the namespace that we are going to use in our tutorial today . The System.Xml namespace contains number of classes that are used for reading and writting Xml data from XML Documents . System.Xml contains :-


  • XmlReader for Reading Xml Documents we are not going to use it in our tutorial today
  • XmlWritter For Writting Xml Documents we are not going to use it in our tutorial today

There is another important class that we will use in our XML Parsing today . This is XmlNode It plays important role for getting xml data node by node This class represents every single node of the XML Document


OUTPUT SCREEN WITH RESULT 
I have used API 8 for building this app you Download the Application complete code from here :-
Download Xml Parser Android with TableLayout -- geeksprogrammings


Main.Xaml CODE MONO ANDROID

<?xml version="1.0" encoding="utf-8"?>
<LinearLayout xmlns:android="http://schemas.android.com/apk/res/android"
    android:layout_width="match_parent"
    android:layout_height="match_parent"
    android:layout_gravity="center_horizontal"
    android:orientation="vertical">
    <TableLayout
        android:id="@+id/main_table"
        android:layout_weight="1"
        android:layout_height="wrap_content"
        android:layout_width="match_parent"
        android:layout_marginTop="0.0dp"
        android:scrollbars="vertical" />
</LinearLayout>

using System;
using Android.App;
using Android.Content;
using Android.Runtime;
using Android.Views;
using Android.Widget;
using Android.OS;
using Android.Graphics;
using System.Xml;

XAML CODE EXPLANATION MONO ANDROID

step 1
In first line i have declared the xml version and encoding type this denotes that  this is an xml file code . In android xml code is used for creating design or layout of mono Android Apps

step 2
Now We have added a Linear Layout this is a default layout for Mono Android Application all controls or other layouts that we will use in our Mono Android Application will reside under this LinearLayout Tag
It contains Starting and Ending Tag .

<LinearLayout xmlns:android="http://schemas.android.com/apk/res/android"
    android:layout_width="match_parent"
    android:layout_height="match_parent"
    android:layout_gravity="center_horizontal"
    android:orientation="vertical">

</LinearLayout>

step 3
Now Under LinearLayout we have included a Table layout We have included Table layout because we in this tutorial of xml parsing is going to parse xml and then view the retrieved xml data in table view . We have used following code for styling or placing table layout

<TableLayout
        android:id="@+id/main_table"
        android:layout_weight="1"
        android:layout_height="wrap_content"
        android:layout_width="match_parent"
        android:layout_marginTop="0.0dp"
        android:scrollbars="vertical" />


Csharp Code For XML Parsing MONO ANDROID

namespace AndroidApplication5
{
    [Activity(Label = "AndroidApplication5", MainLauncher = true, Icon = "@drawable/icon")]
    public class Activity1 : Activity
    {
        int count = 1;

        protected override void OnCreate(Bundle bundle)
        {
            base.OnCreate(bundle);
            SetContentView(Resource.Layout.Main);

            XmlDocument doc = new XmlDocument();
            doc.LoadXml("<Product>    <ID>1</ID>    <SeqNo>1</SeqNo>    <Stage>Stage</Stage> <Observation>Observation</Observation><CHK></CHK> </Product>");
   
            XmlNode node = doc.DocumentElement.SelectSingleNode("/Product/ID");
            XmlNode node1 = doc.DocumentElement.SelectSingleNode("/Product/SeqNo");
            XmlNode node2 = doc.DocumentElement.SelectSingleNode("/Product/Stage");
            XmlNode node3 = doc.DocumentElement.SelectSingleNode("/Product/Observation");
            XmlNode node4 = doc.DocumentElement.SelectSingleNode("/Product/CHK");

            TableLayout ll = FindViewById<TableLayout>(Resource.Id.main_table);
         
     
            for (int i = 0; i < 10; i++)
            {
                TableRow row = new TableRow(this);
                TableRow.LayoutParams lp = new TableRow.LayoutParams(TableRow.LayoutParams.FillParent);
             
                row.LayoutParameters = lp;
                row.SetGravity(GravityFlags.CenterHorizontal);
             
            TextView checkBox = new TextView(this);
             TextView   tv = new TextView(this);
             TextView addBtn = new TextView(this);
             TextView rcf = new TextView(this);
             CheckBox verified = new CheckBox(this);
             TextView ver = new TextView(this);
             TextView    qty = new TextView(this);
             
                if (i == 1)
                {
                    checkBox.Text = node.Name.ToUpper().ToString();
                    checkBox.SetBackgroundColor(Color.AliceBlue);
                    checkBox.SetTextColor(Color.Black);
                    checkBox.SetPadding(7,9,7,9);

                    qty.Text = node1.Name.ToUpper().ToString();
                    qty.SetBackgroundColor(Color.AliceBlue);
                    qty.SetTextColor(Color.Black);
                    qty.SetPadding(7, 9, 9, 9);

                    tv.Text = node2.Name.ToUpper() .ToString();
                    tv.SetBackgroundColor(Color.AliceBlue);
                    tv.SetTextColor(Color.Black);
                    tv.SetPadding(7, 9, 9, 9);

                    addBtn.Text = node3.Name.ToUpper().ToString();
                    addBtn.SetBackgroundColor(Color.AliceBlue);
                    addBtn.SetTextColor(Color.Black);
                    addBtn.SetPadding(9, 9, 9, 9);

                    ver.Text = node4.Name.ToUpper().ToString();
                    ver.SetBackgroundColor(Color.AliceBlue);
                    ver.SetTextColor(Color.Black);
                    ver.SetPadding(9, 9, 9, 9);
                 
                }
                else if (i == 0)
                {
                    checkBox.Text = "Inspection";
                    checkBox.SetBackgroundColor(Color.AliceBlue);
                    checkBox.SetTextColor(Color.Black);
                    checkBox.SetPadding(9, 9, 9, 9);

                    qty.Text = "Details";
                    qty.SetBackgroundColor(Color.AliceBlue);
                    qty.SetTextColor(Color.Black);
                    qty.SetPadding(9, 9, 9, 9);

                    tv.Text = "Rail";
                    tv.SetBackgroundColor(Color.AliceBlue);
                    tv.SetTextColor(Color.Black);
                    tv.SetPadding(9, 9, 7, 9);

                    addBtn.Text = "Coach";
                    addBtn.SetBackgroundColor(Color.AliceBlue);
                    addBtn.SetTextColor(Color.Black);
                    addBtn.SetPadding(7, 9, 9, 9);

                    ver.Text = "";
                    ver.SetBackgroundColor(Color.AliceBlue);
                    ver.SetTextColor(Color.Black);
                    ver.SetPadding(9, 9, 9, 9);
                }
                else
                {
                    checkBox.Text = (i-1).ToString();
                    checkBox.SetBackgroundColor(Color.Black);
                    checkBox.SetTextColor(Color.White);
                    checkBox.SetPadding(7,9,9,9);

                    qty.Text = (i - 1).ToString();
                    qty.SetBackgroundColor(Color.Black);
                    qty.SetTextColor(Color.White);
                    qty.SetPadding(7,9,9,9);

                    tv.Text = node2.InnerText+(i-1).ToString ();
                    tv.SetBackgroundColor(Color.Black);
                    tv.SetTextColor(Color.White);
                    tv.SetPadding(9, 9, 9, 9);

                    addBtn.Text = node3.InnerText + (i-1).ToString();
                    addBtn.SetBackgroundColor(Color.Black);
                    addBtn.SetTextColor(Color.White);
                    addBtn.SetPadding(9, 9, 9, 9);
                    verified.Checked = true;
                }

                checkBox.Gravity = GravityFlags.CenterHorizontal;
                tv.Gravity = GravityFlags.CenterHorizontal;
                qty.Gravity = GravityFlags.CenterHorizontal;
                addBtn.Gravity = GravityFlags.CenterHorizontal;

                row.AddView(checkBox);
                row.AddView(qty);
                row.AddView(tv);
                row.AddView(addBtn);

                if (i == 1)
                {
                    row.AddView(ver);
                }
                else if(i>1)
                {
                    row.AddView(verified);

                }
                ll.AddView(row, i);
            }
   
   }
            }
    }

CsharpCode Explanation For XML Parsing MONO ANDROID

step1 

we start with main login of xml parsing that we are covering in our this tutorial here we have first include System.Xml namespace at top of our code document then we have used a XmlDocument class by making an instance of that class then we have passed the static Xml data to instance of XmlDocument by using LoadXml class that receives the xml data . you can see code below :-

 XmlDocument doc = new XmlDocument();
            doc.LoadXml("<Product>    <ID>1</ID>    <SeqNo>1</SeqNo>    <Stage>Stage</Stage> <Observation>Observation</Observation><CHK></CHK> </Product>");

Step 2

After passing the xml data now we are going to filter the xml data with respect to nodes of xml In our xml data Product is Parent node and it contains other child node like ID,SeqNo ..........
As we have loaded the xml data in doc we have used doc.Documentelement.SelectSingleNode that will select the single node of 'ID' that is child of Parent node 'Product'
You can see the code below :-

            XmlNode node = doc.DocumentElement.SelectSingleNode("/Product/ID");
            XmlNode node1 = doc.DocumentElement.SelectSingleNode("/Product/SeqNo");
            XmlNode node2 = doc.DocumentElement.SelectSingleNode("/Product/Stage");
            XmlNode node3 = doc.DocumentElement.SelectSingleNode("/Product/Observation");
            XmlNode node4 = doc.DocumentElement.SelectSingleNode("/Product/CHK");

step 3

With these lines of code below we are select the table layout that we have added in our xml code in layout file . You can see the code below :-

            TableLayout ll = FindViewById<TableLayout>(Resource.Id.main_table);

Step 4

This is main logic of code where we are reading xml data and then adding dynamic rows to table layout

 for (int i = 0; i < 10; i++)    // starting loop form 0 -9 to display 10 rows in table dynamically
            {
//creating a new tablerow
                TableRow row = new TableRow(this);    

//Setting tablerow hight , width parameters
                TableRow.LayoutParams lp = new   TableRow.LayoutParams(TableRow.LayoutParams.FillParent);
             
assigning the layoutparameters to row
                row.LayoutParameters = lp;

//setting row to alignment to center horizontal
                row.SetGravity(GravityFlags.CenterHorizontal);
             
//Adding some required TextView
            TextView checkBox = new TextView(this);
             TextView   tv = new TextView(this);
             TextView addBtn = new TextView(this);
             TextView rcf = new TextView(this);
             CheckBox verified = new CheckBox(this);
             TextView ver = new TextView(this);
             TextView    qty = new TextView(this);
             
                if (i == 1)        // this is for second row of table to display column names not values
                {
                    checkBox.Text = node.Name.ToUpper().ToString();
                    checkBox.SetBackgroundColor(Color.AliceBlue);
                    checkBox.SetTextColor(Color.Black);
                    checkBox.SetPadding(7,9,7,9);

                    qty.Text = node1.Name.ToUpper().ToString();
                    qty.SetBackgroundColor(Color.AliceBlue);
                    qty.SetTextColor(Color.Black);
                    qty.SetPadding(7, 9, 9, 9);

                    tv.Text = node2.Name.ToUpper() .ToString();
                    tv.SetBackgroundColor(Color.AliceBlue);
                    tv.SetTextColor(Color.Black);
                    tv.SetPadding(7, 9, 9, 9);

                    addBtn.Text = node3.Name.ToUpper().ToString();
                    addBtn.SetBackgroundColor(Color.AliceBlue);
                    addBtn.SetTextColor(Color.Black);
                    addBtn.SetPadding(9, 9, 9, 9);

                    ver.Text = node4.Name.ToUpper().ToString();
                    ver.SetBackgroundColor(Color.AliceBlue);
                    ver.SetTextColor(Color.Black);
                    ver.SetPadding(9, 9, 9, 9);
                 
                }
                else if (i == 0)      //this is for first row to display Heading
                {
                    checkBox.Text = "Inspection";
                    checkBox.SetBackgroundColor(Color.AliceBlue);
                    checkBox.SetTextColor(Color.Black);
                    checkBox.SetPadding(9, 9, 9, 9);

                    qty.Text = "Details";
                    qty.SetBackgroundColor(Color.AliceBlue);
                    qty.SetTextColor(Color.Black);
                    qty.SetPadding(9, 9, 9, 9);

                    tv.Text = "Rail";
                    tv.SetBackgroundColor(Color.AliceBlue);
                    tv.SetTextColor(Color.Black);
                    tv.SetPadding(9, 9, 7, 9);

                    addBtn.Text = "Coach";
                    addBtn.SetBackgroundColor(Color.AliceBlue);
                    addBtn.SetTextColor(Color.Black);
                    addBtn.SetPadding(7, 9, 9, 9);

                    ver.Text = "";
                    ver.SetBackgroundColor(Color.AliceBlue);
                    ver.SetTextColor(Color.Black);
                    ver.SetPadding(9, 9, 9, 9);
                }
//else is used for all other rows to be added dynamically except 0,1 row
                else
                {
                    checkBox.Text = (i-1).ToString();
                    checkBox.SetBackgroundColor(Color.Black);
                    checkBox.SetTextColor(Color.White);
                    checkBox.SetPadding(7,9,9,9);

                    qty.Text = (i - 1).ToString();
                    qty.SetBackgroundColor(Color.Black);
                    qty.SetTextColor(Color.White);
                    qty.SetPadding(7,9,9,9);

                    tv.Text = node2.InnerText+(i-1).ToString ();
                    tv.SetBackgroundColor(Color.Black);
                    tv.SetTextColor(Color.White);
                    tv.SetPadding(9, 9, 9, 9);

                    addBtn.Text = node3.InnerText + (i-1).ToString();
                    addBtn.SetBackgroundColor(Color.Black);
                    addBtn.SetTextColor(Color.White);
                    addBtn.SetPadding(9, 9, 9, 9);
                    verified.Checked = true;
                }

                checkBox.Gravity = GravityFlags.CenterHorizontal;
                tv.Gravity = GravityFlags.CenterHorizontal;
                qty.Gravity = GravityFlags.CenterHorizontal;
                addBtn.Gravity = GravityFlags.CenterHorizontal;

                row.AddView(checkBox);
                row.AddView(qty);
                row.AddView(tv);
                row.AddView(addBtn);

                if (i == 1)
                {
                    row.AddView(ver);
                }
                else if(i>1)
                {
                    row.AddView(verified);

                }
                ll.AddView(row, i);
            }