Thursday 25 December 2014

Microsoft HTTP/API port 80 is actually used


Microsoft HTTP/API 2.0 Using Port 80,
WAMP - Your port 80 is actually used , change port number in wamp


After Installation of Wamp you may suffer from an Error that says that Your Port 80 is actually used , change port number in wamp
I decided to sit and give a search on this error to finally find and share an optimal solution to this error . This error may come if you have already Installed IIS Server on your windows Computer .
you may see one of these Errors :

 "Microsoft HTTP/API 2.0" Using Port 80

 WAMP - Your port 80 is actually used 

Steps For Optimal Solution to this Error -


1.  Updating/configuring httpd.conf file
2.  Updating/configuring wampmanager.tpl file
3.  Updating/configuring testport.php file
4.  Updating/configuring testportForInstall.php file
5.  Checking http.exe Application

 Updating/configuring httpd.conf file

httpd.conf file is http configuration file for apache server . All apache configuration in wamp are stored in this file . This file contains the information regarding which port and server is to connect for making connection to Server .

As this error states the port 80 is already used so follow the steps below to change the port that apache is using currently

Steps For Change Apache Port Number In WAMP

  • Click on Wamp Icon on quick Launch Bar 
  • In popup Menu click on Apache and then in further menu click on httpd.conf
  • It will open httpd.conf file in your editor like you can use Notepad
  • Now Press Ctrl + f and find for lines given below :


#Listen 12.34.56.78:80
Listen 0.0.0.0:80
Listen [::0]:80

ServerName localhost:8080
  • Now Replace these lines with given below :

#Listen 12.34.56.78:8484
Listen 0.0.0.0:84
Listen [::0]:84

ServerName localhost:8484
  • Now it's done . Press Ctrl +s  to save all changes and close the httpd.conf file
  • Now again click on wamp icon in Quick Launch Bar and click On Restart All Services 

Updating/configuring wampmanager.tpl file

1. In order to find wampmanager.tpl file you need to go to following location .Like we have installed wamp in C drive then your wampmanager.tpl file location will be c:\wamp\wampmanager.tpl
2. Now open wampmanager.tpl file and press ctrl + f and find for 'testPort84' without quotes
3. Then replace -
testPort80 with atestPort84
4. Press ctrl + s to save changes and Close the File .

Updating/configuring testport.php file

Now we need to make changes to testport.php file . This file tests for whether the port 80 is available to install the apache service to that port . 

This file checks the socket port 80 for installation of apache service . use the simple steps below to configure testport.php file 

1. I will give you simple way to configure it Just open the file testport.php . File location will be available at C:\wamp\scripts\testport.php . Just open the file and replace all the test with text given below -

<?php
$fp = @fsockopen("127.0.0.1", 84, $errno, $errstr, 1);
   $out = "GET / HTTP/1.1\r\n";
   $out .= "Host: 127.0.0.1\r\n";
   $out .= "Connection: Close\r\n\r\n";
if ($fp)
{
    echo  'Your port 84 is actually used by :';
   fwrite($fp, $out);
   while (!feof($fp)) 
   {
        $line = fgets($fp, 128);
        if (ereg('Server: ',$line))
        {
           
            echo $line;
            $gotInfo = 1;
        }  
        }
    fclose($fp);
    if ($gotInfo != 1)
        echo 'Information not available (might be Skype).';
}
else
{
    echo 'Your port 84 is not actually used.';
}
echo 'Press Enter to exit...';
trim(fgets(STDIN));
?> 

 Updating/configuring testportForInstall.php file

Now we need to make changes to testportForInstall.php file . This file tests for whether the port 80 is available to install the apache service to that port . 

This file checks the socket port 80 for installation of apache service . use the simple steps below to configure testportForInstall.php file 

1. I will give you simple way to configure it Just open the file testport.php . File location will be available at C:\wamp\scripts\testportForInstall.php . Just open the file and replace all the test with text given below -

<?php
$fp = @fsockopen("127.0.0.1", 84, $errno, $errstr, 1);
   $out = "GET / HTTP/1.1\r\n";
   $out .= "Host: 127.0.0.1\r\n";
   $out .= "Connection: Close\r\n\r\n";
if ($fp)
{
           echo  'Your port 84 is actually used by :

';
   fwrite($fp, $out);
   while (!feof($fp)) 
   {
        $line = fgets($fp, 128);
        if (ereg('Server: ',$line))
        {
            echo $line;
            $gotInfo = 1;
        }
    
    }
    fclose($fp);
    if ($gotInfo != 1)
        echo 'Information not available (might be Skype).';
    echo '
Cannot install the Apache service, please stop this application and try again.

Press Enter to exit...';
trim(fgets(STDIN));
}
else
{
    echo 'Your port 84 is available, Install will proceed.';
    echo '

Press Enter to continue...';
    trim(fgets(STDIN));
}
?> 

Checking http.exe Application

you can find httpd.exe file at location - C:\wamp\bin\apache\apache2.4.9\bin\httpd.exe , if C is installed at C drive .

Double click on file it will open for a slight small amout of time and show you any error in first line if exist otherwise everything will be fine . If error exist then try to ensure you have done previous steps completely . As these are the final possible steps that may solve this problem
Tuesday 23 December 2014

Pass Data between Activity in Android


Hello Friends ,

Today I got one message from a person to tell him how to pass data between android activities So, I am going to give a simple way for how we can transfer data or how we can pass data across activities in android . In android we use activity for  each layout code .

I am using Mono Android for this article but that will similar functions in Dalvik android that is used with java based android applications .

Here are simple Steps How to Pass data between Activities in Android Using Csharp -

  1. Open Visual Studio . Click on File --> New Project -->
  2. Now choose Mono For Android and click on Android Application . Now Simple Android application will be created
  3. This project will create a single activity named MainActivity (MainActivity.cs), which contains a button.
  4. Add a second New activity class named Activity2 to the project. by right click on Solution Name and click on New then click on Android Activity leave the name as default and click on Ok  This class must inherit from Android.App.Activity .
  5. right click on layout folder inside Resource folder then click new and choose Android Layout give it a name and leave as default and click ok .
  6. In the button.Click handler in MainActivity.cs , create an intent for Activity2 , and add data to the intent by calling PutExtra and this data given in Put Extra will be transfered to Activity2 . Add the Code Below for that :-
 button.Click += delegate {
               // button.Text = string.Format("{0} clicks!", count++);
                var activity2 = new Intent(this, typeof(Activity2));
                activity2.PutExtra("MyData", "Data from Activity1");
                StartActivity(activity2);
            };
      
      7. Now Open you layout.xm file in Resource --> layout folder ( layout folder under resource folder ) . Add code below to it for Adding button under <linearlayout> tag :-

        <Button
        android:id="@+id/MyButton"
        android:layout_width="fill_parent"
        android:layout_height="wrap_content"
        android:text="@string/Hello" />    string text = Intent.GetStringExtra

    8. Now add code below to Newly added Activity - activity2.cs under Activiy.Oncreate Method :-
            ("MyData") ?? "Data not available";
            string text1 = Intent.GetStringExtra("MyData");
            Button button = FindViewById<Button>(Resource.Id.MyButton);
            button.Text = text;

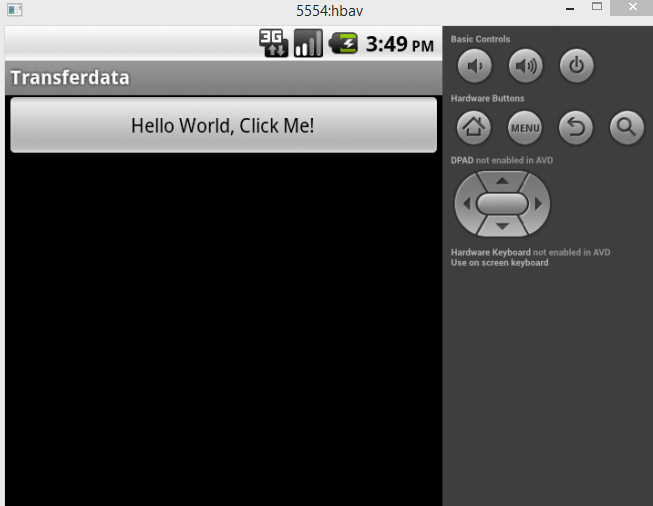
       9. Now Run the app by pressing F5 and see the output in emulator as below -
Pass Data between Activity in android 
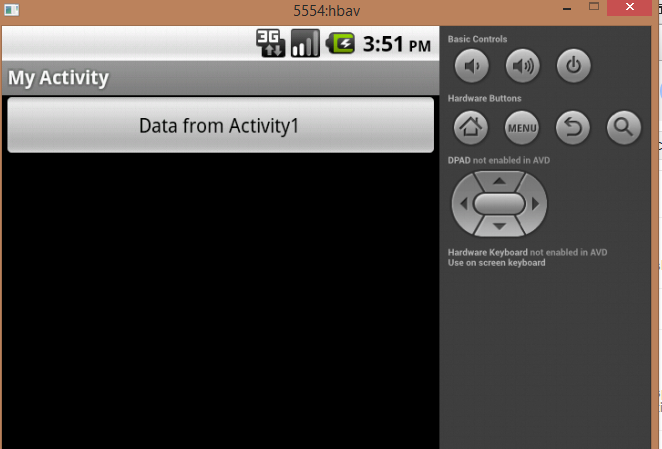
10. Now click on button saying "Hello World,Click Me!" Now you will see New Avtivity Activity2 as below that contain the text that we have passed from activity Activity1

Pass Data between Activity in android 


Thursday 18 December 2014

Import dbf database in sqlserver


Steps For Importing Dbf database into Sql Server

There is no appropriate way or direct way to do that but nothing is impossible so there is workaround that can be done to perform this task . Here is the steps :-

  • First we have to convert the .dbf format data into .csv format data
  • Then depending on table structure Create the Table in database one by one 
  • Then using import bulk options of sql server that accept the data in csv format we can easily insert data in sql server

Convert DBF to CSV

DBF Converter allows you convert a single dbf file or folder with dbf files to csv format from GUI or command line.
1. Select the dbf file or foder with dbf files for batch conversion.
2. Select the output csv file or folder for csv files for batch conversion.

Download Software 
dbf to csv conversion


3. Preview, select options for sorting, filtering data (if necessary)
You can also select/unselect columns, set order for columns.
common options for dbf to csv conversion

4. Select options for csv format:columns delimiter, rows delimiter (if necessary), and click "Finish"

CSV file format options


Import CSV File Into SQL Server Using Bulk Insert


 CSV stands for Comma Separated Values, sometimes also called Comma Delimited Values.

Steps For Importing CSV in Sql server 

  • Create The table whose data we are going to import into database

USE TestData
GO
CREATE TABLE
CSVTest
(ID INT,
FirstName VARCHAR(40),
LastName VARCHAR(40),
BirthDate SMALLDATETIME)
GO


where TestData is database name and CSVTest is table name
  • I assume your .Csv file lies in c:\csvtest.txt and it contains data like this

    1,James,Smith,19750101
    2,Meggie,Smith,19790122
    3,Robert,Smith,20071101
    4,Alex,Smith,20040202


  • Then Run the following script in the query windows of sql server . Make sure your paths given are correct to .csv file

    Code


    BULK
    INSERT
    CSVTest
    FROM 'c:\csvtest.txt'
    WITH
    (
    FIELDTERMINATOR = ',',
    ROWTERMINATOR = '\n'
    )
    GO
    --Check the content of the table.
    SELECT *
    FROM CSVTest
    GO
    --Drop the table to clean up database.
    DROP TABLE CSVTest
    GO

    Snapshot


Saturday 13 December 2014

using git making pull request and troubleshoot errors

Today I am going to share some most simple and easy steps how to use git . 

How we can get a git repository data on our Personal computer 
How to make changes to these files and then how to propose that merging of files to repository from where you have downloaded it 
How to deal or remove some every basic errors that came during this process

So lets start --
  • First of all go to link of directory or as we say repository on github like i am doing this for a MonoWeb Repository on link below
                             https://github.com/mono/webiste
Ths repository is repository of official website of Mono https://www.mono-project.com/ 

  • First of the the thing you must have is gitbash . You can Download and setup gitbash from  here :-
1.  Download Git for Windows here:
I downloaded Git-1.7.6-preview20110708.exe. It contains the  full installer for official Git 1.7.6
2.  Follow the instructions here exactly as it says.
3.  Be sure to select these options:
- Use Git Bash only
- Checkout Windows-style, commit Unix-style line ending

After Succesfully instaling git . You will having gitbash application we will be using it in our futher article 

These steps will also give Solution to error that came during pull or pushing data to git or cloning data from git . follow these simple steps will be answer for that .

Errors like 


not a valid object name 'master'


First go to the website or file on github like i goto github.com/mono/webite and on the top there will something written Fork click on it then website will be forked to your github account like my repository is forked to  https://github.com/bhallaheemanshu/webiste

Step 1first create a directory say website


Step 2
get inside the directory using change directory command as show in image below 

Then clone the directory using following command with url from where you want to clone the data 


Step 3
now again website you are cloned will be cloned inside your website directory get inside it and fire the command to add upstream


Step 4
Now fetch the brancher available using fetch upstream command


Step 5 
Now Make some change to your files all the editing or insertion or new thing yo want to create

Step 6
Now pusht the repository you edited on your personal computer to the online repository to propose the changes
 

Step 7
Now all changes that i want to do are done and saved on my files that i have forked here at github.com/bhallaheemanshu/website

So to do them also on github.com/mono/website Login to your account and go to website repository or website original community like i am going to or goto link like i am going to github.com/mono/website  then click on pull requests then click on create pull request 
Then it choose your branch there and then it will show automatically what changes you are propsing then write the title and some summery and click on create . Now your request for proposing changes to online repository will be done


Setting Up Path Variable windows


Setting Up Path Variables For Ruby 

Setting Up Path Variables For Python

Path variables are must need to setup whenever you are installing some developement platforms like android , java , Python , Ruby .

Today i have some task related to installation of Ruby and using the jekyll for some configuration a website so I decided to taste the task

Here is the Installation procedure for installing Python , Installing Ruby and setting up jekyll

Setting Up Jekyll , Python , Ruby

To set up your path variables you follow these steps


  1. Right on mycomputer 
  2. click on properties 
  3. click on Advanced settings
  4. Click on Environment Variables
  5. Now Search for Path System variable
  6. and hit enter on it
  7. Now in value field fill values for python and ruby installation at end of values already filled

C:\ruby\bin;C:\Python27;C:\Python27\Scripts;


These values will be filled according to where you have installed Ruby and python