Thursday 18 December 2014

Import dbf database in sqlserver


Steps For Importing Dbf database into Sql Server

There is no appropriate way or direct way to do that but nothing is impossible so there is workaround that can be done to perform this task . Here is the steps :-

  • First we have to convert the .dbf format data into .csv format data
  • Then depending on table structure Create the Table in database one by one 
  • Then using import bulk options of sql server that accept the data in csv format we can easily insert data in sql server

Convert DBF to CSV

DBF Converter allows you convert a single dbf file or folder with dbf files to csv format from GUI or command line.
1. Select the dbf file or foder with dbf files for batch conversion.
2. Select the output csv file or folder for csv files for batch conversion.

Download Software 
dbf to csv conversion


3. Preview, select options for sorting, filtering data (if necessary)
You can also select/unselect columns, set order for columns.
common options for dbf to csv conversion

4. Select options for csv format:columns delimiter, rows delimiter (if necessary), and click "Finish"

CSV file format options


Import CSV File Into SQL Server Using Bulk Insert


 CSV stands for Comma Separated Values, sometimes also called Comma Delimited Values.

Steps For Importing CSV in Sql server 

  • Create The table whose data we are going to import into database

USE TestData
GO
CREATE TABLE
CSVTest
(ID INT,
FirstName VARCHAR(40),
LastName VARCHAR(40),
BirthDate SMALLDATETIME)
GO


where TestData is database name and CSVTest is table name
  • I assume your .Csv file lies in c:\csvtest.txt and it contains data like this

    1,James,Smith,19750101
    2,Meggie,Smith,19790122
    3,Robert,Smith,20071101
    4,Alex,Smith,20040202


  • Then Run the following script in the query windows of sql server . Make sure your paths given are correct to .csv file

    Code


    BULK
    INSERT
    CSVTest
    FROM 'c:\csvtest.txt'
    WITH
    (
    FIELDTERMINATOR = ',',
    ROWTERMINATOR = '\n'
    )
    GO
    --Check the content of the table.
    SELECT *
    FROM CSVTest
    GO
    --Drop the table to clean up database.
    DROP TABLE CSVTest
    GO

    Snapshot


Saturday 13 December 2014

using git making pull request and troubleshoot errors

Today I am going to share some most simple and easy steps how to use git . 

How we can get a git repository data on our Personal computer 
How to make changes to these files and then how to propose that merging of files to repository from where you have downloaded it 
How to deal or remove some every basic errors that came during this process

So lets start --
  • First of all go to link of directory or as we say repository on github like i am doing this for a MonoWeb Repository on link below
                             https://github.com/mono/webiste
Ths repository is repository of official website of Mono https://www.mono-project.com/ 

  • First of the the thing you must have is gitbash . You can Download and setup gitbash from  here :-
1.  Download Git for Windows here:
I downloaded Git-1.7.6-preview20110708.exe. It contains the  full installer for official Git 1.7.6
2.  Follow the instructions here exactly as it says.
3.  Be sure to select these options:
- Use Git Bash only
- Checkout Windows-style, commit Unix-style line ending

After Succesfully instaling git . You will having gitbash application we will be using it in our futher article 

These steps will also give Solution to error that came during pull or pushing data to git or cloning data from git . follow these simple steps will be answer for that .

Errors like 


not a valid object name 'master'


First go to the website or file on github like i goto github.com/mono/webite and on the top there will something written Fork click on it then website will be forked to your github account like my repository is forked to  https://github.com/bhallaheemanshu/webiste

Step 1first create a directory say website


Step 2
get inside the directory using change directory command as show in image below 

Then clone the directory using following command with url from where you want to clone the data 


Step 3
now again website you are cloned will be cloned inside your website directory get inside it and fire the command to add upstream


Step 4
Now fetch the brancher available using fetch upstream command


Step 5 
Now Make some change to your files all the editing or insertion or new thing yo want to create

Step 6
Now pusht the repository you edited on your personal computer to the online repository to propose the changes
 

Step 7
Now all changes that i want to do are done and saved on my files that i have forked here at github.com/bhallaheemanshu/website

So to do them also on github.com/mono/website Login to your account and go to website repository or website original community like i am going to or goto link like i am going to github.com/mono/website  then click on pull requests then click on create pull request 
Then it choose your branch there and then it will show automatically what changes you are propsing then write the title and some summery and click on create . Now your request for proposing changes to online repository will be done


Setting Up Path Variable windows


Setting Up Path Variables For Ruby 

Setting Up Path Variables For Python

Path variables are must need to setup whenever you are installing some developement platforms like android , java , Python , Ruby .

Today i have some task related to installation of Ruby and using the jekyll for some configuration a website so I decided to taste the task

Here is the Installation procedure for installing Python , Installing Ruby and setting up jekyll

Setting Up Jekyll , Python , Ruby

To set up your path variables you follow these steps


  1. Right on mycomputer 
  2. click on properties 
  3. click on Advanced settings
  4. Click on Environment Variables
  5. Now Search for Path System variable
  6. and hit enter on it
  7. Now in value field fill values for python and ruby installation at end of values already filled

C:\ruby\bin;C:\Python27;C:\Python27\Scripts;


These values will be filled according to where you have installed Ruby and python

Installing Python and Easy_install


Today i am going to touch the Python . I am having some task regarding configuration of a website so for that i have to use Python . I have never used it . But as a Programmer Saying - 

The More Time We have Spent on First programming language More Fastly we can do other 

Today i am going to test this saying

So Lets get started with the work --

Install Python

  • First of all Go to http://www.python.org/download/
  • Download appropriate version of Python windows installer, e.g. Python 2.7.6 Windows Installer.I prefer to install python 2 as currently python 3 is creating some problem .

Install

  • For Python Installation Set the installation directory (e.g. C:\Python27) to PATH. (How to? See Troubleshooting #1)
  • Verify Python installation

python --version


Example output:

  • If your installation is done properly then it will show message as below .

Python 2.7.6


Install ‘Easy Install’


python “C:\ez_setup.py”


  • Add ‘Python Scripts’ directory (e.g. C:\Python27\Scripts) to PATH.

Install Pygments


  • Verify easy_install is installed properly

easy_install --version

  • Example output:

setuptools 3.1


Install Pygments using “easy_install”


easy_install Pygments

Installing jekyll on windows

Install Ruby

while installation of ruby you may suffer from some errors like

bundle-command-not-found-windows-x64

Following the steps below carefully will be answer to these errors

  • Go to http://rubyinstaller.org/downloads/
  • In RubyInstallers section, click a version to download.
  • For example, Ruby 2.0.0-p451 (x64) is the Windows installer for Ruby 2.0.0 x64 on 64-bit machines. These are installers that i am going to use.
  • Complete the installtion by going through installer that you have downloaded
  • At time of installing Keep the default directory  to C:\Ruby200-x64 if possible, please note installer advises that 'Please avoid any folder name that contains spaces (e.g. My Ruby).'
  • Markt he checkbox saying "Add Ruby executables to your PATH" , so PATH will be updated automatically to avoid headaches.
  • Open up a command prompt window by pressing ctrl + r from your keyword and type in cmd and hit enter this will open command prompt and type in the following command, to see if Ruby has been install correctly or not.

Ruby installtion Setting Up jekyll
Ruby Installation - Installing jekyll
                              

ruby -v                                                                              


Example output:
If ruby is installed correctly it will give you output as -

ruby 2.0.0p451 (2014-02-24) [x64-mingw32]


Install DevKit


  • The DevKit is a toolkit that makes it easy to build and use native C/C++ extensions for Ruby on Windows. 
  • Now first Go to http://rubyinstaller.org/downloads/ again.
  • Download “DEVELOPMENT KIT” installer that matches the Windows architecture and the Ruby version just installed. For instance, DevKit-mingw64-64-4.7.2-20130224-1432-sfx.exe is for 64-bit Windows with Ruby 2.0.0 x64. These are versions that i am using

  • Here is a list about how to choose the correct DevKit version:
  1. Ruby 1.8.6 to 1.9.3: DevKit tdm-32-4.5.2
  2. Ruby 2.0.0: DevKit mingw64-32-4.7.2
  3. Ruby 2.0.0 x64: DevKit mingw64-64-4.7.2
  • Run the installer and extract it to a folder, e.g. C:\DevKit.
  • Initialize and create config.yml file. Type in the following commands in command Prompt window:


cd “C:\DevKit”
ruby dk.rb init
notepad config.yml


  • In opened notepad window, add a new line - C:\Ruby200-x64 at the end, SAVEand close.


  • Back to the Command Prompt, review (optional) and install.


ruby dk.rb review

ruby dk.rb install


Install Jekyll


  • Verify that gem has been installed properly


gem -v


Example output:

2.0.14
Install Jekyll gem
gem install jekyll


Install Python

Here is link on my blog about its installation or you can follow steps below
Installing Python and Easy_install
  • First of all Go to http://www.python.org/download/
  • Download appropriate version of Python windows installer, e.g. Python 2.7.6 Windows Installer.I prefer to install python 2 as currently python 3 is creating some problem .


Install

  • For Python Installation Set the installation directory (e.g. C:\Python27) to PATH. (How to? See Troubleshooting #1)
  • verify Python installation

python --version


Example output:

  • If your installation is done properly then it will show message as below .

Python 2.7.6


Install ‘Easy Install’

  • Visit https://pypi.python.org/pypi/setuptools#installation-instructions for detailed installation instructions.
  • For Windows 7 machines, download ez_setup.py and SAVE it, for example, to C:\. Then run it using Python in a command prompt window:

python “C:\ez_setup.py”


  • Add ‘Python Scripts’ directory (e.g. C:\Python27\Scripts) to PATH.

Install Pygments

  • Verify easy_install is installed properly

easy_install --version

  • Example output:

Install Pygments using “easy_install”


easy_install Pygments


Start Jekyll


  • Following the commands on official Jekyll Quick-start guide, a new Jekyll blog should be created and can be browsed at localhost:4000.

jekyll new myblog
cd myblog
jekyll serve


  • Now Everything is done Everytime you want to Start you already built website or new website with jekyll you just start your command prompt navigate to your website's root directory like

cd mywebsite


  • Then type in :-  'jekyll serve' and that's it yout server will be started in few seconds and after that you can navigate to your browser with url as -

http://localhost:4000/

Setting Up Path Variables For Python and Ruby


Saturday 6 December 2014

Mind Blowing Interesting facts about Google


Google Timer

You can set a timer on Google (and get an alarm to sound when time is up) by Googling any amount of time followed by "timer."


 Google Sky

Google sky lets you explore the far reaches of the universe using images from NASA satellite, the Sloan Digital Sky Survey, and the Hubble Telescope.


  • Google Grams


    Google nGrams is a fun tool that lets you search for words in 5.2 million books published between 1500 and 2008 so you can see how much it's been used over time.

    Spell Huge Numbers

    Intimidated by huge numbers? Google will help you figure out how to pronounce that 12-string number if you type "=english" after it.
     
    Add +anything To email
     You can add "+anything" when typing your email address and it will still work. This can be good for filtering emails (for example, you could set up a folder for all emails sent to "youremail+datingsite@gmail.com").


    • Google SmartyPins
      Google recently released a fun new Maps game called SmartyPins that gives you geographic trivia.


      Google Getting Married

      Getting married? Google will help you plan your wedding, announce the news, locate a venue, fill in the plans, make a website, and more.


      Google Translate

      There's a "Manual" feature in Google Translate that lets you draw characters or symbols.

      Google Fonts
      Find a gorgeous font that you can use for free (Google Fonts).

      Google Art ProjectGet your culture on by using Google Art Project to check out super high-res photos of artwork from the world's greatest museums.


      Google Reverse ( ulta-pulta google )


      • Google when spelled backwards becomes 'elgooG', But the interesting fact is we can also use http://www.elgoog.im for our searches.
      • 'elgooG' is the mirror image of Google search engine; not only is all of its content a reversal of Google, the search terms must also be written in reverse order to yield the desired results.
      • Though created for fun purpose, it found practical use in the People's Republic of China after the domestic banning of Google, as it circumvented the government firewalls.


      Google Currency Converter

      Google currency converter is very smart:

  • Tuesday 11 November 2014

    Benefits of Html Helpers in Asp.Net MVC

    So today i am going to give an overview on Html helpers in Asp.Net MVC . So first questions that stuck our mind are -

     What are Html helpers ?
     Why to use them instead of using simple Html coded controls
     What are their benefits in Asp.Net MVC

    Html helpers are very much similar to Asp.Net web controls . But Html helpers are much more lightweight as compared to Asp.net Web forms Server controls . The similarity between server controls in Asp.net webforms and Html helpers in Asp.Net MVC are Viewstate . Means they both contain the ability to hold or update the data on postbacks using ViewStates for each controls .

    Main  Benefits Of using Html Helpers in Asp.net MVC

    • MVC Html Helpers contains Overloaded Methods like IPostBackDataHandler that Pre-populate the values of html helpers means it works similar to as viewstates
    • Html Helpers is also having one more advantage It provide inbuilt Validation for html helpers textboxes 
    Available HTML Helpers 

    There following HTML helpers can be used to render (modify and output) HTML form elements:

    1. BeginForm()
    2. EndForm()
    3. TextArea()
    4. TextBox()
    5. CheckBox()
    6. RadioButton()
    7. ListBox()
    8. DropDownList()
    9. Hidden()
    10. Password()

    Sample Code To Demonstrate Use of Html Helpers


    ASPX CODE

    <%= Html.ValidationSummary("Create was unsuccessful. Please correct the errors and try again.") %>
    <% using (Html.BeginForm()){%>
    <p>
    <label for="FullName">FullName</label>
    <%= Html.TextBox("FullName") %>
    <%= Html.ValidationMessage("FullName", "*") %>
    </p>
    <p>
    <label for="Username">Username</label>
    <%= Html.TextBox("Username") %>
    <%= Html.ValidationMessage("Username", "*") %>
    </p>
    <p>
    <label for="Password">Password:</label>
    <%= Html.Password("Password") %>
    <%= Html.ValidationMessage("Password", "*") %>
    </p>
    <p>
    <label for="Password">Confirm Password:</label>
    <%= Html.Password("ConfirmPassword") %>
    <%= Html.ValidationMessage("ConfirmPassword", "*") %>
    </p>
    <p>
    <%= Html.CheckBox("ReceiveNewsletter") %>
    <label for="ReceiveNewsletter" style="display:inline">Receive Newsletter?</label>
    </p>
    <p>
    <input type="submit" value="Register" />
    </p>
    <%}%>

    RAZOR CODE

    @Html.ValidationSummary("Create was unsuccessful. Please correct the errors and try again.")
    @using (Html.BeginForm()){ 
    <p>
    <label for="FullName">FullName</label>
    @Html.TextBox("FullName")  
    @Html.ValidationMessage("FullName", "*")  
    </p>
    <p>
    <label for="Username">Username</label>
    @Html.TextBox("Username")  
    @Html.ValidationMessage("Username", "*")  
    </p>
    <p>
    <label for="Password">Password:</label>
    @Html.Password("Password")  
    @Html.ValidationMessage("Password", "*")  
    </p>
    <p>
    <label for="Password">Confirm Password:</label>
    @Html.Password("ConfirmPassword")  
    @Html.ValidationMessage("ConfirmPassword", "*")  
    </p>
    <p>
    @Html.CheckBox("ReceiveNewsletter")  
    <label for="ReceiveNewsletter" style="display:inline">Receive Newsletter?</label>
    </p>
    <p>
    <input type="submit" value="Register" />
    </p>

    Advantage of Asp.Net MVC

    Asp.net  is a part of .net platform for creating,building, deploying and running web applications using C#,VB etc .we can develop a web application by using Asp.Net Web Form and Asp.Net MVC. Asp.Net MVC is advanced technology that is most widely used nowadays . MVC is a great thing available for developers that makes work of developers easy and more flexible .

    MVC stands for Model-View-Controller . MVC separates the code in 3 different things that make the code cleaner , flexible and easy to understand and modify . So Today I am going to tell some of big advantages or some good things that Asp.Net MVC provides as compared to Web-forms . This is not a comparison of Web-forms and MVC this is just overview or advantages or features that Asp.Net mvc provides us

    1. Rapid Application Development ( RAD ) :- So first I will start with biggest advantage of Asp.net Mvc and this is the thing that is most in demand in Enterprises and everywhere in development area . This is Rapid application development . Asp.Net MVC provides Database First Approach for developing WebApplications . This approach is used with Scanfolding Technique this technique is like a magic provided in Asp.Net MVC . Scanfolding technique tells if you have designed your database in good manner that means if you have Created Normalized Database with all like Primary keys, foreign keys ,One-many , many-many relationships then you need not to do more effort for developing rest on your application in Asp.Net MVC Rest of things will be created with less efforts using scanfolding . With Asp.Net MVC you can have your simple basic website ready within 1 minute after you created your Database . So that was explanation to RAD in Asp.Net MVC

    In Pic below we are choosing MVC5 scanfolding template


    Then it automatically generate code for us


    2. Partial Layouts :- In Asp.Net we ofter use User controls that were used for code reusability we create a user control then where we require that type of code that we coded in user control we call that user control there . In similar way Partial Layouts is provided in Asp.Net MVC .Partial Layouts are very useful things provided in Asp.Net MVC . Partial Layouts are like Master Pages that we use in Asp.Net web-forms . These are used as master pages or master layouts that can be called in any view in Asp.Net MVC . Like in php we use include ( "partialheader.php" ); to include some header in all pages or some specific pages so instead of writting that code in all pages we call then there . Similar in Asp.Net Web-Forms We use content placeholders and contentplaceholders are placed in Master Pages and when we call these master pages and use then in child forms then code of child forms is placed in content placeholder area In the similar way Partial layout works . The partial layout contains @Renderbody in Razor view then replace the child page or code of  page that is calling it

    3. MVC Is  Stateless : Asp.Net was Statefull by using viewstates or sessions but Asp.net MVC is stateless . It will be wrong to say mvc is stateless it would say http is stateless . By stateless i mean there is nothing in http that holds the user session or that record the activity of user when user logged in etc so this was maintained or state was maintained using viewstate and sessions . This was used in asp.net Webforms because they contain server controls that contains viewstate and that postback the values and update viewstates But there is not server controls in Asp.Net MVC So it does not maintain states . It has divided the code in three patterns model-view-controller that handles everything That's why it says MVC is stateless But in actual http is stateless that why MVC is stateless

    4. No Events : As we came to know there are no server controls in Asp.Net MVC so there are no events for any control as there are not server controls All this is handled by connection of controllers with views where views hold your html code or designing code and controller hold your logics code .


    Difference Between ViewState and Session in Asp.Net

    "View State and Session "
      The Two main State Management things used in Asp.net Web applications . We cannot even think of an application without ViewState and Session . So today i decided to gave an overview of what is the difference between viewstate and session why these two terms exist and what are their usage To clearify this difference i am giving some points below

    1. So First of all what is a Session ? -- A Session is a Time or a span of time upto which user used that webapplication or for how much session of how much period of time user has used your webapplication will be called session . Session contains some values that will be used throughout the user interaction with the webapplication and used in more than one webpage that user navigate So we can say that it is a variable in simple sense that takes our value from one page to another and Session got distroyed or killed automatically after a particular span or time or it is automatically destroyed or cleared when like user signout of application or when user close the browser

    A live example would be a web application where a user login . Each user that logs into your system will have a unique session. We can hold additional data into the session which can be used as the user browses your site. We can hold the username, userrole, userpermissions simply by adding it to the session:


    Session[“userrole”] = “programmer”; 
    Session[“username”] = “Ageek”; 
    Session[“userpermissions"] = “cangotohell”; 

    A Session  stores the information on the server side  . It stores the values or it uses server memory for storage of data that it holds in . Session variables will use different new and unique session variables for each different user that logs in to web application . large amount of data can be stored on the session, web sites that have a large amount of traffic not use this method, because it will put a severe load on the server memory.

    2. Now What is ViewState ? -- so we are clear with session now comes the turn of viewstate . So ViewState is also used for holding our important data But in case of viewstate data is kept in the single viewstate page . It means viewstate data is not taken from one page to another page in this point it is different from session . 

    ViewState is only used to Track to analyse the changes that occur to current page during postbacks of data to pages .The viewstate of page can be viewed if you right click on webpage and then clickon view page source then you will see some code of lines similar to below code --

    <input type="hidden" name="__VIEWSTATE" id="__VIEWSTATE" value=””></input>

    If you are having large number of viewstate fields then it will make the postbacks very slow as all viewstate values will be needed to updated during postbacks so it will make the webpage open slower

    Data can be written into viewstate like we do in sessions . But it can retain that data only with life cycle of page after that it will be changed or updated .If you closes that page or redirects to another page then viewstate data will be reset .

    How to fill data in viewstate and how to access that data 
    ViewState[“PreviousPage”] = “http://www.google.com”; 

    Retrieving data form ViewState:
    string PreviousPage = ViewState[“PreviousPage”].ToString();  

    Wednesday 29 October 2014

    Display Category on Product Page in Opencart

    Necessity is the advent of everything today while doing some project i got requirement from my client to show the categories of the product to which that particular product belongs along with the product on the product view page So in order to accomplish this task we have to perform some simple and easy steps :

    • In your open-cart folder whether it is online or offline double click on Catalog Folder
    • Then inside Catalog folder double click on Controller folder
    • Then inside Controller Folder double click on Product Folder
    • Then inside Product Folder open Product.php file in your text editor
    • Then Search for following line in Product.php file

    $this->load->model('catalog/product');

    • When this line found just below this line add the following code 

    //product category

    $this->load->model('catalog/category');

    $this->data['catprod'] = array();

    $product_category = $this->model_catalog_product->getCategories($product_id);

    foreach ($product_category as $prodcat) {

    $category_info = $this->model_catalog_category->getCategory($prodcat['category_id']);

    if ($category_info) {

    $this->data['catprod'][] = array(
    'name' => $category_info['name'],
    'href' => $this->url->link('product/category', 'path=' . $category_info['category_id'])
    );
    }
    }

    //end of product category


    • Then again come in root folder of opencart
    • In your open-cart folder whether it is online or offline double click on Catalog Folder
    • Then inside Catalog folder double click on view folder
    • Then inside Controller Folder double click on theme Folder
    • Then inside Product Folder open your currently applied theme folder
    • Then inside theme folder open template folder


    Saturday 25 October 2014

    How to use Login Dialog Box in Android Mono C#


    For This small demo project we require the following file structure

    Main.axml file that contains code for hello world button on which we place button that will further generate the Dialog Box for Login Activity

    Main.cs file Now this file will contain the code for Main.axml actions and events

    Login.axml file that will contain the code that will contain the style or pattern how the login dialog will look all .axml design code for login form will reside here


    AXML Code For Login  Dialog Box  ( login .axml ) file code

    Design Look -


    It is a simple code that contains a linear layout that will place all controls in linear order as they are placed in it Then we have placed two Edittext for allowing the user to enter username in first and Password in second . Then we have placed two buttons One for login and second for cancellation of login .

    <?xml version="1.0" encoding="utf-8"?>
    <LinearLayout xmlns:android="http://schemas.android.com/apk/res/android"
        android:orientation="vertical"
        android:layout_height="match_parent"
        android:paddingLeft="10dp"
        android:paddingRight="10dp"
        android:background="#fff"
        android:layout_width="300dp"
        android:paddingTop="10dp">
        <EditText
            android:layout_height="wrap_content"
            android:id="@+id/txtUsername"
            android:layout_width="match_parent">
            <requestFocus />
        </EditText>
        <EditText
            android:layout_height="wrap_content"
            android:inputType="textPassword"
            android:id="@+id/txtPassword"
            android:layout_width="match_parent" />
        <LinearLayout
            android:layout_width="match_parent"
            android:layout_height="wrap_content"
            android:id="@+id/linearLayout1">
            <Button
                android:layout_width="wrap_content"
                android:layout_height="wrap_content"
                android:layout_weight="0.5"
                android:id="@+id/btnLogin"
                android:text="Login" />
            <Button
                android:layout_width="wrap_content"
                android:layout_height="wrap_content"
                android:layout_weight="0.5"
                android:id="@+id/btnCancel"
                android:text="Cancel" />
        </LinearLayout>
    </LinearLayout>

    XAML code for Main .axml file 

    Design Look -


    <?xml version="1.0" encoding="utf-8"?>
    <LinearLayout xmlns:android="http://schemas.android.com/apk/res/android"
        android:orientation="vertical"
        android:layout_height="match_parent"
        android:paddingLeft="10dp"
        android:paddingRight="10dp"
        android:background="#fff"
        android:layout_width="300dp"
        android:paddingTop="10dp">
     
            <Button
                android:layout_width="wrap_content"
                android:layout_height="wrap_content"
                android:layout_weight="0.5"
                android:id="@+id/hello"
                android:text="Hello world!" />
     
    </LinearLayout>


    C# Code for Main.cs file 


     protected override void OnCreate(Bundle bundle)
    {
     base.OnCreate(bundle);
     SetContentView(Resource.Layout.Main);
     TextView hellobtn = FindViewById<TextView>(Resource.Id.hello);
     hellobtn.Click += btnclick;
    }

    void btnclick(object sender, EventArgs e)
            {

                Dialog login = new Dialog(this);
                login.SetContentView(Resource.Layout.login);
                login.Show();
    }

    Explanation of Code 

    PART I

    protected override void OnCreate(Bundle bundle)
    {
     base.OnCreate(bundle);
     SetContentView(Resource.Layout.Main);
     TextView hellobtn = FindViewById<TextView>(Resource.Id.hello);
     hellobtn.Click += loginclick;
    }

    In above code First i have used OnCreate Method that is startup method when an android application starts it first load up everything in OnCreate Method and Create their space in memory

    SetContentView(Resource.Layout.Main);

    Then at this line i have set what layout will this code is meant for I have choosen Main layout in Resource folder whose design preview is shown in images above

     Button loginbtn = FindViewById<Button>(Resource.Id.btnLogin);

    Then at this line i have made instance of button and set that textview to the hello world button that i have placed on Main form I have used FindviewById method to find the button and then assign that button to hellobtn

    Then at this line i have assigned click event to button by using following line of code

     hellobtn.Click += btnclick;

    Then i have given definition to btnclick funtion in code below

    PART I

    void btnclick(object sender, EventArgs e)
            {

                Dialog login = new Dialog(this);
                login.SetContentView(Resource.Layout.login);
                login.Show();
    }

    In this code i have made Instance of Dialog class for showing dialog box on screen i have created new class instance then i have set what view will be shown on dialog that is going to appear i have set the view contentview to login.axml content view that i have designed earlier in this article then i have used show( ) function to show login dialog box


    Friday 24 October 2014

    Star Pattern Programs Cplusplus

    Program To Print Following Star Pattern in Cpluplus


    Star Pattern in Cpluplus


    #include<iostream.h>
    void main()
    {
       int i,j,k,n;
       cout<<"\Enter the number of lines to be printed: ";
        cin>>n;
       for(i=0;i<n;i++)
       {
          for(j=0;j<(n-i-1);j++)
     cout<<" ";
          for(k=0;k<(2*i+1);k++)
     cout<<"*";
          cout<<endl;
       }
          for(i=0;i<n-1;i++)
       {
          for(j=0;j<=i;j++)
    cout<<" ";
          for(k=(2*n-2*i-3);k>0;k--)
       cout<<"*";
          cout<<endl;
       }
    }


    Program To Print Following Star Pattern in Cpluplus

    Star Pattern in Cpluplus

    Star Pattern in Cpluplus


    #include<iostream.h>
    void main()
    {
     int i,j,k,n;
     cout<<"\Enter the number of lines to be printed: ";
     cin>>n;
     for(i=0;i<n;i++)
     {
           for(j=n-i-1;j>0;j--)
         cout<<" ";
           cout<<"*";
           for(k=2*i-1;k>0;k--)
         cout<<" ";             //code for upper triangle
           if(i!=0)
         cout<<"*";
           cout<<endl;
      }
      for(i=n-1;i>0;i--)
      {
           for(j=0;j<n-i;j++)
         cout<<" ";
           cout<<"*";                  //code for lower triangle
    for(k=2*i-3;k>0;k--)
        cout<<" ";
           if(i!=1)
         cout<<"*";
           cout<<"\n";
        }
    }


    Program To Create Circular Loading Bar using Graphics.h


    #include<graphics.h>

    #include<dos.h>

    void main()
    {
    int gd=DETECT,gm; 
                  // variable to detect graphics driver and graphic mode

     int counter;   

    //Below is code to initialize the graphics with parameters for graphics initgraph(&gd,&gm,"c:\\turboc3\\bgi");

    //Loop to show the loading circle for(counter=0;counter<=360;++counter)
    {
    circle(300,200,80);
    pieslice(300,200,0,counter,80);
    outtextxy(200,320,"Loading....Please Wait!");
    delay(20);
    }
    closegraph();
    }

    OUTPUT :
    Program To Create Circular Loading Bar graphics.h cplusplus
    Program To Create Circular Loading Bar graphics.h cplusplus


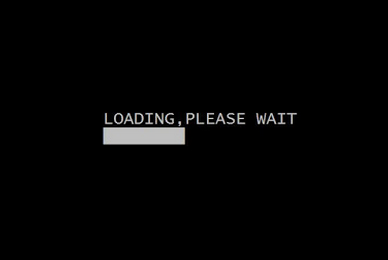
    Program To Create Loading Bar using Graphics.h


    #include<iostream.h>
    #include<conio.h>
    #include<graphics.h>
    #include<dos.h>

    void main()
    {
     int x=170,i,gdriver=DETECT,gmode;
      // variable to detect graphics driver and graphic mode

    //Below is code to initialize the graphics with parameters for graphics
     initgraph(&gdriver,&gmode,"c:\\tc\\bgi");

     settextstyle(DEFAULT_FONT,HORIZ_DIR,2);

    //Outtextxy is used to print the given text at specified x and y pixel position 
    //It will print given text at pixel position 170,180
     outtextxy(170,180,"LOADING,PLEASE WAIT");

      for(i=0;i<300;++i)
     {
      delay(30);
      line(x,200,x,220);
      x++;
     }
     getch();

    //close the graph that was initialized
     closegraph();  

    }

    OUTPUT :
    Program To Create Loading Bar using Graphics.h Cplusplus
    Program To Create Loading Bar using Graphics.h Cplusplus


    Program To Print Star Triangle Pattern in Cplusplus


    #include<iostream.h>
    #include<conio.h>

    void main()
    {
    clrscr(); //to clear the screen
    int i,j,k,num;

    cout<<"Tell How many lines you want";
    cin>>num;

    num*=2;
    for(i=0;i<num;i+=2)
    {
    cout<<"\n";

    for ( j = num; j > i; j -= 2 )
    cout<<" ";

    for( k=0; k<=i; ++k )
    cout<<"*";
    }
    getch(); //to stop the screen
    }
    OUTPUT


    Program To Print Star Triangle Pattern Cplusplus
    Program To Print Star Triangle Pattern Cplusplus

    Program To Print Alphabets in Cplusplus ( I have printed A to H ) 


    #include<iostream>

    using namespace std;

    int main()
    {
    int i,j,k=1;
    char ch;
    cout<<"Input an Alphabet in capital letters that you want to print:";
    cin>>ch;
    cout<<"\n\n\n\n";
    switch(ch)
    {
    case 'A':
    cout<<"\t\t\t    ";
    for(i=1;i<=40;++i)
    {
    for(j=0;j<=22;++j)
    {
    if(i==1||i==2||i==21||i==20)
    cout<<"*";
    else
    {
    if(j==0||j==20)
    cout<<"**";
    else
    cout<<" ";
    }
    }
    cout<<"\n\t\t\t    ";

    }
    break;


    case 'B':
    cout<<"\t\t\t\t";

    while(k<=2)
    {
    for(i=1;i<=9;++i)
    {
    for(j=0;j<=i;++j)
    {
    if(j==0||j==i)
    cout<<"**";
    else
    cout<<" ";
    }

    cout<<"\n\t\t\t\t";

    }
    for(i=1;i<=10;++i)
    {
    if(i==1||i==10)
    cout<<"**";
    else
    cout<<" ";
    }
    cout<<"\n\t\t\t\t";

    for(i=1;i<=10;++i)
    {
    if(i==1||i==10)
    cout<<"**";
    else
    cout<<" ";
    }
    cout<<"\n\t\t\t\t";

    for(i=9;i>=1;--i)
    {
    for(j=0;j<=i;++j)
    {
    if(j==0||j==i)
    cout<<"**";
    else
    cout<<" ";
    }
    cout<<"\n\t\t\t\t";
    }
    ++k;
    }
     break;

     case'C':
    cout<<"\t\t\t    ";

    for(i=1;i<=40;++i)
    {
    for(j=0;j<=22;++j)
    {
    if(i==1||i==2||i==39||i==40)
    cout<<"*";
    else
    {
    if(j==0)
    cout<<"**";
    else
    cout<<" ";
    }
    }
    cout<<"\n\t\t\t    ";

    }
    break;

     case'D':
     cout<<"\t\t\t\t";
     for(i=1;i<=18;++i)
     {
    for(j=0;j<=i;++j)
    {
    if(j==0||j==i)
    cout<<"**";
    else
    cout<<" ";
    }
    cout<<"\n\t\t\t\t";
     }
     while(k<=4)
     {
    for(i=1;i<=19;++i)
    {
    if(i==1||i==19)
    cout<<"**";
    else
    cout<<" ";
    }
    cout<<"\n\t\t\t\t";
     ++k;
     }
     for(i=18;i>=1;--i)
     {
    for(j=0;j<=i;++j)
    {
    if(j==0||j==i)
    cout<<"**";
    else
    cout<<" ";
    }
     cout<<"\n\t\t\t\t";
     }
     break;

     case'E':

     cout<<"\t\t\t\t";
     for(i=1;i<=39;++i)
     {
    for(j=1;j<=20;++j)
    {
    if(i==1||i==2||i==20||i==21||i==38||i==39)
    cout<<"*";
    else
    {
    if(j==1)
    cout<<"**";
    else
    cout<<" ";
    }
    }
     cout<<"\n\t\t\t\t";
     }
     break;

     case'F':

     cout<<"\t\t\t\t";

    for(i=1;i<=40;++i)
    {
    for(j=1;j<=20;++j)
    {
    if(i==1||i==2||i==18||i==19)
    cout<<"*";
    else
    {
    if(j==1)
    cout<<"**";
    else
    cout<<" ";
    }
    }
    cout<<"\n\t\t\t\t";
    }
    break;

     case'G':

    cout<<"\t\t\t";
    for(i=1;i<=25;++i)
    {
    for(j=1;j<=20;++j)
    {
    if(i==1||i==2)
    cout<<"*";
    else
    {
    if(j==1)
    cout<<"**";
    else
    cout<<" ";
    }
    }
    cout<<"\n\t\t\t";
    }
    for(i=1;i<=10;++i)
    {
    for(j=1;j<=20;++j)
    {
    if(i==1||i==2)
    { if(j==1||j==14||j==15||j==16)
    cout<<"**";
      else
      cout<<" ";
    }
    else
    {
    if(i==9||i==10)
    cout<<"*";
    else
    {  if(j==1||j==18)
      cout<<"**";
      else
      cout<<" ";
    }
    }
    }
    cout<<"\n\t\t\t";
    }
    break;


     case'H':

    cout<<"\t\t\t";
    for(i=1;i<=40;++i)
    {
    for(j=1;j<=21;++j)
    {
    if(i==20||i==21)
    cout<<"*";
    else
    {
    if(j==1||j==19)
    cout<<"**";
    else
    cout<<" ";
    }
    }
    cout<<"\n\t\t\t";
    }
    break;

    return 0;
    }

    OUTPUT :