Wednesday 29 October 2014

Display Category on Product Page in Opencart

Necessity is the advent of everything today while doing some project i got requirement from my client to show the categories of the product to which that particular product belongs along with the product on the product view page So in order to accomplish this task we have to perform some simple and easy steps :

  • In your open-cart folder whether it is online or offline double click on Catalog Folder
  • Then inside Catalog folder double click on Controller folder
  • Then inside Controller Folder double click on Product Folder
  • Then inside Product Folder open Product.php file in your text editor
  • Then Search for following line in Product.php file

$this->load->model('catalog/product');

  • When this line found just below this line add the following code 

//product category

$this->load->model('catalog/category');

$this->data['catprod'] = array();

$product_category = $this->model_catalog_product->getCategories($product_id);

foreach ($product_category as $prodcat) {

$category_info = $this->model_catalog_category->getCategory($prodcat['category_id']);

if ($category_info) {

$this->data['catprod'][] = array(
'name' => $category_info['name'],
'href' => $this->url->link('product/category', 'path=' . $category_info['category_id'])
);
}
}

//end of product category


  • Then again come in root folder of opencart
  • In your open-cart folder whether it is online or offline double click on Catalog Folder
  • Then inside Catalog folder double click on view folder
  • Then inside Controller Folder double click on theme Folder
  • Then inside Product Folder open your currently applied theme folder
  • Then inside theme folder open template folder


Saturday 25 October 2014

How to use Login Dialog Box in Android Mono C#


For This small demo project we require the following file structure

Main.axml file that contains code for hello world button on which we place button that will further generate the Dialog Box for Login Activity

Main.cs file Now this file will contain the code for Main.axml actions and events

Login.axml file that will contain the code that will contain the style or pattern how the login dialog will look all .axml design code for login form will reside here


AXML Code For Login  Dialog Box  ( login .axml ) file code

Design Look -


It is a simple code that contains a linear layout that will place all controls in linear order as they are placed in it Then we have placed two Edittext for allowing the user to enter username in first and Password in second . Then we have placed two buttons One for login and second for cancellation of login .

<?xml version="1.0" encoding="utf-8"?>
<LinearLayout xmlns:android="http://schemas.android.com/apk/res/android"
    android:orientation="vertical"
    android:layout_height="match_parent"
    android:paddingLeft="10dp"
    android:paddingRight="10dp"
    android:background="#fff"
    android:layout_width="300dp"
    android:paddingTop="10dp">
    <EditText
        android:layout_height="wrap_content"
        android:id="@+id/txtUsername"
        android:layout_width="match_parent">
        <requestFocus />
    </EditText>
    <EditText
        android:layout_height="wrap_content"
        android:inputType="textPassword"
        android:id="@+id/txtPassword"
        android:layout_width="match_parent" />
    <LinearLayout
        android:layout_width="match_parent"
        android:layout_height="wrap_content"
        android:id="@+id/linearLayout1">
        <Button
            android:layout_width="wrap_content"
            android:layout_height="wrap_content"
            android:layout_weight="0.5"
            android:id="@+id/btnLogin"
            android:text="Login" />
        <Button
            android:layout_width="wrap_content"
            android:layout_height="wrap_content"
            android:layout_weight="0.5"
            android:id="@+id/btnCancel"
            android:text="Cancel" />
    </LinearLayout>
</LinearLayout>

XAML code for Main .axml file 

Design Look -


<?xml version="1.0" encoding="utf-8"?>
<LinearLayout xmlns:android="http://schemas.android.com/apk/res/android"
    android:orientation="vertical"
    android:layout_height="match_parent"
    android:paddingLeft="10dp"
    android:paddingRight="10dp"
    android:background="#fff"
    android:layout_width="300dp"
    android:paddingTop="10dp">
 
        <Button
            android:layout_width="wrap_content"
            android:layout_height="wrap_content"
            android:layout_weight="0.5"
            android:id="@+id/hello"
            android:text="Hello world!" />
 
</LinearLayout>


C# Code for Main.cs file 


 protected override void OnCreate(Bundle bundle)
{
 base.OnCreate(bundle);
 SetContentView(Resource.Layout.Main);
 TextView hellobtn = FindViewById<TextView>(Resource.Id.hello);
 hellobtn.Click += btnclick;
}

void btnclick(object sender, EventArgs e)
        {

            Dialog login = new Dialog(this);
            login.SetContentView(Resource.Layout.login);
            login.Show();
}

Explanation of Code 

PART I

protected override void OnCreate(Bundle bundle)
{
 base.OnCreate(bundle);
 SetContentView(Resource.Layout.Main);
 TextView hellobtn = FindViewById<TextView>(Resource.Id.hello);
 hellobtn.Click += loginclick;
}

In above code First i have used OnCreate Method that is startup method when an android application starts it first load up everything in OnCreate Method and Create their space in memory

SetContentView(Resource.Layout.Main);

Then at this line i have set what layout will this code is meant for I have choosen Main layout in Resource folder whose design preview is shown in images above

 Button loginbtn = FindViewById<Button>(Resource.Id.btnLogin);

Then at this line i have made instance of button and set that textview to the hello world button that i have placed on Main form I have used FindviewById method to find the button and then assign that button to hellobtn

Then at this line i have assigned click event to button by using following line of code

 hellobtn.Click += btnclick;

Then i have given definition to btnclick funtion in code below

PART I

void btnclick(object sender, EventArgs e)
        {

            Dialog login = new Dialog(this);
            login.SetContentView(Resource.Layout.login);
            login.Show();
}

In this code i have made Instance of Dialog class for showing dialog box on screen i have created new class instance then i have set what view will be shown on dialog that is going to appear i have set the view contentview to login.axml content view that i have designed earlier in this article then i have used show( ) function to show login dialog box


Friday 24 October 2014

Star Pattern Programs Cplusplus

Program To Print Following Star Pattern in Cpluplus


Star Pattern in Cpluplus


#include<iostream.h>
void main()
{
   int i,j,k,n;
   cout<<"\Enter the number of lines to be printed: ";
    cin>>n;
   for(i=0;i<n;i++)
   {
      for(j=0;j<(n-i-1);j++)
 cout<<" ";
      for(k=0;k<(2*i+1);k++)
 cout<<"*";
      cout<<endl;
   }
      for(i=0;i<n-1;i++)
   {
      for(j=0;j<=i;j++)
cout<<" ";
      for(k=(2*n-2*i-3);k>0;k--)
   cout<<"*";
      cout<<endl;
   }
}


Program To Print Following Star Pattern in Cpluplus

Star Pattern in Cpluplus

Star Pattern in Cpluplus


#include<iostream.h>
void main()
{
 int i,j,k,n;
 cout<<"\Enter the number of lines to be printed: ";
 cin>>n;
 for(i=0;i<n;i++)
 {
       for(j=n-i-1;j>0;j--)
     cout<<" ";
       cout<<"*";
       for(k=2*i-1;k>0;k--)
     cout<<" ";             //code for upper triangle
       if(i!=0)
     cout<<"*";
       cout<<endl;
  }
  for(i=n-1;i>0;i--)
  {
       for(j=0;j<n-i;j++)
     cout<<" ";
       cout<<"*";                  //code for lower triangle
for(k=2*i-3;k>0;k--)
    cout<<" ";
       if(i!=1)
     cout<<"*";
       cout<<"\n";
    }
}


Program To Create Circular Loading Bar using Graphics.h


#include<graphics.h>

#include<dos.h>

void main()
{
int gd=DETECT,gm; 
              // variable to detect graphics driver and graphic mode

 int counter;   

//Below is code to initialize the graphics with parameters for graphics initgraph(&gd,&gm,"c:\\turboc3\\bgi");

//Loop to show the loading circle for(counter=0;counter<=360;++counter)
{
circle(300,200,80);
pieslice(300,200,0,counter,80);
outtextxy(200,320,"Loading....Please Wait!");
delay(20);
}
closegraph();
}

OUTPUT :
Program To Create Circular Loading Bar graphics.h cplusplus


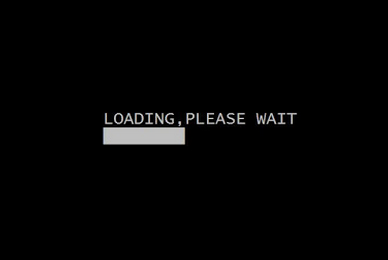
Program To Create Loading Bar using Graphics.h


#include<iostream.h>
#include<conio.h>
#include<graphics.h>
#include<dos.h>

void main()
{
 int x=170,i,gdriver=DETECT,gmode;
  // variable to detect graphics driver and graphic mode

//Below is code to initialize the graphics with parameters for graphics
 initgraph(&gdriver,&gmode,"c:\\tc\\bgi");

 settextstyle(DEFAULT_FONT,HORIZ_DIR,2);

//Outtextxy is used to print the given text at specified x and y pixel position 
//It will print given text at pixel position 170,180
 outtextxy(170,180,"LOADING,PLEASE WAIT");

  for(i=0;i<300;++i)
 {
  delay(30);
  line(x,200,x,220);
  x++;
 }
 getch();

//close the graph that was initialized
 closegraph();  

}

OUTPUT :
Program To Create Loading Bar using Graphics.h Cplusplus


Program To Print Star Triangle Pattern in Cplusplus


#include<iostream.h>
#include<conio.h>

void main()
{
clrscr(); //to clear the screen
int i,j,k,num;

cout<<"Tell How many lines you want";
cin>>num;

num*=2;
for(i=0;i<num;i+=2)
{
cout<<"\n";

for ( j = num; j > i; j -= 2 )
cout<<" ";

for( k=0; k<=i; ++k )
cout<<"*";
}
getch(); //to stop the screen
}
OUTPUT


Program To Print Star Triangle Pattern Cplusplus

Program To Print Alphabets in Cplusplus ( I have printed A to H ) 


#include<iostream>

using namespace std;

int main()
{
int i,j,k=1;
char ch;
cout<<"Input an Alphabet in capital letters that you want to print:";
cin>>ch;
cout<<"\n\n\n\n";
switch(ch)
{
case 'A':
cout<<"\t\t\t    ";
for(i=1;i<=40;++i)
{
for(j=0;j<=22;++j)
{
if(i==1||i==2||i==21||i==20)
cout<<"*";
else
{
if(j==0||j==20)
cout<<"**";
else
cout<<" ";
}
}
cout<<"\n\t\t\t    ";

}
break;


case 'B':
cout<<"\t\t\t\t";

while(k<=2)
{
for(i=1;i<=9;++i)
{
for(j=0;j<=i;++j)
{
if(j==0||j==i)
cout<<"**";
else
cout<<" ";
}

cout<<"\n\t\t\t\t";

}
for(i=1;i<=10;++i)
{
if(i==1||i==10)
cout<<"**";
else
cout<<" ";
}
cout<<"\n\t\t\t\t";

for(i=1;i<=10;++i)
{
if(i==1||i==10)
cout<<"**";
else
cout<<" ";
}
cout<<"\n\t\t\t\t";

for(i=9;i>=1;--i)
{
for(j=0;j<=i;++j)
{
if(j==0||j==i)
cout<<"**";
else
cout<<" ";
}
cout<<"\n\t\t\t\t";
}
++k;
}
 break;

 case'C':
cout<<"\t\t\t    ";

for(i=1;i<=40;++i)
{
for(j=0;j<=22;++j)
{
if(i==1||i==2||i==39||i==40)
cout<<"*";
else
{
if(j==0)
cout<<"**";
else
cout<<" ";
}
}
cout<<"\n\t\t\t    ";

}
break;

 case'D':
 cout<<"\t\t\t\t";
 for(i=1;i<=18;++i)
 {
for(j=0;j<=i;++j)
{
if(j==0||j==i)
cout<<"**";
else
cout<<" ";
}
cout<<"\n\t\t\t\t";
 }
 while(k<=4)
 {
for(i=1;i<=19;++i)
{
if(i==1||i==19)
cout<<"**";
else
cout<<" ";
}
cout<<"\n\t\t\t\t";
 ++k;
 }
 for(i=18;i>=1;--i)
 {
for(j=0;j<=i;++j)
{
if(j==0||j==i)
cout<<"**";
else
cout<<" ";
}
 cout<<"\n\t\t\t\t";
 }
 break;

 case'E':

 cout<<"\t\t\t\t";
 for(i=1;i<=39;++i)
 {
for(j=1;j<=20;++j)
{
if(i==1||i==2||i==20||i==21||i==38||i==39)
cout<<"*";
else
{
if(j==1)
cout<<"**";
else
cout<<" ";
}
}
 cout<<"\n\t\t\t\t";
 }
 break;

 case'F':

 cout<<"\t\t\t\t";

for(i=1;i<=40;++i)
{
for(j=1;j<=20;++j)
{
if(i==1||i==2||i==18||i==19)
cout<<"*";
else
{
if(j==1)
cout<<"**";
else
cout<<" ";
}
}
cout<<"\n\t\t\t\t";
}
break;

 case'G':

cout<<"\t\t\t";
for(i=1;i<=25;++i)
{
for(j=1;j<=20;++j)
{
if(i==1||i==2)
cout<<"*";
else
{
if(j==1)
cout<<"**";
else
cout<<" ";
}
}
cout<<"\n\t\t\t";
}
for(i=1;i<=10;++i)
{
for(j=1;j<=20;++j)
{
if(i==1||i==2)
{ if(j==1||j==14||j==15||j==16)
cout<<"**";
  else
  cout<<" ";
}
else
{
if(i==9||i==10)
cout<<"*";
else
{  if(j==1||j==18)
  cout<<"**";
  else
  cout<<" ";
}
}
}
cout<<"\n\t\t\t";
}
break;


 case'H':

cout<<"\t\t\t";
for(i=1;i<=40;++i)
{
for(j=1;j<=21;++j)
{
if(i==20||i==21)
cout<<"*";
else
{
if(j==1||j==19)
cout<<"**";
else
cout<<" ";
}
}
cout<<"\n\t\t\t";
}
break;

return 0;
}

OUTPUT :


Tuesday 14 October 2014

How To Create Printable Bootstrap Page


Every Day Is a New Learning Day . Today, I learnt a new thing with bootstrap When We use the page becomes responsive it will adapt its width and height and change it accordingly to the screen on which we are viewing that webpage that's the magic of Bootstrap .

 BUT there is one thing need to be noticed that is When we print that page . Like i needed to give one functionality in my web application to the client . Client wants a button when client click on that button a print preview of current page is given to client and page will be downloaded as .PDF file 
But Now you may face some problem as below :-

Bootstrap - Print layout and breaks after each grid column

Grid stacks when printing Bootstrap page

you may search How to Create Printable bootstrap page So solution is below


when you see in your print preview or .PDF file you can see bootstrap  layout will be not there . This is because bootstrap make the columns and rows by using some inbuilt classes these classes are by default included in bootstrap.min.css file but you have to set them to be allowed in all media As bydefault it is set to screen only


When you try code below in your html page you can see it is not printing your page with bootstrap enabled 

<!DOCTYPE html>
<html lang="en">
  <head>
    <meta charset="utf-8">
    <meta http-equiv="X-UA-Compatible" content="IE=edge">
    <meta name="viewport" content="width=device-width, initial-scale=1">
    <title>Bootstrap 101 Template</title>

    <!-- Bootstrap -->
    <link href="css/bootstrap.min.css" rel="stylesheet">

    <!-- HTML5 Shim and Respond.js IE8 support of HTML5 elements and media queries -->
    <!-- WARNING: Respond.js doesn't work if you view the page via file:// -->
    <!--[if lt IE 9]>
      <script src="https://oss.maxcdn.com/html5shiv/3.7.2/html5shiv.min.js"></script>
      <script src="https://oss.maxcdn.com/respond/1.4.2/respond.min.js"></script>
    <![endif]-->
  </head>
  <body>
   <div class="container">
  <div class="row">
  <div class="col-md-6">Column1</div>
    <div class="col-md-6">Column2</div>
  </div>
</div>

    <!-- jQuery (necessary for Bootstrap's JavaScript plugins) -->
    <script src="https://ajax.googleapis.com/ajax/libs/jquery/1.11.1/jquery.min.js"></script>
    <!-- Include all compiled plugins (below), or include individual files as needed -->
    <script src="js/bootstrap.min.js"></script>
  </body>
</html>

Steps To Create your Bootstrap Webpage Printable


1. Replace every col-md- with col-xs-
 e.g. :- replace every col-md-6 to col-xs-6 This is the thing that worked for me to get me rid of this problem you can see what you have to replace

Replace following code

   <div class="container">
  <div class="row">
    <div class="col-md-6">Column1</div>
    <div class="col-md-6">Column2</div>
  </div>
</div>

With this code in our given example

<div class="container"> <div class="row"> <div class="col-xs-6">Column1</div> <div class="col-xs-6">Column2</div> </div> </div>