Tuesday 18 March 2014

Implementing Search Functionality in ASP.NET MVC 4

What we are Going To cover


* In this Tutrial we are going to cover how to implement search functionality in Asp.Net MVC 4 . In our web applications in MVC we often need to add the functionality to search the database objects for specific data based on some creteria like to find employees with name starting with 'N' or to find data of employees that have Gender Male

Download Demo App With Database Link Below

Creating Database For This Application

1. First create Database

* Open Microsoft Sql server . Click on New Query . Now execute the query below to create database

Create Database searchingInmvc

Implementing Search Functionality in ASP.NET MVC 4
Create Database Searching in Asp.net MVC 4

2. Then Press F5 . This will create Database successfully

Create Table And Inserting Demo Data


create table tblEmployee         //creating table
(
ID int identity primary key,
Name nvarchar(50),
Gender nvarchar(50),
Email nvarchar(50)
)
Implementing Search Functionality in ASP.NET MVC 4
Creating Table In database 

//Inserting Demo Data

Here , we are inserting 4  Rows in Database table

insert into tblEmployee values('John','Female','john@geeksprogrammings.blogspot.in')
insert into tblEmployee values('funky','Male','funky@geeksprogrammings.blogspot.in')
insert into tblEmployee values('wiley','Male','wiley@geeksprogrammings.blogspot.in')
insert into tblEmployee values('ceren','Female','ceren@geeksprogrammings.blogspot.in')

Implementing Search Functionality in ASP.NET MVC 4
Inserting Data in Table 

Showing All Inserted Data

Download Database script file

In link below you can download the script file and then double click on file it will open in sql server . It will create the database automatically for you when you execute it

Create New MVC 4 Application in Visual Studio

1. Start Visual Studio with language selected as C#
2.Click on File --> Then click on New Project
3. Scroll down and select ASP.NET MVC 4 Web Application

Implementing Search Functionality in ASP.NET MVC 4
Implementing Search Functionality in Asp.Net MVC 4


4. Give appropriate Name,Path and solution Name and Hit Enter
5. choose Empty Template
6. Choose Razor View Engine and Hit Enter
7. Now New MVC 4 web application is started

Adding Models to MVC 4 Application

1. In solution Explorer -- > Right click on Models --> Then click on New item

Implementing Search Functionality in ASP.NET MVC 4

2. Then select ADO.NET Entity Data Model --.> Give it a valid name like 'sampledatamodel'
3. Click Add

Implementing Search Functionality in ASP.NET MVC 4
Implementing Search Functionality in Asp.Net MVC 4

4. Now A dialog box appears choose database connection to sql server and give your connection string a name that will be give to connection string in web.config file

Implementing Search Functionality in ASP.NET MVC 4
Implementing Search Functionality in Asp.Net MVC 4

5. click next
6. Now in next dialog box you will be presented with tables available in database table select you table

Implementing Search Functionality in ASP.NET MVC 4
Implementing Search Functionality in Asp.Net MVC 4

7. Now click Finish
8. Now Entity model of table is generated you can rename your database here to 'Employee'

Implementing Search Functionality in ASP.NET MVC 4
Implementing Search Functionality in Asp.Net MVC 4

9. Now Model is successfully Added

Adding Controller and Views To MVC 4 Application

To add controller to database --

1. Right click on Controllers folder in solution folder
2. click on Add --> Then click on Controller

Implementing Search Functionality in ASP.NET MVC 4
Implementing Search Functionality in Asp.Net MVC 4

3. Now Add controller Dialog Box appears
4. Give your controller a name like 'HomeController'
5. In template choose  'MVC controller with read/write and views using Entity  Framework'
6. The Reason behind choosing this is it will automatically generate some pages to insert,delete , update data of model to which we are associating this controller
7. Now give the Model name that we have added in previous step 'Employee'
8. Now Choose dbcontext class from dropdown menu and finally  click ADD
9. This autimatically add Views for insert , update, delete and index view in views folder under controller named folder

Implementing Search Functionality in ASP.NET MVC 4
Implementing Search Functionality in Asp.Net MVC 4

 10. Now Run your application . This will give output below:-

Implementing Search Functionality in ASP.NET MVC 4
Implementing Search Functionality in Asp.Net MVC 4

Adding Style And Look To Application

So we are going to search the database and retrieve data from database and then show the retrieved result to user. For this we have to get some controls and code . The GUI design that are going to give to this application is as below :-

1. In solution Explorer under Index view Double click on Index.cshtml
2. Now just before the line '<h2>Index</h2>' add a line 

<div style='font-family:Arial'>
and close this div right below the code after table tag 

Other UpdationAre in Demo Project Downlao And Use it

3. Update your Index.cshtml file under view folder in solution Explorer with the code below

@model IEnumerable<SearchInMVC.Models.Employee>
@{
    ViewBag.Title = "Index";
}
<div style="font-family:Arial ">
<h2>Index</h2>

<p>
    @Html.ActionLink("Create New", "Create")
</p>
<p>
@using (Html.BeginForm ("Index","Home",FormMethod.Get ))
{
<b>Search by:</b>@Html.RadioButton("searchBy","Name")<text> Name</text>
@Html.RadioButton("searchBy","Gender")<text>Gender</text><br />
@Html.TextBox("Search");<input type="submit" value="Search" />
    }
</p>
<table border="1">
    <tr>
        <th>
            @Html.DisplayNameFor(model => model.Name)
        </th>
        <th>
            @Html.DisplayNameFor(model => model.Gender)
        </th>
        <th>
            @Html.DisplayNameFor(model => model.Email)
        </th>
        <th>Action</th>
    </tr>
    @if (Model.Count() == 0)
    {
        <tr>
        <td colspan ="4">No Rows Match Search Criteria</td>
        
        </tr>
    }
    else
    {
foreach (var item in Model)
{
    <tr>
        <td>
            @Html.DisplayFor(modelItem => item.Name)
        </td>
        <td>
            @Html.DisplayFor(modelItem => item.Gender)
        </td>
        <td>
            @Html.DisplayFor(modelItem => item.Email)
        </td>
        <td>
            @Html.ActionLink("Edit", "Edit", new { id = item.ID }) |
            @Html.ActionLink("Details", "Details", new { id = item.ID }) |
            @Html.ActionLink("Delete", "Delete", new { id = item.ID })
        </td>
    </tr>
}
    }
</table>
</div>


Now Run your Application and you can see the change with output below :-

Implementing Search Functionality in ASP.NET MVC 4
Implementing Search Functionality in Asp.Net MVC 4

Code Description

In code above we have used Razor code and instead of using <form> tag that we usually use in html we have used Html Helper below


@using (Html.BeginForm ("Index","Home",FormMethod.Get ))
{
<b>Search by:</b>@Html.RadioButton("searchBy","Name")<text> Name</text>
@Html.RadioButton("searchBy","Gender")<text>Gender</text><br />
@Html.TextBox("Search");<input type="submit" value="Search" />
    }


In Html.BeginForm ("Index","Home",FormMethod.Get )

Here, Html.BeginForm  is used in place of using form tag . Html.BeginForm  Received 3 arguments .
Here, "Index" is Name of action that will be executed on posting form  to server
Here, "Home" is name of controller to which this link will be redirected when clicked
Here, " FormMethod.Get" type of encoding method that applied on data we are posting 

Now Open Controller And Add code below to Index Action of home controller

 if (searchby == "Gender")
            {
                return View(db.Employees.Where(x => x.Gender == search || search ==null).ToList());
            }
            else
            {
                return View(db.Employees.Where(x => x.Name.StartsWith(search)).ToList());
}


Monday 3 March 2014

Working with Master Pages Asp.net


Why Do We Need Master Pages ?


Most Web sites today have common elements used throughout the entire application or on a majority of the pages within the application. If you look at main page of Reuters News website  ( www.reuters.com ) , you can see common elements that are used throughout the entire web site. Here is screenshot of website given below :-


In this screenshot , notice header section , the navigation section, and footer section on the page. In fact, nearly every page within the entire applicaiton uses these same elements. Even before master pages, you had ways to put these elements into every page through a variety of means; but in most cases, doing so posed difficulties.

Some developers simply copy and paste the code for these common sections to each and every page that requires them. This works , but it's rather labor intensive. However, if you use the copy-paste method, whenever a change is required to one of these common sections of the application, you have to go into each and every page and duplicate the change.


How To Use Master Page In Asp.net

DEMO APP DOWNLOAD LINK IS AVAILABLE  BELOW

1. In Visual Studio click on file then New Project then Choose your preferred
language like i have used c# then choose Web  and Then click on Asp.NET Empty Web Application and click ok

2. Now empty web site solution is created for you

3. Now in solution explorer in right side panel Right click on you solution name

4. In popup menu click on Add then click on New Item

5. Now choose Master Page give it a name like 'master1.Master' and click ok

Each Master Page consist of ContentPlaceHolder  control that control provides the space to other webform that is inheriting this Masterpage to place its own content on that webform along with Content on Master Page The Master Page contents are availaible in Child Webform but we cannot edit these content in child webform But in Content placeholder we can add the content according to our requirements

Content Placeholder are used like below:- 


These lines of code are automatically added to your Master Page .

 <asp:ContentPlaceHolder ID="ContentPlaceHolder1" runat="server">

<%-- This Place is available to Child web-form to put its content along wit master page --%>

</asp:ContentPlaceHolder>

To place default content within one of the content areas of master page, you simply put it in the contentPlaceholder server control on the master page itself or it is automatically added. Any content page that inherits this master page also inherits the default content

Calling Master Page Content Placeholder in other WebForm

Add  ' MasterPageFile ="~/master1.Master" '   to Page Tag at Top of your Webform


This tells that webform to inherit contents from its master Page and webform can also put its own content within content placeholder avaliable by Master Page

Demo App 

App To use Master Pages in Asp.net

Master Page Code


<%@ Master Language="C#" AutoEventWireup="true" CodeBehind="master1.Master.cs" Inherits="WebApplication5.Site1" %>

<!DOCTYPE html PUBLIC "-//W3C//DTD XHTML 1.0 Transitional//EN" "http://www.w3.org/TR/xhtml1/DTD/xhtml1-transitional.dtd">

<html xmlns="http://www.w3.org/1999/xhtml">
<head runat="server">
    <title></title>
    <asp:ContentPlaceHolder ID="head" runat="server">
    </asp:ContentPlaceHolder>
</head>
<body>
    <form id="form1" runat="server">
    <div>
    This is Master Page
        <asp:ContentPlaceHolder ID="ContentPlaceHolder1" runat="server">
      
       
        </asp:ContentPlaceHolder>
    </div>
    </form>
</body>
</html>


Webform Page code


<%@ Page Language="C#" AutoEventWireup="true" MasterPageFile ="~/master1.Master" CodeBehind="WebForm1.aspx.cs" Inherits="WebApplication5.WebForm1" %>
<asp:Content runat ="server" ContentPlaceHolderID ="ContentPlaceHolder1"><p>
    <br />

    This is Child Page Inheriting Master Page</p>
</asp:Content>


Description of code :- In @ Page directive we have included the MasterPageFile that implements the Master Pages concept in your web application or website This highly reduces code in websites and webapplications and it reduces redundancy of code

In this code we have called or used the contentPlaceHolder that we have initialized in Master Page we can add contents to this Content Place Holder that is only specific to this page only.


Nesting Master Pages

I hope you see the power that master pages provide to help you create templated web applications . so far you have been creating single master page that the content page can sue. Most companies and organisations, however are not just two layers. Many divisions and groups exist within the organization that might want to use variations of the master by, in effect , having a master page within a master page. With ASP>NET , this is quite possible.

How To USE DEMO APP

In this Demo App i have connected contains :-

( i )  master1.master
( ii ) master2.master  // inherit from master1
( iii) Default.aspx  // has master page - master 2

So we have 2 Master Pages and 1 Webform . These two master pages contain all Designing part of webpage and it remains same for full website so it kept in master . Master1 contains Header and Navigation part and Master 2 conatains other Remaining body part of webpage 

Code For Master Page 1


<%@ Master Language="C#" AutoEventWireup="true" CodeBehind="master1.master.cs" Inherits="Masterpages.master1" %>

<!DOCTYPE html PUBLIC "-//W3C//DTD XHTML 1.0 Transitional//EN" "http://www.w3.org/TR/xhtml1/DTD/xhtml1-transitional.dtd">

<html xmlns="http://www.w3.org/1999/xhtml">

<%--oswd.org--%>


<head runat="server">
    <link href="Styles/style1.css" rel="stylesheet" type="text/css" />
    <title></title>
    f
</head>
<body>
    <form id="form1" runat="server">

    <table width="100%" border="0" cellspacing="0" cellpadding="0">
  <tr>


   <%--fgfg--%>

    <td class="shadow_left">&nbsp;</td>
    <td class="header_column">
<table width="100%" border="0" cellspacing="10" cellpadding="0">
      <tr>
        <td class="logo_area">Logo Here </td>
        <td width="300">
          <form id="form2" name="form1" method="post" action="">
  Search the website <br />
            <input name="search_text" type="text" id="search_text" />
            <input type="submit" name="Submit" value="Search" />
          </form>
          </td>
      </tr>
    </table></td>
    <td class="shadow_right">&nbsp;</td>
  </tr>
  <tr>
    <td class="horizontal_column">&nbsp;</td>
    <td class="horizontal_center"><table width="100%" border="0" cellpadding="0" cellspacing="0" class="linkcontainer">
      <tr>
        <td><div class="navigation"><a href="#" class="main_link">Home</a></div></td>
        <td><div class="navigation"><a href="#" class="main_link">Gallery</a></div></td>
        <td><div class="navigation"><a href="#" class="main_link">About</a></div></td>
        <td><div class="navigation"><a href="#" class="main_link">Help</a></div></td>
        <td><div class="navigation"><a href="#" class="main_link">Partner</a></div></td>
      </tr>
    </table></td>
    <td class="horizontal_column">&nbsp;</td>
  </tr>
  <tr>
    <td class="shadow_left">&nbsp;</td>
    <td class="below_header">Lorem ipsum dolor sit amet, consectetur adipisicing elit, sed do  eiusmod tempor incididunt ut labore et dolore magna aliqua. Ut enim ad  minim veniam, quis nostrud exercitation ullamco laboris nisi ut aliquip  ex ea commodo consequat. Duis aute irure dolor in reprehenderit in  voluptate velit esse cillum dolore eu fugiat nulla pariatur. Excepteur  sint occaecat cupidatat non proident, sunt in culpa qui officia  deserunt mollit anim id est laborum</td>
    <td class="shadow_right">&nbsp;</td>
  </tr>
  </table>
    </form>
     <asp:ContentPlaceHolder ID="contentholder" runat="server">

    </asp:ContentPlaceHolder>
    <tr>
    <td class="shadow_left">&nbsp;</td>
    <td class="bottom_link_container"><p><a href="#" class="bottom_link">Link</a> | <a href="#" class="bottom_link">Link</a> | <a href="#" class="bottom_link">Link</a> | <a href="#" class="bottom_link">Link</a> | <a href="#" class="bottom_link">Link</a> </p>
    <p>All Right Reserved &copy; 2006 by bprizze<br />
      http://heartlessg.4uhost.info Web Master
    </p></td>
    <td class="shadow_right">&nbsp;</td>
  </tr>
</body>
</html>


Code for Master Page 2 ( master2.master )


<%@ Master Language="C#" MasterPageFile="~/master1.Master" AutoEventWireup="true" CodeBehind="master2.master.cs" Inherits="Masterpages.master2" %>

<asp:Content ID="content" ContentPlaceHolderID="contentholder" runat="server">
    <tr>
    <td class="shadow_left">&nbsp;</td>
    <td class="main_content_box"><table width="100%" border="0" cellspacing="0" cellpadding="0">
      <tr>
        <td class="left_content">
            <p>link</p>
            <p>Link</p>
            <p>link</p>
            <p>link</p>
             <p>link</p>
            <p>Link</p>
            <p>link</p>
            <p>link</p>
            <p>Link</p>
            
        </td>

        <td class="body_content" valign="top">
        <asp:ContentPlaceHolder ID="Main" runat="server">
        
        </asp:ContentPlaceHolder>
        &nbsp;</td>
      </tr>
    </table></td>
    <td class="shadow_right">&nbsp;</td>
  </tr>
  <tr>
    <td class="shadow_left">&nbsp;</td>
    <td class="middle_spacer"><div class="bottom_content">Lorem ipsum dolor sit amet, consectetur adipisicing elit, sed do  eiusmod tempor incididunt ut labore et dolore magna aliqua. Ut enim ad  minim veniam, quis nostrud exercitation ullamco laboris nisi ut aliquip  ex ea commodo consequat. Duis aute irure dolor in reprehenderit in  voluptate velit esse cillum dolore eu fugiat nulla pariatur. Excepteur  sint occaecat cupidatat non proident, sunt in culpa qui officia  deserunt mollit anim id est laborum</div></td>
    <td class="shadow_right">&nbsp;</td>
  </tr>

</asp:Content>


Code For Default.Aspx


<%@ Page Language="C#" AutoEventWireup="true" MasterPageFile="~/master2.Master" CodeBehind="default.aspx.cs" Inherits="Masterpages._default" %>
<asp:Content ID="content" ContentPlaceHolderID="Main" runat="server">
    <h1>Main page</h1>
</asp:Content>

Sunday 2 March 2014

HTML / aspx web Page TO PDF using iTestsharp C#


HTML web Page TO PDF Conversion


A number of times while searching on internet for relevant information we like content of more than one website so we often want to save that content we mostly do the old technique like saving the webpage using Ctrl + s or copy its content and save it in some other Notepad file or Microsoft Word etc. This technique consumes  our a lot of time .

So As web Developers we must give easy content saving way to user. For including the Feature of converting a web Page into PDF you can search for number of libraries available on internet . I have used iTextsharp and it works fine for me without any more complications . It takes very less time to implement as compared to other libraries and implements easily

Introduction to iTextSharp


iTextSharp is a free library that is available to create PDF documents with Microsoft  Visual studio using C# or Vb# Language. It is very easy to use and give more flexibility as compared to all other libraries available to  generate PDF. I have used a lot of libraries almost 4-5 but i feel very
comfortable using iTextsharp library that more full customization features for PDF Documents. It consist of number of objects for creating Tables or paragraphs that make easy to customize the view of your data on PDF Documents

Download iTextSharp


For using iTestSharp library in your project for converting your HTML or aspx Web Page into PDF you have to download iTextSharp.dll file from Link Below :


Download C# Application To Convert Html/aspx To PDF

How To Use This Application Code


1. First Download iTextSharp.dll file By clicking on link above

2. Now Download C# Application To Convert Html/aspx To PDF

3. Extract the winrar file on your computer . Then open web2pdf solution file . 

4. Now first, add the reference to download iTextSharp.dll file by following steps :-

( i )   click on Solution Explorer in Right sidebar
( ii )  Now Right click on Reference Folder --> Then click on Add Reference
( iii ) Now in Add Reference Dialog Box click on Browse Tab


upload itextsharp.dll


( iv )  Now select the iTextSharp.dll file from location where you download it ( make sure you   have extracted the iTextSharp file )
( v )   Now click ok
( vi )  Now you can see in Reference folder your iTextSharp file Reference will be added

5. Now Add Reference to following Namespaces in your webform


using iTextSharp.text;


using iTextSharp.text.pdf;
using iTextSharp.text.html;
using iTextSharp.text.xml;
using iTextSharp.text.html.simpleparser;


Application Demo WebPage Code :


<%@ Page Language="C#" AutoEventWireup="true" CodeBehind="WebForm1.aspx.cs" Inherits="web2pdf.WebForm1" %>


<!DOCTYPE html PUBLIC "-//W3C//DTD XHTML 1.0 Transitional//EN" "http://www.w3.org/TR/xhtml1/DTD/xhtml1-transitional.dtd">

<html xmlns="http://www.w3.org/1999/xhtml" > 
<head id="Head1" runat="server"> 
<title>Untitled Page</title> 
    <style type="text/css">
        .style5
        {
            width: 24px;
            height: 342px;
        }
        .style6
        {
            height: 89px;
        }
        .style7
        {
            height: 342px;
        }
        </style>
</head> 
<body> 

<form id="form1" runat="server" > 
<div style="width:100%;height:375px;"> 
<table border="1" style="height: 484px; width: 567px" > 
<tr> 
<td colspan="2" style="background-color:#FFA500;" class="style6"> 
    <h1>Web Page To PDF Conversion Using iTextSharp</h1></td> 
</tr> 
<tr> 
<td style="background-color:#FFD700;" class="style5"> 
</td> 
<td style="background-color:#eeeeee;" class="style7"> 
    Don&#39;t Forget To Subscribe us</td> 
</tr> 
<tr> 
<td colspan="2" style="background-color:#FFA500;"> 
    Powered By geeksprogrammings.blogspot.in</td> 
</tr> 
</table> 
</div> 
</form> 

</body> 

</html> 

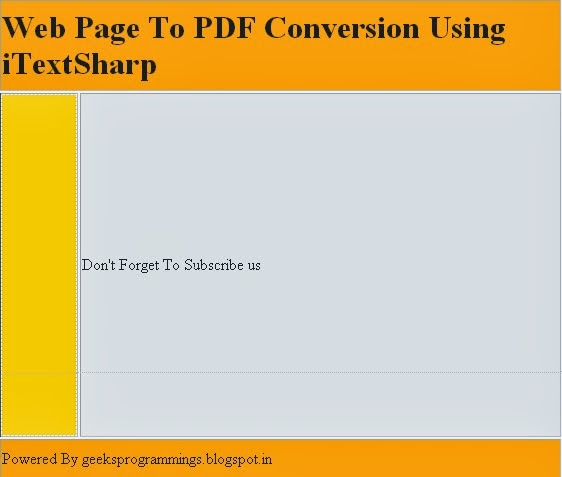
Design of Demo Webform


HTML Web Page To PDF Using iTextSharp C#


Application C# Code 

( Don't Forget to change
 project, namespaces names or class names according to your App)


using System;
using System.Collections.Generic;

using System.Linq;

using System.Web;

using System.Web.UI;

using System.Web.UI.WebControls;

using System.IO;
using System.Text.RegularExpressions;
using iTextSharp.text;
using iTextSharp.text.pdf;
using iTextSharp.text.html;
using iTextSharp.text.xml;
//using System.Xml;
using iTextSharp.text.html.simpleparser; 


namespace web2pdf
{
    public partial class WebForm1 : System.Web.UI.Page
    {
        protected void Page_Load(object sender, EventArgs e)
        {

        }
        protected override void Render(HtmlTextWriter writer) 
MemoryStream mem = new MemoryStream(); 
StreamWriter twr = new StreamWriter(mem); 
HtmlTextWriter myWriter = new HtmlTextWriter(twr); 
base.Render(myWriter); 
myWriter.Flush(); 
myWriter.Dispose(); 
StreamReader strmRdr = new StreamReader(mem); 
strmRdr.BaseStream.Position = 0; 
string pageContent = strmRdr.ReadToEnd(); 
strmRdr.Dispose(); 
mem.Dispose(); 
writer.Write(pageContent); 
CreatePDFDocument(pageContent); 


public void CreatePDFDocument(string strHtml) 

string strFileName = HttpContext.Current.Server.MapPath("test.pdf"); 
// step 1: creation of a document-object 
Document document = new Document(); 
// step 2: 
// we create a writer that listens to the document 
PdfWriter.GetInstance(document, new FileStream(strFileName, FileMode.Create)); 
StringReader se = new StringReader(strHtml); 
HTMLWorker obj = new HTMLWorker(document); 
document.Open(); 
obj.Parse(se); 
document.Close(); 
ShowPdf(strFileName); 


public void ShowPdf(string strFileName) 
Response.ClearContent(); 
Response.ClearHeaders(); 
Response.AddHeader("Content-Disposition", "inline;filename=" + strFileName); 
Response.ContentType = "application/pdf"; 
Response.WriteFile(strFileName); 
Response.Flush(); 
Response.Clear(); 


If, you have any problem with code working or any other issue with converting HTML / aspx to pdf you can share in comments